

Welcome back to another craftalong tuesday. Hope everyone is keeping well and having lots of fun fitting in a bit of crafting. As promised I have another card for you that I've made using the beautiful Dahlia Days bundle. I love the large detailed flower die within this set it just sets the card off that you make, and it's really fun to create with too! So let's get on with this weeks make...............
1. Cut a piece of fresh freesia cardstock - 14.8cm x 21cm and score at 10.5cm fold and burnish, this is the card base.
2. Cut another piece of the fresh freesia cardstock - 10.2cm x 14.5cm and emboss using the Macrame 3D embossing folder. Attach to the front of the card using glue. Cut a piece of basic white cardstock the same size as the front piece and attach this to the inside of the card flat using glue.
3. Cut a piece of the flowering fields paper - 10cm x 14.3cm and attach at an angle, flat to the front of the card using glue.
4. Die cut the largest Stitched so sweetly rectangle out of basic white cardstock and attach to the card front using dimensionals.
5. Die cut 2 detailed flowers out of highland heather and basic white cardstock and cut up as shown in the diagrams below.

before cutting up

bottom section used for the card front
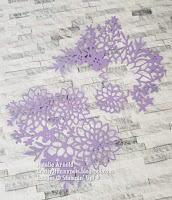
top section smaller flower cut from the centre to use

two smaller flowers cut out of the centres to use
6. Attach the detailed flower section to the card front using cut up dimensionals behind sections that you can't see them through at the front.
7. Stamp the sentiment using evening evergreen ink and die cut out as show below.

this has a matching stamp to go with it but we're not using this today

turn the die around and then cut it again this will give you a perfect shape without the flower section on the end

8. Attach the silver trim to the back of the sentiment using glue dots/ tear 'n tape and then attach the whole thing to the card using dimensionals.
9. Stamp the ferns out and either die cut them or fussy cut them out, which is what I chose to do, and then attach them to the card using glue. tucking them under the sentiment and the flower.
10. Attach the other flowers that were cut out from the whole detailed flower pieces, using cut up dimensionals, and then to finish the card off place a basic rhinestone in the centre of each flower.

this weeks and last weeks makes
I hope you enjoyed making these 2 cards with me, I really loved making them to share with you all, it was such fun creating them. And I think you will agree how different they both look from each other!
Thanks for popping by and looking at my weekly craftalongs, I really do appreciate it and I love creating to hopefully inspire you.
Until next time
Huge Crafty hugs
Natalie x
Please remember if shopping with myself on line and you live in the UK to use my current Host Code for the month, as this will enable me to send you a small thankyou gift the following month 😊.
G74SAESF
March host code
Product List
 |  | |
 |  |  |
 |  |  |
 |  |  |
 |  |  |
 | ||
 |
 Designer Series Paper")


Wowzer, Natalie, an absolutely gorgeous card with wonderful details and different elements, love the colours too! x
ReplyDeleteI'm just loving these dies Anne thanks for commenting x Natalie
Delete