About Me

My photo
My name is Natalie and I love anything to do with card/paper. I have been a papercrafter for many years now and I never get bored playing with all the wonderful products available. I've been married to my wonderful husband Nathan for 35years now and we are still very much in love with each other as the first day we met each other. We have 3 wonderful children and 5 gorgeous grandchildren so we have lots to be thankful for. Since joining Stampin' Up! in 2018 I've grown so much in confidence with myself and I even tackle technology, which for me is a huge step to have taken, but I'm getting there slowly.

Wednesday 27 October 2021

Merriest moments - #CCC8


Hi everyone and welcome to another Creative Colour Challenge  and for this week the colours are as seen below......

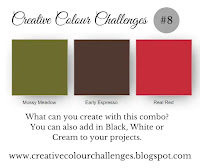
Click on the image above to see all of the other creations made using this colour combination and see how easy it is to join in with the fun challenge yourself......

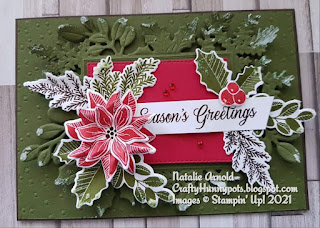
So for this colour challenge I immediately thought of this beautiful bundle 'Merriest moments' and it is definitely merry using this bundle and creating with it your project just seems to come alive as you create.

I used an early espresso card base and then a layer of the mossy meadow was embossed with the hybrid embossing folder that is within this bundle, this was glued flat to the front of the card. The next layer which is also mossy meadow was embossed and die cut at the same time and then die cut again with the detailed die, this was attached to the front of the card using dimensionals.

I then die cut the stitched rectangle, this is within the same bundle, using real red cardstock and attached this to the front of the card using dimensionals again. 
All of the foilage was stamped using the three different colour inks and then die cut out, and attached to the card front using glue and a few dimensionals. 

I stamped the sentiment using early espresso ink, cut using my trimmer and then attached using glue. 

Red rhinestones were attached to the card front to add a bit of sparkle.

The final thing I did to add a bit of interest to the foilage was to use a pallette knife and very carefully apply small amounts of the shimmery paste to the leaves, once dry it gives a look of frost on the foilage....... I love it!

Hope you enjoyed what I shared with you and maybe you'll jump onto the #CCC8
and give it a go yourself.

Until next time
Huge Crafty Hugs
Natalie x


Product List

Paper Trimmer
[152392]
£23.00


Tuesday 26 October 2021

SUOC-287 Favourite holiday catalogue


Hi everyone and welcome to another great SUOC challenge where this time the theme is 'Favourite holiday catalogue' , choose what you have as one of your favourites from the mini catalogue July - December 2021, and I chose the really lovely 'Painted Christmas' suite. I haven't used all of the products from this suite, but almost 😊😀, well it is my favourite!


I just love how you can keep adding to your project and building it up!

The card I've made using it today is a 5" x 5" square card of which I've added different layers to the front incorporating different colours as I build it up. The paper layer I've added some crumb cake and early espresso ink to, using a blending brush to softly build the colour up.
I've stamped all of the elements using two colours for the 2 step pine cones stamps and then die cut them all out.
Some of the foilage has been snipped off from the large detailed die, using garden green, this is from the 'Christmas pinecone' dies.


The gold ribbon has been attached to the front of the card using tear n' tape to hold it in place and then the topper, which consists of a white label and a red velvet label (cut in half) from the 'Seasonal labels' dies, has been attached over the ribbon using dimensionals, and all of the foilage has then been tucked under and around the label.
I stamped and fussy cut the sentiment out, using 2 of the inks to give a nice contrast and then attached these with glue to the card front.
Finally using a pallette knife I applied some of the gorgeous shimmer paste, this gives a nice frosty feel to the front of the card, and I think it finishes it off perfectly!


Red rhinestones added and the card is finished!

Hope you liked todays card, as I said this is one of my favourites from the mini catalogue and I'm loving all of the projects I've made using it so far. It's such a great one to create with!

Hope you'll now hop over to the SUOC#287 and see what the rest of the design team have come up with for you, and find out what their favourites are too!

Until next time
Huge Crafty Hugs

Natalie x

OCTOBER HOST CODE
3EDQKF6R
Please do use this code if shopping with myself and you live in the UK to receive a small thankyou gift from me the following month x


Product List

Paper Trimmer
[152392]
£23.00
Paper Snips
[103579]
£9.25


Craftalong Tuesday - Snowflake Bauble


Hello and welcome to Craftalong Tuesday, each tuesday I make something and share it on my blog post giving you a quick guide as to how I made it.
This week I'm carrying on from my last 2 craftalong posts and using the delightful 'Delicate baubles' dies as I have had so much fun creating with these and I'm finding it hard to stop!!!! 😀

I started with a 5" x 5" square card base, this time it's a top folding card.
I then cut myself 2 pieces of the 'Tiding's of Christmas' paper 1" x 4 7/8" these were then glued flat to the sides of the card front, leaving a small edge of the card showing.
My evening evergreen piece measured 3 1/2" x 4 7/8" and this was glued flat to the centre of the card front, leaving the paper to show each side.
The centre of card white piece was a piece that measured 3 1/4" x 4 7/8" , this was embossed with the snowflake embossing folder and then glued flat to the card front, again leaving the evening evergreen piece showing each side.

For the bauble I die cut the basic bauble out of silver foil cardstock, and then I die cut 2 of the detailed bauble, one in basic white and the other in the snowy white velvet. The basic white one had the trim tied through it and then I frayed the ends (start at the very end and work your way down is the easiest way to do this), and then glued flat to the silver foil bauble. The velvet snowflake was snipped away from the bauble piece and then I curled the individual needles of the snowflake, then attached it to the bauble. The whole bauble was then attached using dimensionals. 
With another piece of trim I tied a bow and attachd it using a glue dot. 
The sentiment I used was from the 'Tidings and trimmings' stampset and I stamped it in evening evergreen ink, fussy cut around it and then attached the pieces to the card front using glue for the 'time of the year' and dimensionals for the 'It's the most wonderful'. All that remained to be done then was to attach three of the beautiful brushed metallic dots onto the card front and it's finished.


Just love the way the snowflake looks on the card front and it's got a lovely velvety touch to feel too!

Until next time
Huge Crafty Hugs
Natalie x

OCTOBER HOST CODE
3EDQKF6R
Please use this code when shopping with myself and living in the UK to receive a small thankyou gift from me the following month x

 Product List

Paper Snips
[103579]
£9.25
Paper Trimmer
[152392]
£23.00