About Me

My photo
My name is Natalie and I love anything to do with card/paper. I have been a papercrafter for many years now and I never get bored playing with all the wonderful products available. I've been married to my wonderful husband Nathan for 35years now and we are still very much in love with each other as the first day we met each other. We have 3 wonderful children and 5 gorgeous grandchildren so we have lots to be thankful for. Since joining Stampin' Up! in 2018 I've grown so much in confidence with myself and I even tackle technology, which for me is a huge step to have taken, but I'm getting there slowly.

Tuesday 29 March 2022

SUOC#298 - Critters and Animals


Hello again everyone and welcome to another SUOChallenge where all of the design team have been creating some beautiful projects for you to see using some of their favourite stampsets with critters or animals on. It was clear right from the start which set I was going to be using and I couldn't wait to create with it, so let's see what I came up with for you all to hopefully get some inspiration from............


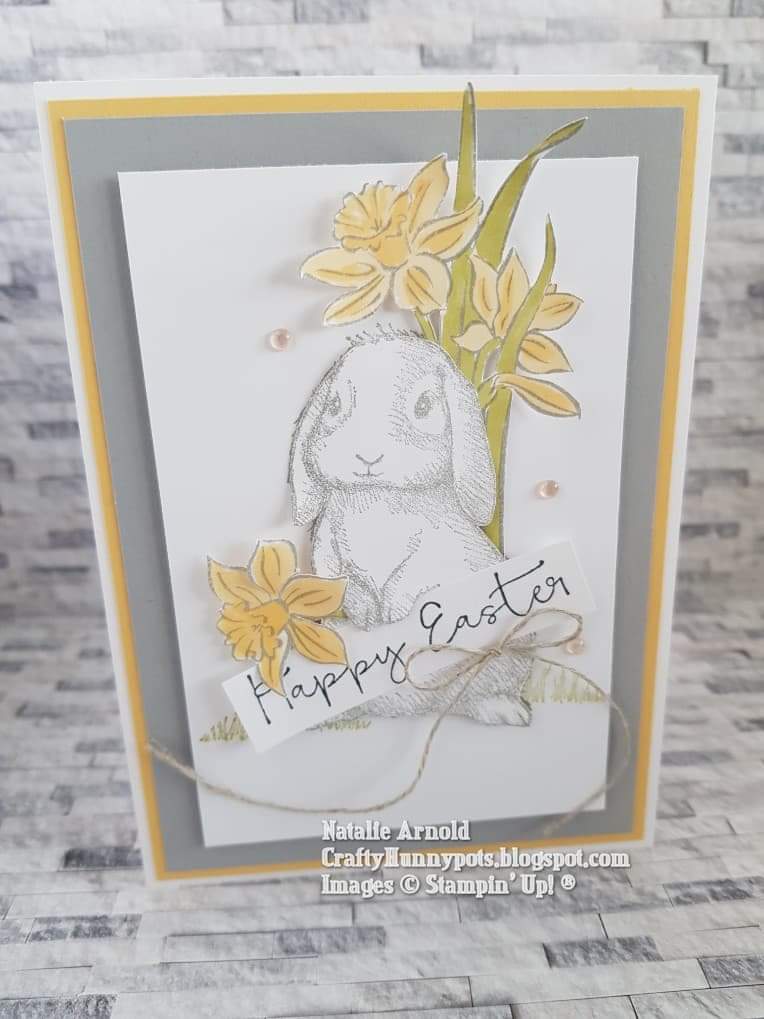
Just had to be done! What with Easter just around the corner, and the fact that I fell in love with this cute character the moment I saw it in the mini catalogue, I knew I had to get it! 
I made myself a basic card base using the thick basic white cardstock, and then chose the colours that I thought looked nice together for my easter card, these were smoky slate and so saffron.  These were both attached to the front of the card using glue. They're both quite soft colours, so I added a bit of old olive for the flower leaves and pear pizzazz for the grass, this just lifted the card a bit. 
I stamped the grass onto the basic white layer where I wanted the bunny to sit, and then I stamped the bunny using smoky slate, this was stamped over the grass. I then stamped the bunny again using the same colour onto a piece of scrap cardstock and fussy cut him out using my snips (the fluffy hairy bit around the outside of the bunny doesn't need to be cut out as this is already on the white layer to use as a shadow guide). Making sure I had cut around the little hands so that he could hold my message, I then attached him to the white layer using dimensionals just down the centre of him, and carefully lined him up with the stamped image. 
The daffodils I stamped using smoky slate ink pad and then coloured in using both of the So Saffron and just the light Old Olive blends, I then fussy cut these out cutting the one flower from the left side of the image away from the rest of the flowers. The stem from the single flower tucked under the bunny's hands and had a dimensional placed under the flower head. The sentiment was stamped using the black memento ink and cut to the size required before being tucked under the bunny's hands and glue placed on the underside of it to keep it in place. The rest of the daffodil bunch had dimensionals placed under the flower heads and this was tucked under the other side of the bunny to help balance him up. This whole layer was then attached to the card front using dimensionals.
To finish my card off I tied a length of the linen thread and attached it with a glue dot, then I placed some of the polished dots onto the front of the card.
I really enjoyed creating this card it was such fun watching it as it developed. I hope you enjoyed seeing my card as much as I enjoyed making it. Now you can hop over to the SUOChallenge and see what all the other design team members have to share with you.
Until next time
Huge Crafty Hugs
Natalie x


 Product List

Linen Thread
[104199]
£4.75
Paper Snips
[103579]
£9.25
Paper Trimmer
[152392]
£23.00


Craftalong Tuesday - Happy Easter


Hi everyone and welcome to another Craftalong tuesday.  Today I've made a card using the really beautiful Daffodil Daydream bundle. I've been using this quite a bit lately and I'm loving using it a so much I thought I'd make a few more things to share with you. So if you pop back next week I'll share another project I've made with you all using this same bundle again. So let's see how I made this weeks then........

1. Cut a piece of old olive cardstock that measures 14.8cm x 21cm and score in half at 10.5cm this is the card base.
2. Cut 2 pieces of basic white cardstock measuring 10cm x 14.3cm and then glue one of these to the inside of the card.
3. Stamp the border image from the stampset across the other piece of white cardstock, using old olive and daffodil delight ink, making sure you alternate the colours as you go along, I started from the bottom of the cardstock and worked my way up.
4. Cut a piece of vellum the same size as the white cardstock and attach it to the white, stamped card by placing a couple of glue dots in the centre so that the topper on the finished card covers them up.
5. Tie some of the linen thread around the 2 layers tying them at the front in a knot. Tie a small bow with the thread and attach to the knot with a glue dot. Glue these 2 layers flat to the card front.
6. Die cut 2 of the stitched so sweetly rectangles out, I used 2 that sat nicely inside each other, one of these is cut from old olive cardstock the other from basic white. I then die cut one more of the smaller rectangles out from the retired sale-a bration papers called Daffodil afternoon, and glued this flat onto the white one. Glue both of the rectangles together flat with, then attach to the card front using dimensionals. 
7. Stamp the daffodil bunch out using memento ink and colour in using daffodil delight and old olive stampin belnds. Die cut out and attach to the front of the card with dimensionals.
8. Stamp the sentiment ( I chose one from the stampset called Easter friends 157737), using versamark ink applying white embossing powder and heat setting with a heat tool. Fussy cut the words out as required and attach to the card front using glue.
9. Finish the card off adding a few of the beautiful Rhinestone Waves basic jewels, which are only available whilst stocks last, so if you'd like them you'd better be quick!

I hope you enjoyed todays project and like I said do pop back next week and I'll share another project with you all using this gorgeous bundle.
Until then take card
Huge crafty hugs 
Natalie x


 Product List

Linen Thread
[104199]
£4.75
Paper Snips
[103579]
£9.25
Paper Trimmer
[152392]
£23.00


Tuesday 22 March 2022

Craftalong Tuesday - You are beyond incredible


Welcome back to another craftalong tuesday. Hope everyone is keeping well and having lots of fun fitting in a bit of crafting. As promised I have another card for you that I've made using the beautiful Dahlia Days bundle. I love the large detailed flower die within this set it just sets the card off that you make, and it's really fun to create with too! So let's get on with this weeks make...............

1. Cut a piece of fresh freesia cardstock - 14.8cm x 21cm and score at 10.5cm fold and burnish, this is the card base.

2. Cut another piece of the fresh freesia cardstock - 10.2cm x 14.5cm and emboss using the Macrame 3D embossing folder. Attach to the front of the card using glue. Cut a piece of basic white cardstock the same size as the front piece and attach this to the inside of the card flat using glue.

3. Cut a piece of the flowering fields paper - 10cm x 14.3cm and attach at an angle, flat to the front of the card using glue.

4. Die cut the largest Stitched so sweetly rectangle out of basic white cardstock and attach to the card front using dimensionals.

5. Die cut 2 detailed flowers out of highland heather and basic white cardstock and cut up as shown in the diagrams below. 

before cutting up

bottom section used for the card front

top section smaller flower cut from the centre to use 

two smaller flowers cut out of the centres to use

6. Attach the detailed flower section to the card front using cut up dimensionals behind sections that you can't see them through at the front. 

7. Stamp the sentiment using evening evergreen ink and die cut out as show below.

this has a matching stamp to go with it but we're not using this today

turn the die around and then cut it again this will give you a perfect shape without the flower section on the end


8. Attach the silver trim to the back of the sentiment using glue dots/ tear 'n tape and then attach the whole thing to the card using dimensionals.

9. Stamp the ferns out and either die cut them or fussy cut them out, which is what I chose to do, and then attach them to the card using glue. tucking them under the sentiment and the flower.

10. Attach the other flowers that were cut out from the whole detailed flower pieces, using cut up dimensionals, and then to finish the card off place a basic rhinestone in the centre of each flower.

this weeks and last weeks makes


I hope you enjoyed making these 2 cards with me, I really loved making them to share with you all, it was such fun creating them. And I think you will agree how different they both look from each other!
Thanks for popping by and looking at my weekly craftalongs, I really do appreciate it and I love creating to hopefully inspire you.
Until next time
Huge Crafty hugs
Natalie x

Please remember if shopping with myself on line and you live in the UK to use my current Host Code for the month, as this will enable me to send you a small thankyou gift the following month 😊.

G74SAESF
March host code


 Product List

Paper Trimmer
[152392]
£23.00
Paper Snips
[103579]
£9.25