About Me

My photo
My name is Natalie and I love anything to do with card/paper. I have been a papercrafter for many years now and I never get bored playing with all the wonderful products available. I've been married to my wonderful husband Nathan for 35years now and we are still very much in love with each other as the first day we met each other. We have 3 wonderful children and 5 gorgeous grandchildren so we have lots to be thankful for. Since joining Stampin' Up! in 2018 I've grown so much in confidence with myself and I even tackle technology, which for me is a huge step to have taken, but I'm getting there slowly.

Tuesday 22 December 2020

Stampin' Up! only challenge - #SUOC265 - Winter


Hello everyone,

Wow can you believe we're only a few days away until the big day!!!

I'm bringing a relaxing make for you today to help you unwind ready for all of the festive celebrations, even though it's going to be alot different this year, hopefully we can still enjoy ourselves with those loved ones that we are able to spend time with, and appreciate all what we have together.


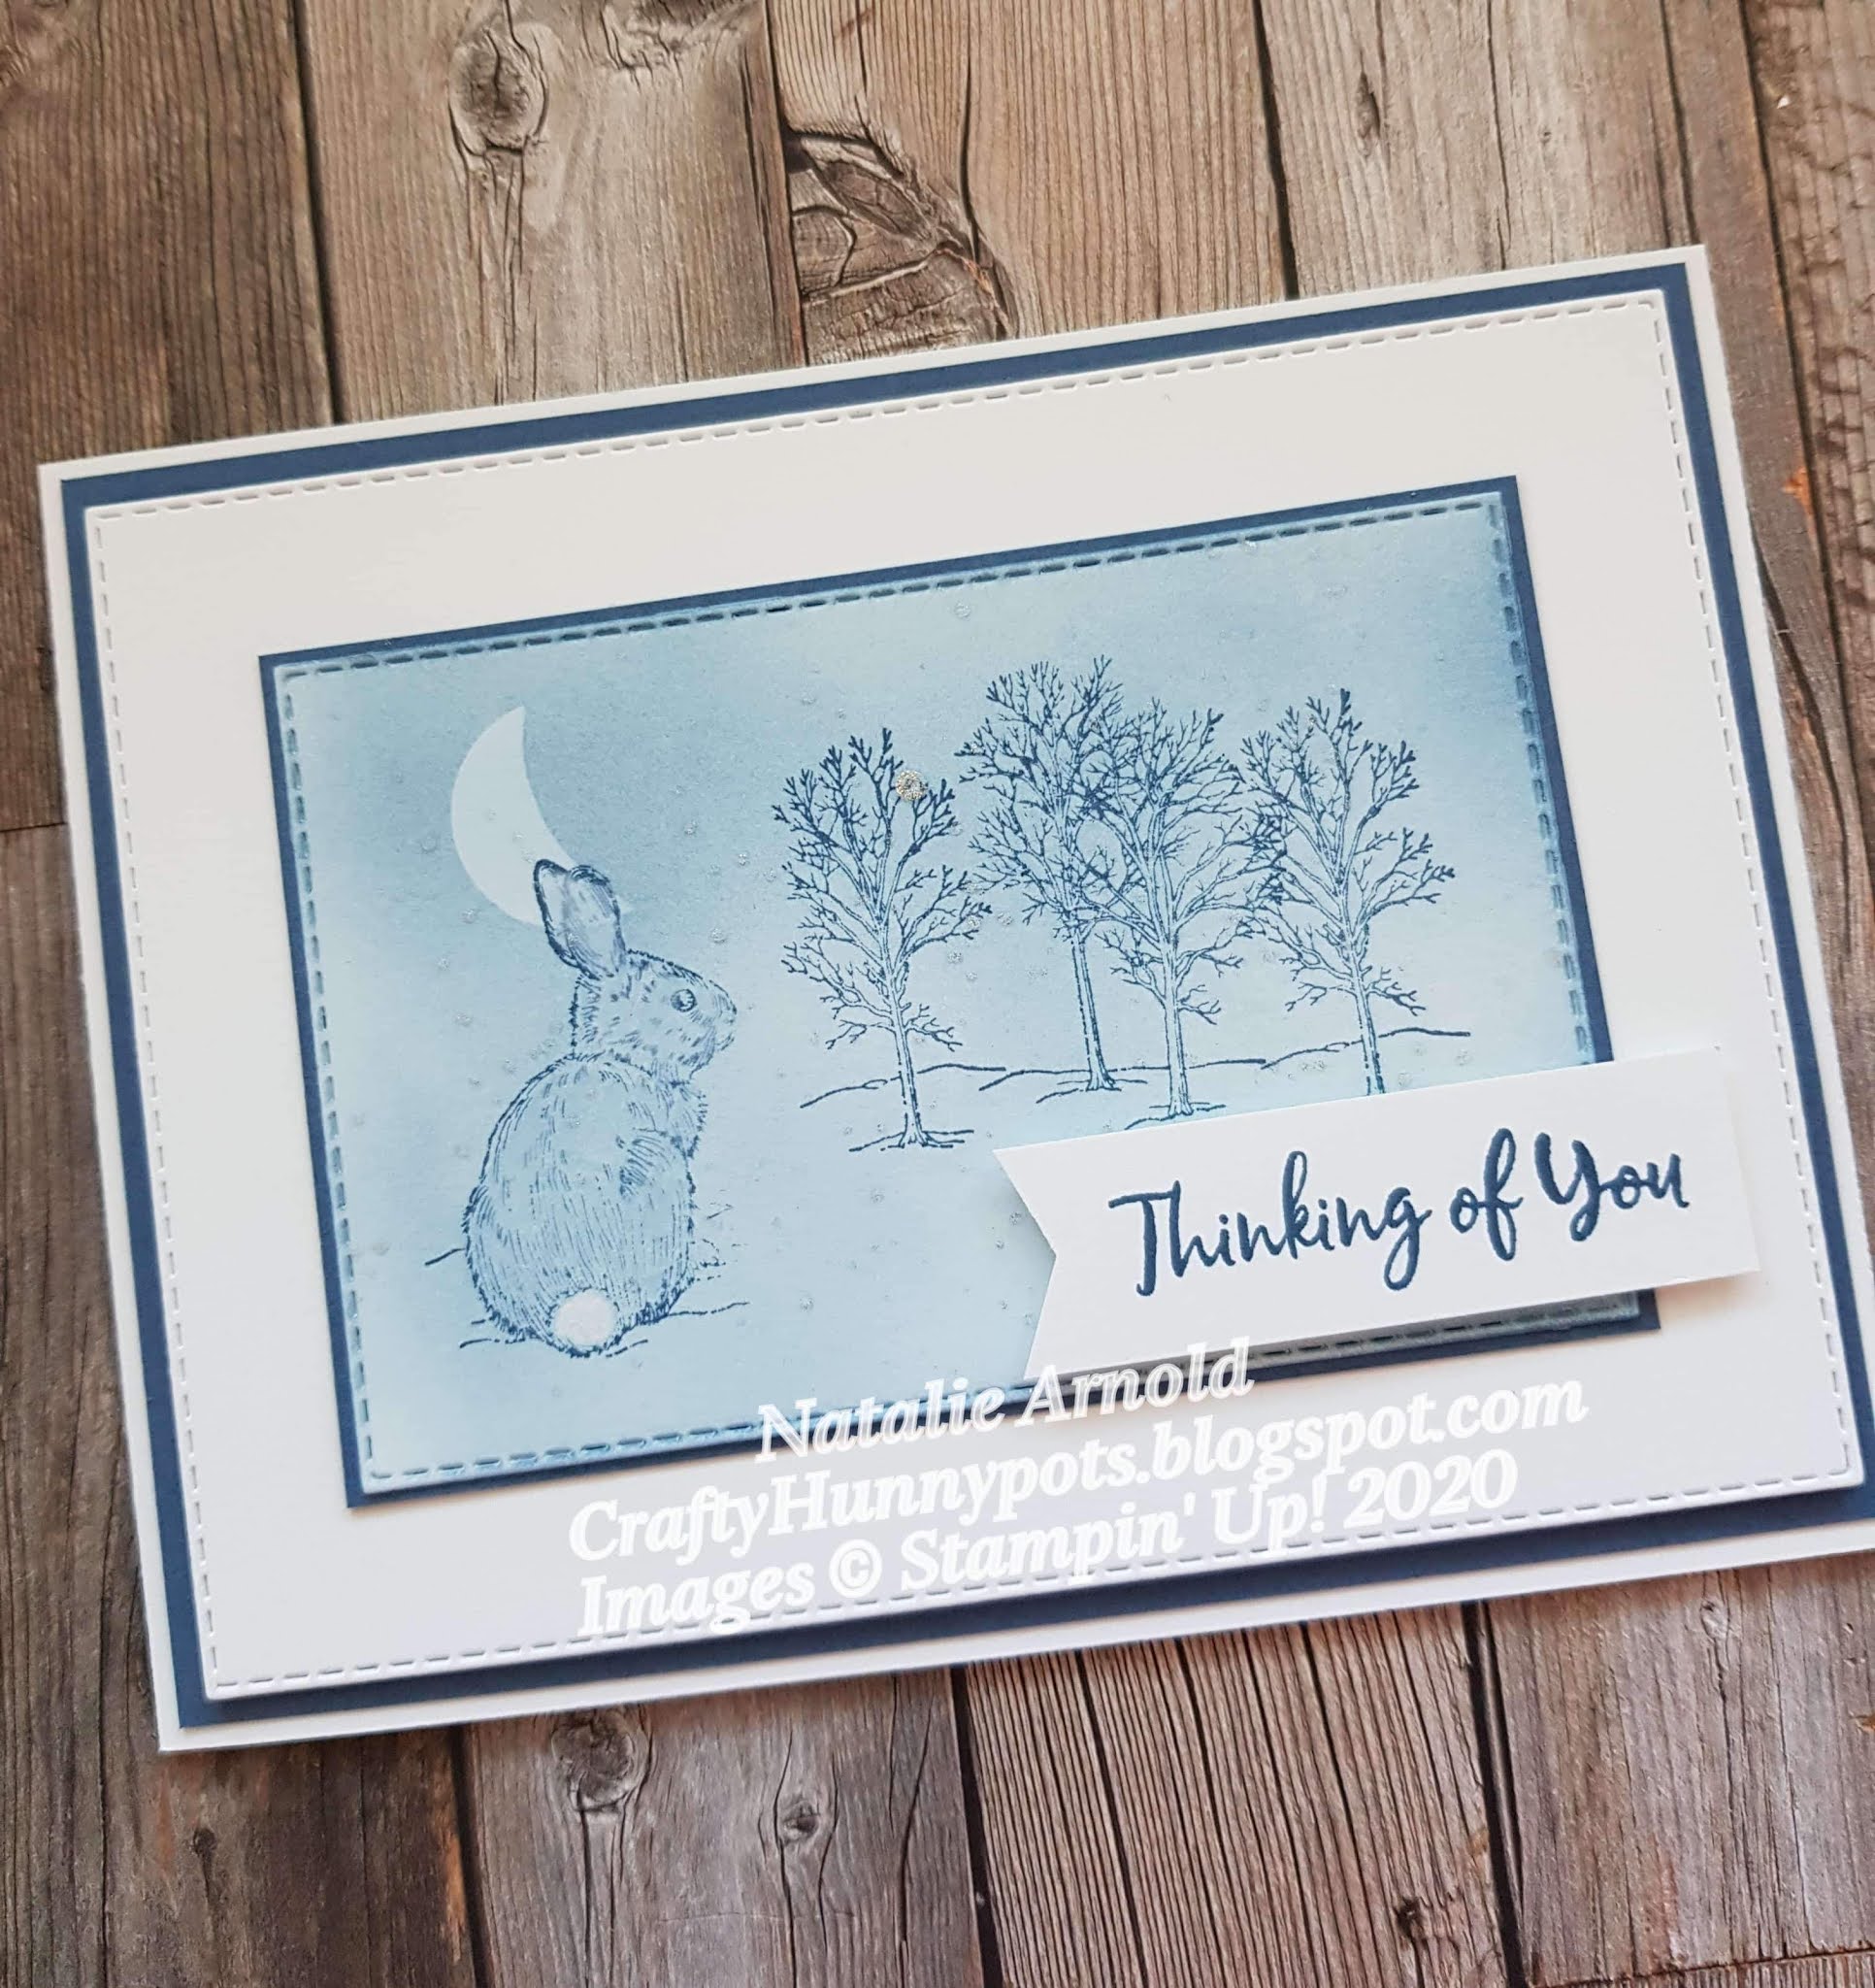
The card I've made uses just two colours Whisper white (which is sadly retiring due to unforseen circumstances, and Basic white will eventually replace it) and Misty moonlight.

Materials needed:

Whisper white thick cardstock - 1pc 4 1/8" x 11" score in half at 5 1/2" card base

1pc - approx 4" x 5 3/8" for die cutting largest stitched rectangle

1pc - approx 2 3/4" x 4 1/4" for die cutting 4th largest stitched rectangle

1pc - approx 2 1/2" x 3/4" for sentiment banner

1pc - 3 5/8" x 5" for inside of card layer

2pc - approx 3 5/8" x 4 7/8" for mounting behind largest rectangle die cut for depth


Misty moonlight cardstock - 1pc - 4" x 5 3/8" for front of card 1st layer

1pc - 2 11/16" x 4 1/16" for front of card 3rd layer

1pc - 3 7/8" x 5 1/4" for inside of card layer


Small circle punch for the moon - I've used a retire 3/4" punch

Post it note for masking with

Blending brushes for softly inking the background - these are available to purchase from the 5th January in the new mini Jan - June catalogue


Card recipe:

Cut, score and burnish your card base. Cut and die cut all of the other layers for the card.

Glue flat the misty moonlight pieces to the front and inside of the card. Stamp the images onto the inside of card, whisper white piece and glue flat into the inside.


 Glue flat to the reverse side of your largest stitched rectangle the 2 pieces that are cut a bit smaller, this will give the card depth but without adding too much thickness to it. Glue this onto the front of the card.

 Stamp your sentiment and then punch one end using the Pick a banner punch.

 Punch part of the circle out of the sticky end of the post it note (forming a crescent shape) and place onto the smaller stitched rectangle. Now using the blending brush or a sponge softly ink all over this piece, I like to place ink onto the brush and then gently brush some off before brushing onto the rectangle piece, using circular motions.


 Remove the sticky moon crescent piece and then gently brush a very faint tint of the ink over the card again, this helps to make the moon look not so bright.

before

after

Stamp all of the images using second generation ink and then using the blender pen just very softly blend the ink on the rabbit.

 Now using the stamping block very carefully tap the wink of stella pen on the side of it so it gives little splatters over your stamped and inked rectangle. Glue this piece flat now to the smaller piece of misty moonlight cardstock and then glue flat to the front of the card.


Hopefully you can see the wink of stella in the pictures above.

 Place dimensionals on the reverse of the sentiment and glue into place.

 Last of all using the chalk marker pen dot it all over the rabbits tail to give it a fluffy white tail. Card finished.


Hope you enjoyed ths project today, as much as I have had creating it, hope you give it a go and discover what a joy this technique is to use on many of your projects. See you all again in the new year!

Take care

Big Crafty Hugs

Natalie xx


Shopping with myself this month then please do use my host code for December if your order is under £150 then I can send you a thankyou card and a small gift in the post the following month thanks!

DECEMBER HOST CODE

7R3G4GBG


Product List
Blender Pens
[102845]
£11.25
Paper Trimmer
[152392]
£23.00


Tuesday 8 December 2020

Sweet treat gift box


Hello everyone and welcome to another Tuesday Crafting. As it draws nearer and nearer to the big day, I thought it would be nice to share a cute little treat box that I've made with dividers inside to seperate those lovely sweets, that we all love at christmas. So let's begin and see how simple these little boxes are to make.

Materials needed:

Box lid - Card measuring 5 1/16" x 6 9/16" scored on all 4 sides at 1" (Old Olive is what I've used for mine)

Box base - Card measuring 6 1/2" x 8" scored on all 4 sides at 1 3/4" (Real Red is what I've used for mine)

Box divider pieces - 1pc of card measuring 1 1/4" x 4 1/2" and on the longside you need to cut at 1 1/2" and 3" but only into the middle/ half way (Real red is what I used)

2pc - 1 1/4" x 3" and on the longside you need to cut at 1 1/2" on both pieces but only into the middle/ half way ( Real red is what I used)

Top of lid layer - 2 3/4" x 4 5/16" embossed using embossing folder

Tis' the season dsp - 2pc 15/16" x 3 for the short sides of box lid sides

2pc 15/16" x 4 1/2" for the long sides of box lid sides


Gold thread - approx 7" for the tags 

Ribbon - approx 27"  for tying around the box

2 Scrap pieces of cardstock for the die cutting of 2 tags

Box recipe:

1. Cut, score and burnish (where necessary) all of your card and dsp pieces.

Both the box base and the lid are cut the same way as below, only cutinng to the score line on each side.


2. Now put wet glue on all 4 side tabs and glue the corners together so they are nice and square, by tucking the tabs inside the box base.

Both the box base and the lid pieces are glued the same way.


3. Now you need to assemble the inside dividers, and you do this by just having cut all the pieces where instructed to the middle/half way and then interlocking them into each other, like below, linking the cut lines together.


This piece should now just slide into place inside the box base.

4. Emboss the layer of card for the top of the box lid and glue flat into place.

5. Glue all of the dsp pieces into place and then tie the ribbon around the whole box (place your sweets of choice inside first).

6. Die cut your 2 tags, stamp a sentiment onto the whte one, I've used the 'To and From' that is within the  Wishes and Wonder stampset, and I've used Real red ink.

7. Attach the gold thread to the tags and then tie them onto the box by tying them onto the ribbon.

That's the box complete, ready to give to someone special for chrtistmas. Very quick and simpe box but very cute way of gifting a little something to someone.
Hope you enjoyed this project and you give it a go.
Till next time take care everyone, stay safe and keep crafting.

Please remember if shopping with myself to use the host code for december if your order is under £150 and then I can send you a small gift in the post next month.

December Host Code
7R3G4GBG


Don't miss out on the year end closeout which has items that are no longer going to be available after 4 January or until supplies run out, from the August - December 2020 mini catalogue. Pop over to my online shop and check there are no items that you really would like to have. Also there have been lots of items added to the clearance rack which you definitely don't want to miss out on.


Product List
Paper Trimmer
[152392]
£23.00


Monday 7 December 2020

Thankyou tent fold card


Hello again everyone, can you believe it's that time again where I join in with the Kylie Bertucci's monthly International blog highights, and yes ask you all to give me a vote to see if I can come in the top 10.
So let's give it a go again and enjoy the process of making another thankyou card together......


Todays card that I've made to show you all is one of my favourite folds, and I haven't made it in a while so I thought let's give it a go......
I've incorporated the really lovely 'Arrange a wreath' bundle as I really love the versatility of this set, and it has a few sayings in the stampset which lend themselves to many occasions. 

Materials needed:

Whisper white thick cardstock

1pc - 4 1/2" x 10 3/4""  scored on the longside at 4 1/2", 9", 9 3/4" and 10 1/2" this is the cardbase.
1pc - 4 1/8" x 4 1/8" for the embossed front of card layer.
Scrap pieces to stamp and fussy cut out the plaque and the thanks sentiment.
Scrap pieces for the die cutting of the bows (2) and the little flowers (5).

Gray Granite cardstock

1pc - 4 3/8" x 4 3/8" for the embossed inside of card layer.
Scrap piece to mount the stamped plaque image on to.

Scrap pieces (for the die cutting of the wreaths and 3 large 4 small flowers) of the following:
Pear Pizzazz cardstock
Soft seafoam cardstock
So saffron cardstock


Rhinestone basic jewels

7 for the centres of the flowers.


Card recipe:

1. Cut and score your card base don't burnish it yet.

2. Cut the apperture out of the front of the card base (this is the section with the other score lines sitting at the bottom) using the largest of the straight edge square dies. To find the middle of the card I draw a pencil mark from corner to corner (both ways) to enable me to line up the die centrally.


3. Now burnish the score lines and set aside.

4. Die cut the pieces of whisper white piece for the front of the card layer, exactly the same way as you do for the card base only use the largest scallop edged die this time.

5. Emboss this piece with the embossing folder and now using a sponge just sponge a small amount of the gray granite ink over the embossed bricks to make the wall look weathered.

6. Cut strips of the foam adhesive sheets about 1/2" thick and place them on to the reverse sides of the inked and embossed piece, now carefully adhere this to the front of the card base, you should have an equal border as long as you've die cut into the middle of both layers.

7. Now fold the score lines at the bottom of the card base so you have a mountain fold a valley fold and then a mountain fold, with the small 1/4" fold tucking into the inside of the card, glue this section to the back of the inside of card .


8. Cut and emboss the gray granite layer (with the embossing folder) and glue this to the inside back of the card, slide it in before you put glue on to it just to check it fits as sometimes the card stretches when you emboss it so it might need a tiny slither cut off the bottom.

9. Die cut all of your wreathes and flowers, adhere with wet glue 3 of the small white flowers to the inside back of the card, the rest are glued flat on to the wreath once you have glued the 2 pieces of the wreath together, place all of the jewels into the centres of the flowers .

10. Stamp your plaque image with gray granite ink and fussy cut it out, then mount it onto the gray granite piece of cardstock leaving a tiny border showing around the edges. Stamp the sentiment using pear pizzazz ink fussy cut around it and then glue it to the plaque.  Now attach this to the wreath using wet glue where needed.

11. Where needed place wet glue onto the reverse of the wreath and attach it to the front of the card.

12. Die cut 2 bows in whisper white glue them together and fold them to give them a bit of depth now attach to the front of the card.

Card is now finished.

Hope you enjoyed todays project and you give it a go it's a really lovely card fold and it folds down not completely flat, but it will fit into and envelope easily.


Thanks so much for taking the time to hop onto my blog and have a look I really do appreciater it. If you like my card I'd really also appreciate it if you gave me a vote on the link above. Until next time stay safe everyone, take card and keepcrafting.

Big Crafty Hugs
Natalie xx


Remember if shopping with me this minth to please use my host code if your order is under £150 and then I will be able to send you a small gift the following month.
If your order is over £150 then please don't use my host code as you become the host and claim the rewards yourself.

DECEMBER HOST CODE

7R3G4GBG