About Me

My photo
My name is Natalie and I love anything to do with card/paper. I have been a papercrafter for many years now and I never get bored playing with all the wonderful products available. I've been married to my wonderful husband Nathan for 35years now and we are still very much in love with each other as the first day we met each other. We have 3 wonderful children and 5 gorgeous grandchildren so we have lots to be thankful for. Since joining Stampin' Up! in 2018 I've grown so much in confidence with myself and I even tackle technology, which for me is a huge step to have taken, but I'm getting there slowly.

Tuesday 30 March 2021

SUOC 272: Case the catalogue - Delicate petals


Hello again everyone, and welcome to another SUOchallenge. For the #SUOC272 - Case the catalogue, I thought I'd use the really pretty 'Delicate petals' bundle from the mini catalogue and you can find them on page 57, which is where you will see this card only I've used different colours for mine. This is such a lovely bundle and the dies make such pretty flowers that you don't really need to add alot to your cards, just a few clear gems or faceted dots, a sentiment and you're there!

For the card I've made I'm using all of the In-colours 2019-2021 which will very soon be retiring and I just love some of these colours and I will miss them, so I thought I'd use all of them on my card and give them a final showing off!

I've die cut all of the flowers, each in all of the colours and attached them to each other, accordingly. I've used basic white thick card for my card base and then a layer of the basic white card for the inside and front of my card, I've also used this for the odd petals that I've just tucked under the coloured flowers. I've attached some of the 'Flowers for every season gems' onto the front of the card and then used pretty peacock ink to stamp my sentiment onto a small piece of white card which is then attached flat to the card front. The last thing I've added is a double bow using the white snail mail twine and that's the card finished, quick simple but very pleasing to the eye, and in the colours I love so it's a win win for me!


I just love the depth you can get using these dies, they're so pretty.


While I was die cutting all of the flowers and petals out, which by the way you can cut the petals with or without pattern, I die cut myself lots in the white and I thought rather than not use them I'd make another quick card with them, and I have to say I was quite pleased with the end result. This time I made a square card and added 2 layers of the white card to the card front, both getting smaller in size, then added the 2019-2021 faceted Dots onto the flower, which I have assembled together using a 1-1/2" circle as the base to glue the petals too,  but I still used the pretty peacock ink for my sentiment, think this is one of my favourite colours and I am definitely going to miss this one for sure.


Really loved the depth on this flower and thought it looked really elegant just in the white.

Measurements for the 2 card bases

5-7/8" x 8-1/4" scored at 4-1/8" for the coloured flower card base
The layers are 3/16" smaller than the card base


5" x 10" scored at 5" for the square card base
4-3/4" x 4-3/4" for the first front of card layer
4-1/2 x 4-1/2" for the second front of card layer

Don't forget to pop over to the #SUOC272 and have a look at all of the other design team makes, and maybe join in with the challenge would love to see what you come up with. 

Many thanks
Huge Crafty hugs
Natalie xx 

HOST CODE FOR ON LINE ORDERS UNDER £150

TE6EFTZ9 


  Product List

Paper Trimmer
[152392]
£23.00
Bone Folder
[102300]
£6.50


Craftalong tuesday - Impossible card using Delicate petals


Hello again it's with a warm welcome to you all on this Craftalong tuesday, which is in fact the last one for March, wow can you believe it's nearly April, which will bring us the celebration of Easter and the season for all the little lambs to come into the world. I love this time of the year when all of the different pops of colour start poking through our soils and burst into a beautiful array of colour, it's so welcoming to see!

Today I have a fun fold card which is known as an impossible card for you all to have a go at, I think it's probably called this because once it's made it seems impossible to see how it was made, that's my thinking anyway. The card folds flat to fit into the envelope, and with the measurements I have for you it means that we can all get 4 yes 4 out of one sheet of A4 UK size card, so for me this is a win win card!. I think it would be a great fold to use for name places at a wedding, birthday celebration and many more celebratory functions, people would be sitting wondering how it was made, and it would probably be a subject of converstion at the table of the guests .........

So let's make the card!!

Materials needed:

Purple Posy cardstock (retiring item)

1 piece 4-1/8 x 5-7/8" for the card base

1 piece 1/2" x 3-1/2" for the sentiment strip

Scrap pieces to die cut 1 large flower and 1 smaller flower


Highland Heather cardstock

Scrap pieces to die cut 1 large flower and 1 smaller flower

Basic white cardstock

2 pieces 1-7/8" x 3-11/16" for the front and back of stand up section

1 piece 1-1/4" x 3" for the sentiment banner

Scrap pieces to die cut 1 large flower and 1 smaller flower

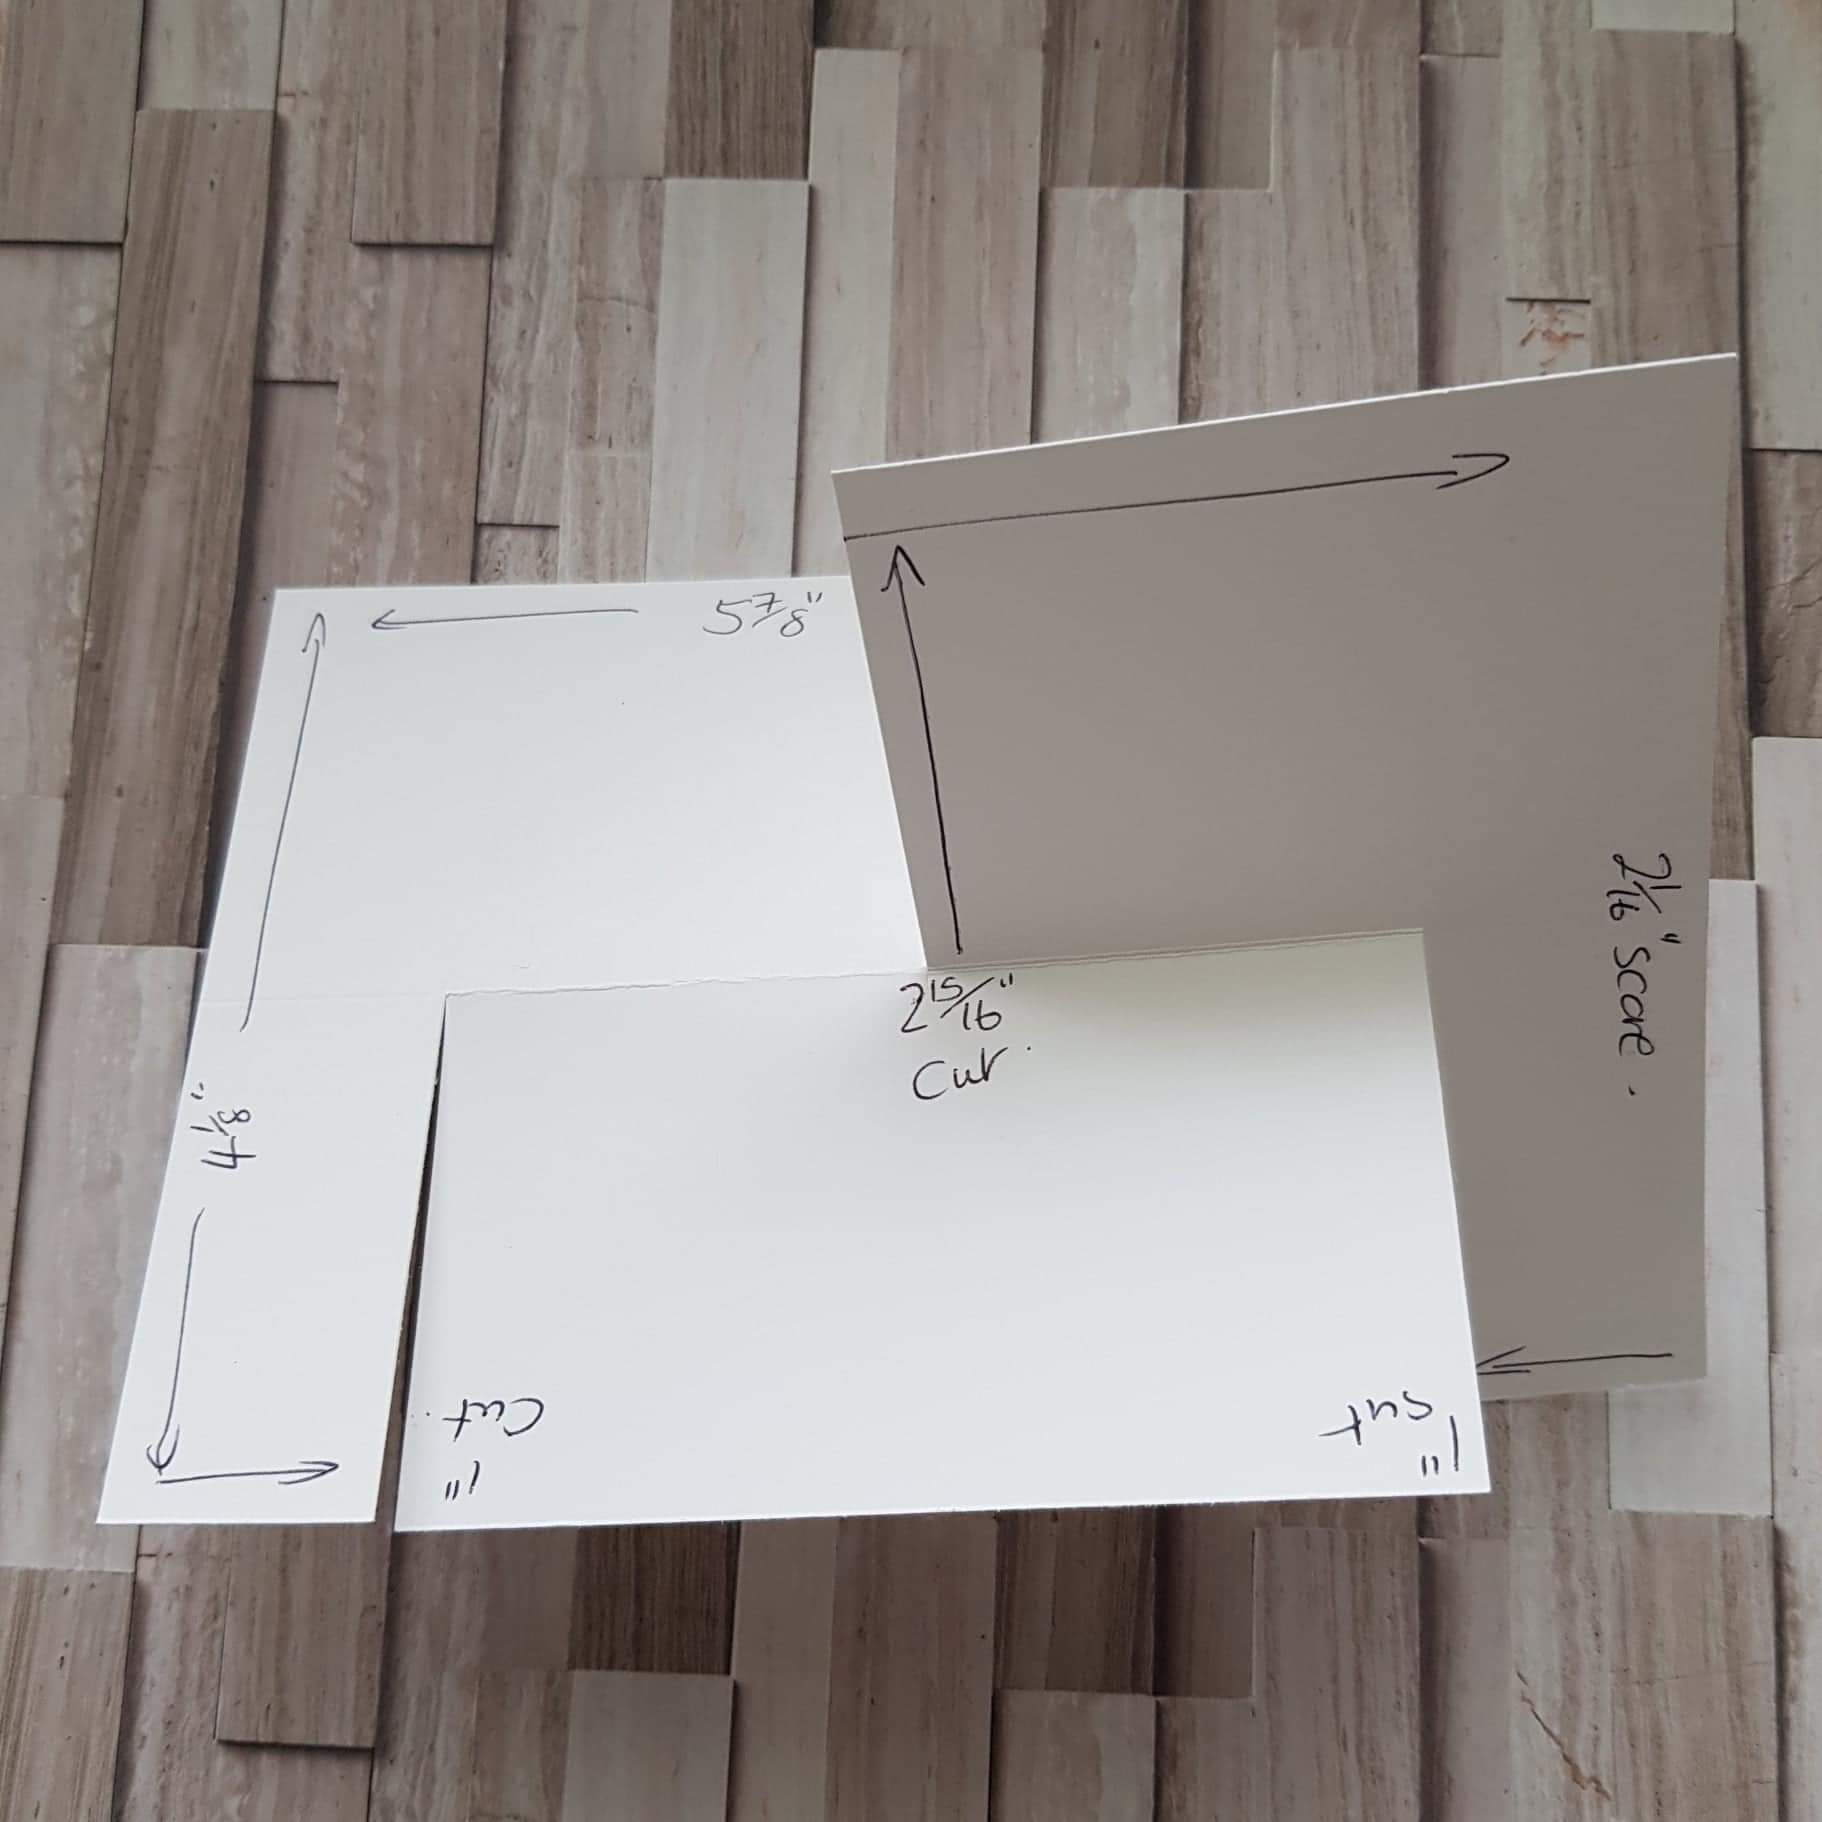
1 piece 2-13/16" x 4" for cutting out a template


Pear Pizzazz cardstock

Scrap piece to die cut 2 leaves


Hydrangea Hill dsp

2 pieces 2-13/16" x 4" for the 2 side panels of card base


Pastel Pearls

Highland Heather classic stampin' pad


Card Instructions:

On the Purple posy card base piece score and cut as follows:

On the short side score at 2-1/16"

On one longside cut in 1" from both ends only to the score line, turn and then cut on the opposite longside at 2-15/16" only to the score line.


Fold on the score line as follows:

Fold one side upwards towards you and the other side downwards towards yourself again so that they look like below.


This is how the card shape will look ready to decorate

Glue flat the 2 pieces of white card for the front and back of stand up section, the back one is going to be where the message can be wrote for the recipient of it.
Die cut all of the flowers and the 2 leaves give all of the petals a slight curve using the bone folder and glue the smaller flowers on to the larger ones flat, making sure you put a different colour on each of the larger ones, now add a pearl to the middle of them all.
After having punched the banner end out of the white piece of card, using highland heather ink, stamp the sentiment on it, give it a slight curve again using the bone folder.
Now we need to cut out our dsp, I found this was easier to do using a template, so here is a diagram of how I cut it:

Now this template can be placed on top of the dsp pieces one at a time and drawn round, then cut out with scissors or craft knife and rule. This is cut exactly the same for both pieces, so that they marry up with both sides of the card base. Glue these into place.
Using highland heather ink stamp the sentiment onto the strip and then glue this flat across the card base front, this helps keep the card from flapping about when picked up.
Now all that's left to do is to glue all of the flowers and leaves into place flat and then tuck the sentiment banner under the flower and glue in place.

I really enjoyed making this card for you all today and I hope you have fun making yours. 

Please leave me a comment on my blog and let me know what you think.
Huge Crafty Hugs
Natale xx


NEW HOST CODE ON LINE ORDERS UNDER £150 

TE6EFTZ9


List of all products used for this project click on the items to add to your basket.

Product List

Paper Trimmer
[152392]
£23.00
Bone Folder
[102300]
£6.50


Friday 26 March 2021

Butterfly brilliance - Fanfold card


I wanted to come on today and share a card I've made with a fanfold in the middle and using the delightful Butterfly brilliance bundle, I'm loving this set the butterflies are just so beautiful, unfortunately the exquisite papers that went with this set have sold out, but I wanted to show you that the butterflies are still beautiful to use. I've paired them up for this card with some of the gorgeous Hydrangea hill dsp using the reverse side of the papers and having the lovely seaside spray colour showing, which unfortunately is going to be retiring 3rd may (seaside spray not paper).

So let's begin and make the card........

Materials needed:

Basic thick white card

1pc - 14.5cm x 20cm scored at 5cm from both sides - gatefold card base

Basic white card

1 piece - 4.5Cm x 13.5cm - inside of card

1 piece - 4.5cm long enough to wrap around the folded shut card and overlap to glue

Scrap pieces for the stamping and die cutting of 4 small and 1 larger butterfly

2pieces - approx 8cm x 8cm to die cut 2 circles card wrap

Seasidespray card

2 pieces - approx 4.2cm x 14.2cm for side embossed panels

1 piece - approx 9.7cm x 14.2cm for back of card panel

1 piece - approx 8cm x 8cm for scallop circle card wrap

Scrap pieces to die cut 2 small detail and 1 larger detail butterfly

Hydrangea hill dsp

1 piece - 14cm x 20cm for the inside folded section

Wink of stella glitter brush

Seaside spray ink

Sponge daubers

Pastel pearls


Card Instructions

Fold and burnish the white card base. Dry emboss the seaside spray side panels using the Ornate floral 3D embossing folder. Attach these panels to the side sections of the card front using glue and then attach the other seaside spray piece of card to the back of the card base.

Stamp and die cut all of the butterflies that are needed for both the inside and the card wrap. On the stamped butterflies using a sponge dauber and a small amount of ink from the ink pad blend it out from the body to the wings, this is very subtle. The smaller stamped butterflies I've added some wink of stella onto them to give them a lovely, but slight glimmer. On 2 of the smaller butterflies and the larger one attach the detail die cut butterflies by applying glue to the body only. Leaves these all to one side to dry off completely.

Die cut all of the circles needed and glue them all together flat, having already stamped the sentiment onto the smallest white circle.

Stamp the sentiment onto the inside of card white piece of card.


Now for the inner fanfold section:


Score the dsp as in the diagram, don't burnish it just use your finger to crease it, or the paper might crack and look horrible. The straight creases are going to be valley folds and the diagonal creases will be mountain folds, the dsp should just fall into place.

I marked the inside back of the card to make sure the dsp layed centrally, I marked in from both sides at 2.5cm top and bottom, then I glued the centre part down flat. I then flattened the dsp out and glued the side sections down, making sure that the fan section folded up neatly when the card was closed.

Glue the sentiment section onto the back panel of the inside of card and attach the small butterflies onto the fan pieces making sure that the card will still fold shut and they don't interfere with each other. Inside of card is finished.

Now for the card wrap:

Fold the white card piece around the closed card and glue the ends together so they sit at the front of the card (make sure that it will slide on and off easily, but not fall off).

Using dimensionals attach the circle topper, hiding the ends that have been glued together, and then again using dimensionals attach the larger butterfly and add a blue pearl to it. The card is complete.

Hope you enjoyed the project and managed to follow the instructions.

Huge Crafty Hugs

Natalie xx


 Product List

Paper Trimmer
[152392]
£23.00