I wanted to come on today and share a card I've made with a fanfold in the middle and using the delightful Butterfly brilliance bundle, I'm loving this set the butterflies are just so beautiful, unfortunately the exquisite papers that went with this set have sold out, but I wanted to show you that the butterflies are still beautiful to use. I've paired them up for this card with some of the gorgeous Hydrangea hill dsp using the reverse side of the papers and having the lovely seaside spray colour showing, which unfortunately is going to be retiring 3rd may (seaside spray not paper).
So let's begin and make the card........
Materials needed:
Basic thick white card
1pc - 14.5cm x 20cm scored at 5cm from both sides - gatefold card base
Basic white card
1 piece - 4.5Cm x 13.5cm - inside of card
1 piece - 4.5cm long enough to wrap around the folded shut card and overlap to glue
Scrap pieces for the stamping and die cutting of 4 small and 1 larger butterfly
2pieces - approx 8cm x 8cm to die cut 2 circles card wrap
Seasidespray card
2 pieces - approx 4.2cm x 14.2cm for side embossed panels
1 piece - approx 9.7cm x 14.2cm for back of card panel
1 piece - approx 8cm x 8cm for scallop circle card wrap
Scrap pieces to die cut 2 small detail and 1 larger detail butterfly
Hydrangea hill dsp
1 piece - 14cm x 20cm for the inside folded section
Wink of stella glitter brush
Seaside spray ink
Sponge daubers
Pastel pearls
Card Instructions
Fold and burnish the white card base. Dry emboss the seaside spray side panels using the Ornate floral 3D embossing folder. Attach these panels to the side sections of the card front using glue and then attach the other seaside spray piece of card to the back of the card base.
Stamp and die cut all of the butterflies that are needed for both the inside and the card wrap. On the stamped butterflies using a sponge dauber and a small amount of ink from the ink pad blend it out from the body to the wings, this is very subtle. The smaller stamped butterflies I've added some wink of stella onto them to give them a lovely, but slight glimmer. On 2 of the smaller butterflies and the larger one attach the detail die cut butterflies by applying glue to the body only. Leaves these all to one side to dry off completely.
Die cut all of the circles needed and glue them all together flat, having already stamped the sentiment onto the smallest white circle.
Stamp the sentiment onto the inside of card white piece of card.
Now for the inner fanfold section:
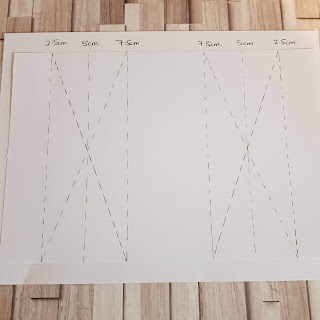
Score the dsp as in the diagram, don't burnish it just use your finger to crease it, or the paper might crack and look horrible. The straight creases are going to be valley folds and the diagonal creases will be mountain folds, the dsp should just fall into place.
I marked the inside back of the card to make sure the dsp layed centrally, I marked in from both sides at 2.5cm top and bottom, then I glued the centre part down flat. I then flattened the dsp out and glued the side sections down, making sure that the fan section folded up neatly when the card was closed.
Glue the sentiment section onto the back panel of the inside of card and attach the small butterflies onto the fan pieces making sure that the card will still fold shut and they don't interfere with each other. Inside of card is finished.
Now for the card wrap:
Fold the white card piece around the closed card and glue the ends together so they sit at the front of the card (make sure that it will slide on and off easily, but not fall off).
Using dimensionals attach the circle topper, hiding the ends that have been glued together, and then again using dimensionals attach the larger butterfly and add a blue pearl to it. The card is complete.
Hope you enjoyed the project and managed to follow the instructions.
Huge Crafty Hugs
Natalie xx
Product List


This is beautiful Natalie xx
ReplyDeleteThankyou so much Victoria I loved making this one the butterflies are just so gorgeous I don't think you always need alot to go with them x Natalie
DeleteAbsolutely gorgeous card, love this fun fold, so delicate with the floating flutterby's. Many thanks for sharing :) x
ReplyDeleteAwww thankyou Anne I love to make and share it's such a great feeling being able to share all that we make and it certainly keeps me going too x Natalie
Delete