About Me

My photo
My name is Natalie and I love anything to do with card/paper. I have been a papercrafter for many years now and I never get bored playing with all the wonderful products available. I've been married to my wonderful husband Nathan for 35years now and we are still very much in love with each other as the first day we met each other. We have 3 wonderful children and 5 gorgeous grandchildren so we have lots to be thankful for. Since joining Stampin' Up! in 2018 I've grown so much in confidence with myself and I even tackle technology, which for me is a huge step to have taken, but I'm getting there slowly.

Tuesday 26 April 2022

SUOC#300 - Focus on sentiments


Hello again all and welcome to another SUOChallenge. Can you believe it is the 300th challenge this week which is amazing, to think this has been going for so long, having seen so many of all of the wonderful creations that everyone has created and shared along the way, I'm so lucky to be part of the amazing design team who all make such wonderful creations, giving so much inspiration to all and this is all thanks to the amzing Cindy Blancett Coutts who has been sorting out all of the wonderful challenges for us all to participate in, so I'd like to take this time to shout out a huge THANKYOU to Cindy for all of her amazing hard work in doing this, such dedication thankyou x


Now for this weeks challenge where the theme is - Focus on sentiments. I chose to use one of my favourite sentiment stampsets - 'Biggest wish' and I'm so pleased to see it carry over to the new catalogue that launches on the 3rd May, so excited can't wait to share some new products with you all............

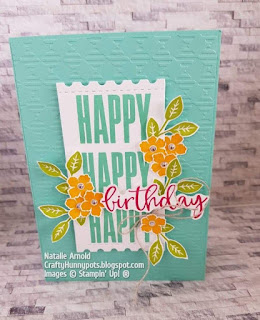
For my card I used Coastal cabana cardstock - 14.8cm x 21cm scored in half at 10.5cm and then cut myself another piece 10.2cm x 14.5cm and embossed this through my die cutting machine using the 'Gingham' EF, this was then added to the front of the card using glue.
I then die cut myself the largest ticket from the 'Sports event' dies from the mini catalogue, this had three of the 'HAPPY' stamped onto it, from the 'Biggest wish' stampset, using coastal cabana ink. The birthday was stamped using Magenta Madness ink and then fussy cut out using my snips and added to the ticket using dimensionals.
The leaves were from the 'Lovely you' stampset, which is another set that I was pleased to see carrying over, using Granny Apple Green ink and fussy cut out. The flowers from the same stampset were stamped using Mango Melody ink all of these were added to the ticket using glue dots. 
The whole ticket was then added to the front of the card base using dimensionals, I did  add another 2 dimensionals stuck on top of each other to the underside of my over hanging section of  'birthday' so that it balanced it up. A linen bow was then added using a glue dot. And to finish the card off I added some of the rhinestones to the centres of each flower.


I loved how all of these colours looked together, and being from the same colour collection always seems to work. That is what's great about Stampin' Up! everything co-ordinates so well together.

Well I hope you enjoyed todays project, please do pop over to the SUOC#300 and see what all the other design team have for your inspiration, and maybe even join in with the challenge yourself, I'd love to see what you create.

Until next time
Huge Crafty Hugs
 Natalie x

MN3KKHYB
Please remember to use this Host code for April if you live in the UK and shop with myself on line to recieve a small thankyou gift the following month from me x


Product List
Linen Thread
[104199]
£4.75
Paper Trimmer
[152392]
£23.00
Paper Snips
[103579]
£9.25

Tuesday 19 April 2022

Craftalong tuesday - Beautiful shapes fun fold card


Hi everyone, and welcome back to the second card using the 'Beautiful shapes' dies. I've been having so much fun creating with these dies and I hope you have fun today creating this weeks make with me. So let's crack on and see what we have this week, by the way it's a really fancy fun fold we're making today which I first saw when I attended a zoom class with my dear friend Anne Ronsky, so thankyou Anne you're such an inspiration to me!

Materials
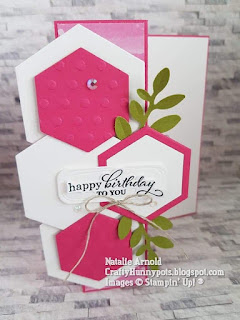
Melon mambo card - 14.8cm x 21cm scored at 4cm and 10.5cm for the card base
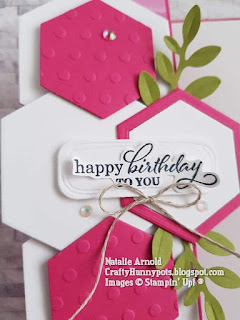
Melon mambo card - 2 x 3rd largest hexagon (embossed with the dots folder),2 x 2nd largest hexagon/one with middle cut out using 3rd largest hexagon to form a frame, 3 x largest hexagon.
Basic white card - 10.2cm x 14.5cm for the inside panel
Basic white card - scrap pieces for 1 x 3rd largest hexagons, sentiment topper + sentiment
Abstract beauty dsp - 3.7cm x 14.5cm for the front side panel
Basic white thick card - 3 x largest hexagon 
Old Olive card - scrap to punch 2 x leaves
Linen thread - tie a bow
Irredescent rhinestones - 3 x for front of card

Tools
Beautiful Shapes dies
Checks & dots EF 
Abstract beauty dsp
Tuxedo black memento ink pad
Bough punch
Paper trimmer
Best year cling stampset
Mini Stampin' cut & emboss machine
Paper snips

Adhesives
Multipurpose Liquid glue
Stampin'dimensionals
Mini glue dots

Instructions
1. Fold and burnish the card base. Fold in half as normal and then fold the 4cm crease back onto itself so you end up with a zig zag sort of shape.
2. Attach the inside panel, and the front side panel to the card using glue.
3. After having die cut all of the different hexagon shapes needed, glue the 2nd largest melon mambo and the frame hexagon together and then glue the 3rd largest white one into the frame section. Glue all of the largest melon mambo to the largest white hexagons, making sure you glue both the reverse sides together as this gives a nicer finish from the back of the card, having the right sides facing out.
4. Glue 2 of the largest white hexagons to the front side panel, lining them up with the edges of the dsp.

5. Attach the 3rd of the largest white hexagons using dimensionals, this is placed centrally over the other 2 already attached just higher up so that it lies flush with the side of the card.  
This is how it should look on the side of the card.

6. The 2 hexagons that have the embossed dots on them are attached using dimensionals on the section that over hangs and glue on the section that lies flush onto the white hexagons.
7. The frame hexagon is attached so that it hangs over the edge using glue on the section that sits flush and dimenionals on the over hang (be careful not apply anything to the section that is hanging over the edge of the card).

The leaves are attached with glue and tucked under the frame hexagon hanging over the edge of the card.

8. Die cut the label for adding the sentiment to by making it a bit longer than it actually is, this is really easy to do by just moving the die along and not die cutting the whole shape in one. 

Cut part of it, slide the die up and then just cut part of it again so that the 2 parts cut meet in the middle.

9. Stamp the sentiment and then fussy cut out using paper snips, attach to the label with glue. Attach to the card front using dimensionals.
10. Attach the bow using a glue dot and finish the card off by adding some of the irredescent rhinestones.
I finshed my card off with another sentiment inside the card, this doesn't show whilst the card is shut but once opened it's revealed to the recipient.

Well I hope you enjoyed todays card, and it wasn't too complicatied for you to follow, it's actually a very easy card to assemble, it's just not easy writing the instructions for it lol.

Huge Crafty Hugs 
Natalie x

MN3KKHYB
Please use this code for April if shopping with me through my on line shop and you live in the UK to receive a small thankyou the following month from me x


 Product List

Linen Thread
[104199]
£4.75
Bough Punch
[157711]
£17.00
Paper Trimmer
[152392]
£23.00
Paper Snips
[103579]
£9.25


Wednesday 13 April 2022

The Stamping Cove Challenge - Spring is in the air


Hi everyone and welcome to another Stamping cove challenge. This time the challenge was to make something with the theme being 'Spring is in the air', and I just couldn't resist making a card using the daffodil dies, but, making snowdrops with them instead! I don't know about you but I do like to get as much use out of a set of dies as I can, and once I realised the bud die within this set of dies was perfect for making snowdrops, my spring card was in the making!
So let's have a look and see how I did it..........

1. Cut a card base from the evening evergreen CS 10" x 5" score in half to make a 5" x 5" side opening square card base.
2. Cut 2 pieces of the basic white CS 4 7/8" x 4 7/8" and attach to the inside and front of the card base, flat using glue.
3. Cut  a piece of the evening evergreen patterned paper, from the new horizons papers  4 1/4" x 4 1/4" and attach this to the centre front of the card, flat using glue.
4. Cut a piece of basic white CS 4 1/8" x 4 1/8" die cut a circle out more to the top section of it but making sure it is central for the sides, emboss this using the Gingham EF. Now out of evening evergreen CS cut a circle the same size as the one already cut out, but at the same time cut the outer scalloped edge, this gives you a frame like piece to attach around the already cut out circle on the white piece of embossed CS. Attach this using glue. 5. Attach a length of the ribbon to the layer at the base using tear n tape on the reverse side to hold it in place. Tie a knot onto the front using another piece of the ribbon.
6. Die cut 5 of the daffodil buds using basic white CS and 1 of the bud top layer. Attach the top layer onto one of the bud pieces using glue. Glue the other 4 bud pieces together in pairs.


7. Die cut some of the leaves, 3 of the stems and 2 of the top layer pieces for the daffodil petals, from evening evergreen CS. Cut and piece together as per the diagram above. Apply dimensionals onto the reverse side of each of the bud pieces and attach them one each onto a stem. Cut the stems and the leaves to be the length required and attach to the reverse side of the circle apperture. Attach dimensionals to the backs of the flowers and the whole of the layer. Adhere to the front of the card centrally onto the paper layer.


8. Stamp the words, I used the 'Happy' from the Daffodil Daydream stampset and the 'Spring' from the Easter friends stampset (but you could use whatever you have), using the black memento ink and then fussy cut each word out that is needed. Attach these using a dimensional off to the one side. I then finished my card off by attaching a few of the pearl jewels.

Hope you enjoyed todays project, I really enjoyed making this one, I love seeing the snowdrops popping their little heads above ground, it just let's us know that spring is really on the way 😊 and what a beautiful time of the year spring is too!
Don't forget to pop over to 'The Stamping Cove' over on facebook to grab some inspiration from all of the lovely cards that the ladies are showing throughout the month of April.

Until next time
Huge Crafty Hugs
Natalie xx

Host code for April

MN3KKHYB

Please use this code if shopping with me on line and you live in the UK to receive a small gift from me the following month x


Product List
Paper Trimmer
[152392]
£23.00
Paper Snips
[103579]
£9.25