

Hi everyone, and welcome back to the second card using the 'Beautiful shapes' dies. I've been having so much fun creating with these dies and I hope you have fun today creating this weeks make with me. So let's crack on and see what we have this week, by the way it's a really fancy fun fold we're making today which I first saw when I attended a zoom class with my dear friend Anne Ronsky, so thankyou Anne you're such an inspiration to me!
Materials
Melon mambo card - 14.8cm x 21cm scored at 4cm and 10.5cm for the card base
Melon mambo card - 2 x 3rd largest hexagon (embossed with the dots folder),2 x 2nd largest hexagon/one with middle cut out using 3rd largest hexagon to form a frame, 3 x largest hexagon.
Basic white card - 10.2cm x 14.5cm for the inside panel
Basic white card - scrap pieces for 1 x 3rd largest hexagons, sentiment topper + sentiment
Abstract beauty dsp - 3.7cm x 14.5cm for the front side panel
Basic white thick card - 3 x largest hexagon
Old Olive card - scrap to punch 2 x leaves
Linen thread - tie a bow
Irredescent rhinestones - 3 x for front of card
Tools
Beautiful Shapes dies
Checks & dots EF
Abstract beauty dsp
Tuxedo black memento ink pad
Bough punch
Paper trimmer
Best year cling stampset
Mini Stampin' cut & emboss machine
Paper snips
Adhesives
Multipurpose Liquid glue
Stampin'dimensionals
Mini glue dots
Instructions
1. Fold and burnish the card base. Fold in half as normal and then fold the 4cm crease back onto itself so you end up with a zig zag sort of shape.
2. Attach the inside panel, and the front side panel to the card using glue.
3. After having die cut all of the different hexagon shapes needed, glue the 2nd largest melon mambo and the frame hexagon together and then glue the 3rd largest white one into the frame section. Glue all of the largest melon mambo to the largest white hexagons, making sure you glue both the reverse sides together as this gives a nicer finish from the back of the card, having the right sides facing out.
4. Glue 2 of the largest white hexagons to the front side panel, lining them up with the edges of the dsp.

5. Attach the 3rd of the largest white hexagons using dimensionals, this is placed centrally over the other 2 already attached just higher up so that it lies flush with the side of the card. 
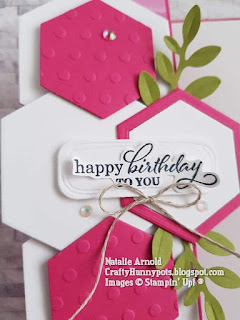


This is how it should look on the side of the card.
6. The 2 hexagons that have the embossed dots on them are attached using dimensionals on the section that over hangs and glue on the section that lies flush onto the white hexagons.
7. The frame hexagon is attached so that it hangs over the edge using glue on the section that sits flush and dimenionals on the over hang (be careful not apply anything to the section that is hanging over the edge of the card).

The leaves are attached with glue and tucked under the frame hexagon hanging over the edge of the card.
8. Die cut the label for adding the sentiment to by making it a bit longer than it actually is, this is really easy to do by just moving the die along and not die cutting the whole shape in one.

Cut part of it, slide the die up and then just cut part of it again so that the 2 parts cut meet in the middle.
9. Stamp the sentiment and then fussy cut out using paper snips, attach to the label with glue. Attach to the card front using dimensionals.
10. Attach the bow using a glue dot and finish the card off by adding some of the irredescent rhinestones.

I finshed my card off with another sentiment inside the card, this doesn't show whilst the card is shut but once opened it's revealed to the recipient.
Well I hope you enjoyed todays card, and it wasn't too complicatied for you to follow, it's actually a very easy card to assemble, it's just not easy writing the instructions for it lol.
Huge Crafty Hugs
Natalie x
MN3KKHYB
Please use this code for April if shopping with me through my on line shop and you live in the UK to receive a small thankyou the following month from me x
Product List
 | ||
 |  | |
 |  |  |
 |  |  |
 |  | |
 |  |  |

 Specialty Designer Series Paper")

")


Wowzer, fabulous bright and cheerful card, Natalie, love these colours and shapes, plus you can't go wrong with a lovely fun fold, many thanks for sharing ;) x
ReplyDelete