

Hi everyone it's time for another SUOChallenge and this time the challenge was - Plants & Gardening. I absolutely love the 'Blessings of Home' bundle and so therefore I just had to use for this challenge.
I chose to use the single flower image for my card, I just love the detail to the images in this stampset they're just so beautiful, and it was such a quick card to make too, so let's see how I created it.................
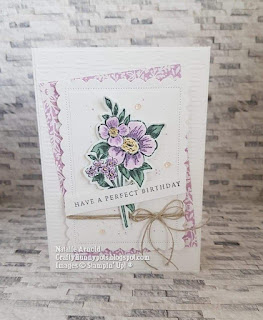
1. Cut a piece of thick basic white cardstock - 14.8cm x 21cm score in half at 10.5cm this is the card base.
2. Cut 2 pieces of basic white cardstock - 10.2cm x 14.5cm one of them attach flat to the inside of the card using glue. The other piece emboss using the Gingham EF and then attach to the front of the card flat.
3. Cut a piece of the heart & home dsp - 8.5cm x 12cm attach to the front of the card flat using glue, laying it at an angle so that it pops out from behind the layers.
4. Die cut the scalloped edged rectangle from the Scalloped contour dies, using basic white cardstock. Cut a piece of the same cardstock - 6.5cm x 9.8cm and with the dark fresh freesia blend flick some of the ink onto it with the brush end, attach this flat to the die cut rectangle using glue.
5. Wrap some of the linen thread around the rectangle and tie in a knot at the front. Tie a further piece of the thread into a bow and attach to the rectangle using glue dots.
6. Attach the rectangle layer to the front of the card using dimensionals, this is laying straight on the card front allowing the dsp to show underneath.
7. Stamp the flower image, one whole and one with the smaller large flower image being inked, using memento black ink and colour in with the stamping blends (I added light pool party around the edges to give a bit of depth to the flower). Die cut the whole flower out and fussy cut the smaller large flower out, this can then be added onto the whole image with glue just in the centre, it doesn't want to be glued down flat, this creates a bit of depth. Attach the flower to the card front using dimensionals.

8. Stamp the sentiment using memento black ink and cut to the size required, this is then attached to the card front across the flower using dimensionals where needed.
9. Finally to finish the card off add a few of the pink polished dots.
I love the this flower I think it makes a pretty card and doesn't need much else on with it, making it a quick and simple card to create!
Until next time
Huge Crafty Hugs
Natalie x
Please remember if shopping with myself on line and you live in the UK to use the current Host Code for that month as this will enable me to send you a small gift the following month 😊 x
G74SAESF
March Host Code
Product List
") |  |  |
 |  | |
 | ||
 |  |  |
 |  |  |
 |  |
 Designer Series Paper")


Natalie, love this beautiful delicate card in soft pastels colours, great layout with lots of details, many thanks sharing :) x
ReplyDeleteThankyou Anne for your lovely comment it's my pleasure to share with everyone what I create so glad you lik it x Natalie
Delete