

Well it's time for another Stampin' Up! only challenge (SUOC#290) and I'm so excited, as it's another christmas inspiration theme.... yayyyyy love it!

I'm just loving these trees! They're so great to create with.
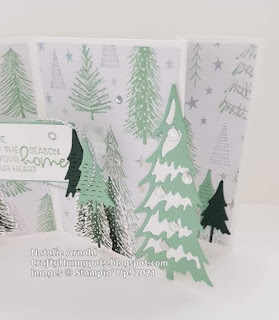
This time I've made a card that folds flat at the sides and then fits into a DL envelope. I love to try and make different shapes, sometimes they work 😊 and sometimes not! This was actually meant to fit into a C6 envelope, but then I realised the trees stuck out too far 😕, but all was not lost as it fits into the DL so I'm happy with it......
Let's see just how I made it, and if you want it to fit a C6 maybe attach the trees further inside! After you've had a look at my post, please do hop over to the SUOC#290and have a look at all the other design team members makes, and maybe you'd like join in with the challenge yourself, we all love seeing what you all create!
I started with a piece of Basic White cardstock that measured 10.5cm x 29.6cm and along the long edge I scored it at 3.7cm, 7.4cm and 14.8cm I then turned it round and scored from the other end at 3.7cm and 7.4cm. This was then folded and burnished using a bone folder, valley fold, mountain fold, valley fold and so on.
I then cut myself 2 pieces of the Whimsy and Wonder papers, same pattern just used both sides, these measured 10cm by the whole length of the paper (12"). Then I cut it into pieces, cutting them as you go so that the pattern flows - 3.2cm, 3.2cm, 6.9cm. 6.9cm, 3.2cm and 3.2cm there will be a small piece leftover. These were then glued onto the front and back of the card, following the pattern as you go.

Reverse of the card and other side of the paper.
I then die cut the large trees out, using the Christmas tree dies, these I glued onto white card and then cut around the edges (just wanted the trees to be filled in and not seen through). These were then glued onto the card front with them hanging over the edge.

Glue them further in if you wish to use a C6 envelope!
I cut myself a piece of the window sheet - 1.5cm x 9.5cm and scored each end on the longside at 1cm. I marked where the centre of the length was, placed tear and tape onto the reverse of the tabs and then attached to the card, making sure the centre mark lined up with the middle score line of the card. This will fold flat when card flattened for putting into the envelope, but it will bow out when card is open. The sentiment was stamped using Mint Macaron ink, cut to the size required, glued flat to a slightly larger piece of Mint Macaron card, and then it was attached to the window sheet piece by placing a dimensional in the centre.
Baubles and small stars were die cut out and attached to the trees and card front. All of the different colour trees were die cut out and glued into place. The stamped trees were stamped using Evening Evergreen ink and then die cut out. These were attached to the middle of the card, on each side using glue for 2 and dimensionals for 1.
With my pokey tool I attached a couple of glue dots to the back of the window sheet piece, behind the sentiment, this then had one end of my silver trim attached to it, I wrapped the rest around the sentiment and tied the other end in a bow, attaching to the trees, that have been attached, with another glue dot. The glue dots on the back of the sentiment were then covered with a scrap of white card, this will prevent them getting stuck to the card when folding it.
Rhinestones were then added to the card to finish it off.

I love how it looks when finished, and like I said, it wasn't really the size I wanted, but all was resolved in the end 😊.
Hope you enjoyed todays project, and maybe you might give it a go yourself ?
Until next time
Huge Crafty Hugs
Natalie x
Product List
") |  | |
 |  |  |
 |  |  |
 |  |  |
 |  | |
 | ||
 |
 Specialty Designer Series Paper")


 Specialty Pack")


I am amazed at how many wonderful ideas you come up with, such a talented lady x
ReplyDelete