About Me

My photo
My name is Natalie and I love anything to do with card/paper. I have been a papercrafter for many years now and I never get bored playing with all the wonderful products available. I've been married to my wonderful husband Nathan for 35years now and we are still very much in love with each other as the first day we met each other. We have 3 wonderful children and 5 gorgeous grandchildren so we have lots to be thankful for. Since joining Stampin' Up! in 2018 I've grown so much in confidence with myself and I even tackle technology, which for me is a huge step to have taken, but I'm getting there slowly.

Wednesday, 17 November 2021

Creative Colour Challenge#11 - Stitched snowflakes


Hi everyone and welcome to another Creative Colour Challenge and for this weeks CCC#11 the colours are as shown below.


click on the above image to see how you too can join in with the challenge!

I've made my card for the challenge today using my new favourite - for now anyway 😂,  'Stitched snowflakes', I'm loving these dies and the stamps that go with them are just wonderful to use. So let's see how I made it!

I started with a side opening white card base, which I glued a white layer to the inside and set aside.
The layer for the front of the card measured 10.2cm x 14.5cm (the inside layer is the same size), I cut 2 of these layers for the front of the card, one I set aside and the other I stamped lots of the snowflake images onto using the Night of Navy and Fresh Freesia inks. Once the ink was dry I then cut myself 5 strips that measured 2.7cm x 10.2cm, there is a small piece leftover that isn't needed. I then glued all of these pieces onto the other layer that I set aside making sure they have equal gaps in between them, the easiest way I found to do this is to glue the two ends on first, these need to be glued flush with the edges, then I glued the middle piece into place, followed by the two inner pieces, the whole time I made sure that I kept them in pattern order. This layer was then glued flat to the front of the card base.
I then die cut some of the stitched snowflakes out and attached them to the front of the card, some flat, the others on a mini dimensional.
The sentiment was stamped using the Evening Evergreen ink and then fussy cut out. Mini dimensionals were attached to the back, I had them doubled up for the depth and this was then attached to the card front. 
The last thing I did was to place some of the rhinestones on to the snowflakes and the card was finished. Simple, quick but such fun to make, and as you can see I made another one this time adding some ribbon, coloured in with my stamping blends to match the colour challenge.


Hope you enjoyed todays make and maybe you'll find time to hop over to the CCC#11 and join in with the fun!

Until next time
Huge Crafty Hugs
Natalie x


 Product List

Paper Trimmer
[152392]
£23.00


Tuesday, 16 November 2021

Craftalong Tuesday - Stitched snowflakes/part 1


Good morning to you all, and welcome to another fun Craftalong tuesday, where today I have a card which I had so much fun creating, I hope you enjoy making it too!
I've used the beautifully, exquisite bundle called 'Merry snowflakes' . The dies in this bundle are so beautiful and the sentiments within the stampset are also delightful.

I'm going to just say that when I made this card, after die cutting my circle out, I just had to use it on another card which is going to follow next week as Part 2, so don't lose it when you've cut it out!

For this card you will need 2 pieces of thick basic white cardstock that measure 10.5cm x 16.5cm. On both pieces, and on both sides of the longside score at 1.5cm and 3cm this leaves an area in the middle that then measures 10.5cm x 10.5cm. Fold and burnish with your bone folder so that you form a valley then a mountain.

this is how the card will look from above once glued together, this is done once the decorating of the card has been done.

On one of the pieces you will need to attach a piece of the exquisite Whimsy & Wonder paper, which measures 10cm x 10cm to the front, once the glue is dry you then need to die cut the largest of the plain circle dies within the 'Layering circles' dies out in the middle, this gives you the see through piece on the front of the card, know as an apperture (do not lose this circle it's needed for next weeks craftalong).
Now you will need to use another piece of paper, same size, I've used the reverse side of my front piece as it just looks so lovely together, and this is glued flat to the other white card piece, this will become the inside of your card.
Three of the die cut snowflakes, which I've die cut out using basic white, mint macaron and silver foil are attached to the inside section of the card, I've glued 2 and used a dimensional for the third one.


The other snowflakes are then attached to the front section of the card, again using glue for some and dimensionals for others.


The sentiment I've inked with Mint Macaron ink and then placed a small amount of glue either end and attached across the apperture. I then coloured my glittered organdy ribbon with a Mint macaron stampin' blend pen and left to dry for a while before tying it into a double bow and attaching to the card front suing glue dots to do so. I added 3 of my Mint Macaron Genial gems onto the centres of all 3 white snowflakes.
The last thing left to do for this card was to attach both of the pieces together using wet glue, you can see from the picture above which sections are glued together. The card should fold reasonably flat to fit in an envelope.

Well I hope you enjoyed the card we made today, as I said I had such fun creating it and I'm hoping you have as much fun re creating with your pieces.

Until next time
Huge Crafty Hugs
Natalie x

Don't forget to pop back next week and see what we will be making with the die cut circle!

  Product List

Genial Gems
[155500]
£7.50
Paper Trimmer
[152392]
£23.00


Friday, 12 November 2021

Evergreen border snowflake lantern


Something a little bit different for you today. Now I made this and showed on my facebook page and had a request from a lovely lady called Sarah Carlyon to do a tutorial for it, now for those of you that know me you can imagine the panic that set in 😓 lol......... I can't do a video, I'm just not confident enough, so I thought how about a blog post with lots of pics on, and here we are, just for you Sarah!!!

You start off with a piece of vellum cardstock that measures 11.5cm x 21.2cm this is wrapped into a tube and glued together using double sided tape, the tear & tape is good you just need to cut it in half so the strip you use is very thin.


This seam of glue will be at the back of your finished lantern and once decorated you will hardly notice it.

You will now need to die cut yourself 2 circles these are the 2nd and 3rd largest dies in the set - the largest of the two will become the base of your lantern and the other one will act like a shelf inside for the battery operated tea light to stand on.

Cut yourself a piece of basic white cardstock that measures 3.6cm x 21.5cm score along the short edge at 0.5cm, fold and burnish and then cut the 0.5cm section into small tabs.


Along the scored edge you will apply tear & tape, this is then attached to the base of the vellum tube, having the tabs so they tuck over the end, this will allow, when ready the base circle to be attached by placing glue onto the tabs. Make sure that all of your joins meet at the back, so that all the joins don't show.

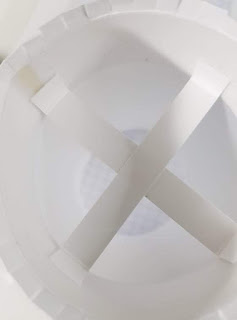
Cut yourself 2 pieces of basic white cardstock that measure 1cm x 8.5cm and score both ends of the long side at 1cm. These now need to be glued together to form a cross shape. 


This is now glued inside the lantern, you will need to go in from the bottom end, which is the end with the white card section with all the tabs on, and it needs to go in the way it is in the picture above. Place glue onto the 4 tabs and attach them to the inside of the vellum, so that they are level with the top of the card, this way they won't show through the vellum from the outside.


This is what it will look like from the bottom once glued in place.


This is what it will look like from the top, you now need to glue the smaller of the 2 die cut circles onto the cross like shelf, I applied glue onto the circle in a cross shape and then attached it.


The large die cut circle can now be glued into place at the base of your lantern, by glueing the tabs and then attaching the circle to it. You might need to fiddle around a bit to get it to sit centrally.


You will now need to cut yourself a border of the Evergreen trees and attach them to outside of the lantern, just above the white card that is attached all the way around, I used glue dots to attach mine, only on a few of the trees you don't need to glue all of them, but you do need to remember to have the ends meeting at the back!

Now you can tie a length of the organdy white ribbon around the lantern, this covers up where the trees meet the top of the white card section, tie in a knot, having this at the front opposite the back seam of the lantern. Tie a seperate bow and attach it to the knot part using glue dots and glue.


All that remains to be done then is to decorate your lantern, I've used die cut snowflakes in white and silver, these are attached with glue dots or glue and then on the silver ones I added some of the gorgeous Garden gems, I then put some more of the gems straight onto the lantern.


Place a battery operated tea light, NEVER a real candle, inside your lantern and voila! See how pretty it looks when lit up!

Hope these instructions were ok for you Sarah and hopefully you and everyone else will have lots of fun making some of these cute little lights for christmas!

Until next time everyone
Huge crafty Hugs
Natalie x


Product List

Paper Trimmer
[152392]
£23.00
Garden Gems
[159277]
£6.50