About Me

My photo
My name is Natalie and I love anything to do with card/paper. I have been a papercrafter for many years now and I never get bored playing with all the wonderful products available. I've been married to my wonderful husband Nathan for 35years now and we are still very much in love with each other as the first day we met each other. We have 3 wonderful children and 5 gorgeous grandchildren so we have lots to be thankful for. Since joining Stampin' Up! in 2018 I've grown so much in confidence with myself and I even tackle technology, which for me is a huge step to have taken, but I'm getting there slowly.

Tuesday, 4 January 2022

SUOC#292 - Designers Choice


Hi everyone and a Happy New Year to you all. I hope you've all had a wonderful christmas and we all have a great 2022! It's time for another SUOchallenge and the theme for this time was - Designers choice, which means we can use whatever takes our fancy, along as it's Stampin' Up! products yayyyyy...........


Today sees the launch of the new Jan - June mini catalogue and I'm so excited to be using one of the new bundles called - Honeybee Home, which you can find on page 59 of the new catalogue.......... If you live in the UK and don't already have a demonstrator and you'd like to get your hands on one of the new catalogues, then get in touch with me and I'll be very happy to send you one.
This new bundle is so pretty, when I first saw it in the catalogue I thought I would definitely need to get this one, I fell in love with it straight away!
The card I made is a relatively simple one to create. I've inked the white background using a blending brush and the Misty moonlight ink, blending a light coating in the middle and then flicking some of the ink from the dark Misty moonlight stampin blend all over the card layer before attaching it to a piece of Misty moonlight card stock. This is then attached flat to the front a Basic white card base.
I stamped a few of the flower images onto the card front, using Misty moonlight ink, and a couple onto scrap card pieces, these I coloured in using the watercolour pencils and then die cut out using the matching die within the bundle. These were then glued onto th card base front.
Using the Tailor made tags dies, I die cut the largest one out, attached a piece of the denim ribbon onto it,  using a stapler, this was then attached to the front of the card base using diemensionals.
The foilage was die cut out using the misty moonlight and basic white card stock, tied at the base using some of the linen thread and attached to the tag using dimensionals. I then tied a small bow out of the same thread and attached it using a glue dot. 
The bumble bee, which I think is really cute and by the way there are actually 3 different bee stamps within this gorgeous stampset, was stamped using black memento ink, and coloured in again using the watercolour pencils before I die cut it out and attachd to the card front using a dimensional.
The classic matt dots were coloured in using my dark Misty moonlight stampin blend and then placed randomnly onto the card front.
All that remained to be done then was to stamp my sentiment, using Misty moonlight ink and fussy cutting the words out before attaching to the card front using glue.
I loved how quickly this card came together and how it looked at the end. I hope you like it, and I hope you find time to hop on over and see what all of the other designers have made for you to see over on the SUOC#292 I'm sure you'll find lots of inspiration and hopefully you'll even join in with the challenge yourself, we love seeing your creations. 

Until next time
Huge Crafty Hugs
Natalie x


 Product List

Linen Thread
[104199]
£4.75
Paper Trimmer
[152392]
£23.00


Tuesday, 21 December 2021

SUOC# 291 - Celebrations


Hi everyone, it's time for another Stampin' Up! only challenge (SUOC#291) and this week the theme is Celebrations!
 Now I chose to use the amazing Eden's Garden bundle for my card this week. This bundle is an early release from the NEW soon to be released January - June mini catalogue, I'm so excited and can't wait for you all to get your hands on a copy of it, so if you live in the UK and don't already have a demonstrator, but you'd like a copy of the catalogue then please do get in touch and I'd be more than happy to send you a copy.

This is a very simple stamping card but I love the images and the colours are just beautiful together!


I chose to use some of my favourite colours  for this card - Bermuda Bay, Pear Pizzazz, Pool Party and Soft Seafoam, I just love mixing these colours on a project, I think they look amazing together - what do you think?

I used a Basic White thick card base that measures 14.8cm x 21cm scored at 10.5cm, then I added a slightly smaller layer of Pear Pizzazz cardstock onto the front of the card and a Basic White layer to the inside.
For the main focal piece of my card I took a piece of the Basic White cardstock approx 9.9cm x 14.2cm and in the middle of it I stamped some of the leaf and foilage images using Pool Party, Pear Pizzaz and Soft Seafoam ink pads, then using the Bermuda Bay ink pad I stamped around the edges and in the corners using second generation ink, this gives a softer look to the image, I then took my Light Bermuda Bay blending pen and flicked some of the ink onto the whole of the card piece, this gives a really subtle depth to the whole layer. This piece was then attached flat to the card front using glue. 


The flower that has been stamped with Bermuda Bay and fussy cut out is then attached to the front, again using glue, but only a small amount in the middle, this allows you to tuck things underneath it.
Using the Bermuda Bay cardstock I die cut out 3 of the foilage pieces and then attached these, tucking them under the flower using glue. 
For the sentiment I stamped this onto Pear Pizzazz cardstock, using versamark ink and applying white embossing powder onto it, I shook the excess powder of and then heated it up using my heat tool. Once it had cooled down I then cut the sentiment into two seperate pieces, these were attached to the card front using dimensionals. 


The last thing I added to the front of the card were a few of the really pretty Artistry Blooms Adhesive-Backed Sequins 152477 (forgot to add these to the Product list 🙈 ) and that is my card finished.
I love how the sequins make the card almost feel like it's come alive, and these gorgeous images from the Eden's Garden bundle are just so beautiful and great to create with. Please do hop over to the SUOC#291 and see what all of the other design team have made for you to grab yourselves some inspiration, and maybe join in with the challenge yourself,  we would love to see what you create!

 Until next time which will now be in the New Year
Huge Crafty Hugs
Have a great Christmas
Natalie x 

  Product List

Paper Trimmer
[152392]
£23.00
Paper Snips
[103579]
£9.25


Wednesday, 8 December 2021

Blog hop Touches of Ink - Whimsy & Wonder


Hello again and welcome to another Touches of Ink blog hop. We have another Winter/Christmas theme for this month, which really makes me happy, I love this time of year when we can go all out and keep making christmas cards and projects, my favourite makes!

So whether you have just hopped on to my blog from the lovely Simone, whom by the way is the lady that organizes this amazing blog hop every month, or you have just come on to see, a very warm welcome and thankyou!

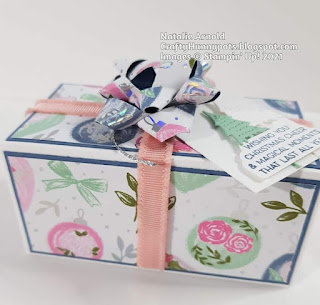
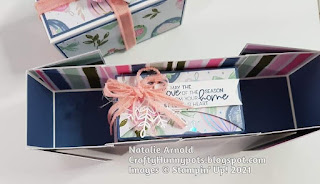
For this months challenge I've made a rather cute box, which has another surprise box inside for you to store some delicious treats. So let's begin ..........


For this box you will need to use 12" x 12" cardstock for the size I've done.
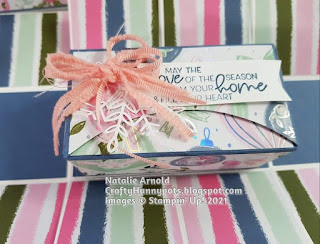
For the lid you need a piece that is 6 1/4" x 8 1/4" and you will score on all 4 sides at  2 1/16" you will then cut this piece, score it and make each corner into a tab, these all get glued to form the lid.


I've cut a small piece off of each tab so that they don't sit on top of each other inside the box lid, they meet in the middle.
 This is then decorated how you like and put to one side. I've used tear and tape to attach ribbon around the lid so that it looks like a wrapped present, constructed a paper bow with strips of the paper and added to the centre using glue dots. The label I attached 2 small die cut trees to and a sentiment stamped in misty moonlight ink, this then had a hole punched through it and a piece of the simple elegant trim attached.

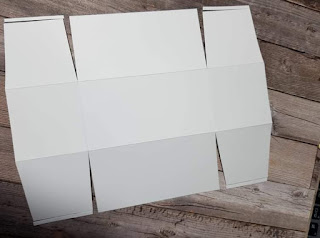
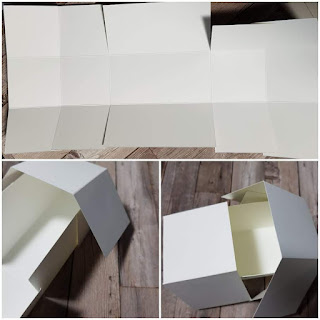
For the base you need a piece that is 6" x 12" and on the 12" side you will score at 2,4, 8 and 10". On the 6" side you will score at 2 and 4". On all of the score lines along the 12" side you need to cut up to the score line that runs along the short side, this is done on both edges of the 12" sides.


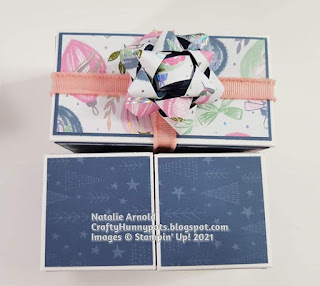
 You will now need to cover all of the sections, I've just used papers on the outside and for the inside I've used papers along all of the flaps, but cardstock for the inside panels.


Each panel is covered, the only one that isn't is the base as this won't be seen. As the panels are all folded in on themselves it's best not to make them bulky, this is why I left mine plain.

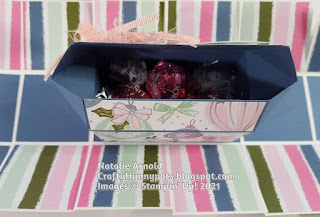
For the box inside I constructed a small box that fitted inside the middle panel, decorated it and popped some delicious treats inside.


For my ribbon I took a length of the really pretty frayed grossgrain ribbon, cut it into 3 long strands and then tied these all together in a bow. I attached half of a snowflake onto my bow with a glue dot, stamped my sentiment, attached this using glue and then attached the bow on top using glue dots.


Strawberries 'n cream lindt chocolates inside and it's ready to gift to someone I love!

Hope you enjoyed the project I made for you today, now please do hop over onto the lovely Karen Egan where on her blog you can see what delights she has waiting for you.

There is a full list of all of the participants in this months blog hop at the end of my blog post!

Until next time
Huge Crafty Hugs 
Natalie xx

 Product List

Paper Trimmer
[152392]
£23.00
Bone Folder
[102300]
£6.50
Paper Snips
[103579]
£9.25


Simone Kleine - derdiedasKleine bastelt

Natalie Arnold (UK) - CraftyHunnypots

Karen Egan (UK) -  Crafty Karen Designs 

Nina Unbehau - Nina’s Kreative Welt

Anja Ehmann - Bastelanja

Liane Gorny - Jungle Cards

Melanie Fischer - MeeFischs Bastelecke

Petra Wittig - Cum Gaudium

Petra Masukowitz - PetMa-Kreativ

Angela Köber - Stempelfamilie