

Good morning all, and welcome to our first craftalong tuesday of October, not sure where September went but there you go!
Today I have a rather lovely pine cone and foilage card for you to have a go at hope you enjoy it and have as much fun making it as I did.
I've used a garden green cardbase and layered it up with a smaller piece of the same colour, after embossing it with the pine embossing folder from the 'Wintry 3D' folders, and I have to say these folders are fast becoming my favourite. This layer is then glued flat to the front of the card base.
I then took another piece in the same colour and the beautiful large foilage detailed die and cut it out, this is then glued to the embossed layer, you only need to put tiny bits of glue here and there, not all over it as you want it to look like its just dropped onto the front rather than squashed flat!. I then did the same with an old olive piece of card, only this time I snipped off pieces of the fern and then using glue just tucked them in here and there, and i must say it does make it look fuller using the two different colours this way.
The next step I did was to die cut some of the gorgeous detailed pine cones using early espresso card and the non detailed were cut using crumb cake, these are then glued together flat, again you only need to use a few tiny bits of glue here and there, and what's great about these cone dies is the base of the two different ones match up completely, so no guessing where they need to sit on each other! (these are from the Christmas to remember bundle along with the foilage die used).
The holly leaves and berries were stamped in the same colour ink as the cardstock and then die cut out (these are from the Christmas season bundle).
I used very vanilla for the lovely tag across the front of the card and stamped a sentiment (from the Christmas to remember bundle) using early espresso ink. To get my gilded leafing on my sentiment I used the broad tip of my tombow glue to swipe small amounts of glue onto the tag, you just need to be able to see the glue and wait for it to go tacky, then the gilded leafing is added and the excess is brushed off, love this effect it adds a lovely touch of gold to your card.
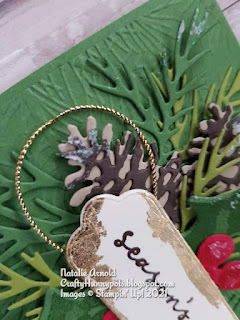
I took my gold twine and using a piece of tear n tape on the centre of my card I wrapped it around until I had a few loops, attaching it to the tape as I went. The tag is then attached using dimensionals and all of the pieces that have been die cut out and glued together are attached to the card front using glue and dimensionals and tucking them under the tag.
The last thing I did using a pallette knife was to gently wipe small amounts of the shimmer paste all over the different foilage pieces, I think this gives them a frosty sort of look adding dimension to an already pretty card.

Hopefully you can see the shimmer paste in the picture it adds a lovely subtle glimmer making the card sparkle like frost in the early morning..........
Hope you enjoyed this weeks card and have fun creating it.
Until next time
Huge Crafty Hugs
Natalie x
OCTOBER HOST CODE
3EDQKF6R
Please use this code if you live in the UK and your order is under £150 and you're shopping with me to receive a small thankyou gift from me the following month x
") |  | |
 |  | |
 |  |  |
 |  | |
 |  |  |
 |  |  |
 |  |  |
 |  |
")


Love the shimmer paste on there, gives a real frosty/snowy look x
ReplyDeleteThanks Debbie it definitely adds that little bit of special to your card x
DeleteAbsolutely gorgeous card, Natalie, love the beautiful dies and shimmer paste, so much detail in this special card, many thanks for sharing :) x
ReplyDeleteMany thanks Anne I loved making this card my favourite cards to make are c
DeleteChristmas so I was in my element x Natalie