
About Me

My photo
My name is Natalie and I love anything to do with card/paper. I have been a papercrafter for many years now and I never get bored playing with all the wonderful products available. I've been married to my wonderful husband Nathan for 35years now and we are still very much in love with each other as the first day we met each other. We have 3 wonderful children and 5 gorgeous grandchildren so we have lots to be thankful for. Since joining Stampin' Up! in 2018 I've grown so much in confidence with myself and I even tackle technology, which for me is a huge step to have taken, but I'm getting there slowly.

Tuesday, 15 March 2022

SUOChallenge#297 - Plants & Gardening


Hi everyone it's time for another SUOChallenge and this time the challenge was -  Plants & Gardening. I absolutely love the 'Blessings of Home' bundle and so therefore I just had to use for this challenge.
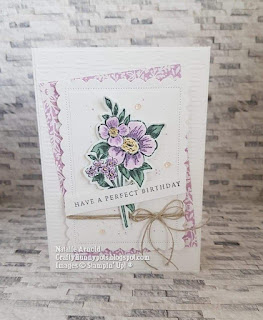

I chose to use the single flower image for my card, I just love the detail to the images in this stampset they're just so beautiful,  and it was such a quick card to make too, so let's see how I created it.................

1. Cut a piece of thick basic white cardstock - 14.8cm x 21cm score in half at 10.5cm this is the card base.
2. Cut 2 pieces of  basic white cardstock - 10.2cm x 14.5cm one of them attach flat to the inside of the card using glue. The other piece emboss using the Gingham EF and then attach to the front of the card flat.
3. Cut a piece of the heart & home dsp - 8.5cm x 12cm attach to the front of the card flat using glue, laying it at an angle so that it pops out from behind the layers.
4. Die cut the scalloped edged rectangle from the Scalloped contour dies, using basic white cardstock. Cut a piece of the same cardstock - 6.5cm x 9.8cm and with the dark fresh freesia blend flick some of the ink onto it with the brush end, attach this flat to the die cut rectangle using glue.
5. Wrap some of the linen thread around the rectangle and tie in a knot at the front. Tie a further piece of the thread into a bow and attach to the rectangle using glue dots.
6. Attach the rectangle layer to the front of the card using dimensionals, this is laying straight on the card front allowing the dsp to show underneath.
7. Stamp the flower image, one whole and one with the smaller large flower image being inked, using memento black ink and colour in with the stamping blends (I added light pool party around the edges to give a bit of depth to the flower). Die cut the whole flower out and fussy cut the smaller large flower out, this can then be added onto the whole image with glue just in the centre, it doesn't want to be glued down flat, this creates a bit of depth. Attach the flower to the card front using dimensionals.


8. Stamp the sentiment using memento black ink and cut to the size required, this is then attached to the card front across the flower using dimensionals where needed.
9. Finally to finish the card off add a few of the pink polished dots.
I love the this flower I think it makes a pretty card and doesn't need much else on with it, making it a quick and simple card to create!

Until next time 
Huge Crafty Hugs
Natalie x

Please remember if shopping with myself on line and you live in the UK to use the current Host Code for that month as this will enable me to send you a small gift the following month 😊 x

G74SAESF
March Host Code

  Product List

Linen Thread
[104199]
£4.75
Paper Trimmer
[152392]
£23.00
Paper Snips
[103579]
£9.25


Craftalong Tuesday - Fun fold thankyou card


Hello again everyone and welcome to another Craftalong tuesday. Today I have a rather lovely fun fold for you all which isn't a difficult one to make, and I think you will be making yourselves many of these using your favourite stampsets. So let's have a look at how I made this weeks card .............

1. Cut a piece of pumpkin pie cardstock - 14.8cm x 21cm and then on the longside score at 4cm and 14.5cm fold and burnish the score lines both the same way so that they meet in the middle. This is the card base.

2. Cut a piece of basic white cardstock - 10.1cm x 14.4cm and attach this to the inside centre panel of the card using glue.

3. Cut a piece of the flowering fields paper - 9.7cm x 14.4cm then along the short side cut at 3.6cm x 14.4cm this leaves a section that measures 6.1cm x 14.4cm, by cutting the paper like this the pattern will flow across the card front. Attach these to the 2 front panels of the card using glue.

4. Cut another piece of pumpkin pie cardstock - 7.4cm x 10.5cm and a piece of basic white - 7cm x 10.1cm glue them together flat. On the reverse left side of these pieces place glue,  and attach this piece to the front of the card onto the left side panel.  Do not place glue all over this piece as you will be glueing the front of your card together!

5. Die cut one of the large detailed flower pieces out of basic white cardstock and then cut it up using snips/scissors as the diagram below.

before cutting

after cutting, I used the section on the bottom for the card

6. Cut some of the mini dimensionals up into small pieces and attach to the reverse side of the detailed die cut flowers where you can't see them showing through from the front. Attach this to the card.

7. Stamp the sentiment using evening evergreen ink and cut it to the size required. attach to the card using dimensionals.


8. Stamp the leaves using soft succulent ink onto the same colour cardstock and die cut them out. Attach to the card using glue, tucking them under the sentiment and the flowers.

9. Die cut some of the tiny flowers out of pumpkin pie cardstock and attach using glue.

10. Finish the card off by adding a few of the basic rhinestones to the centres of the flowers.

Hope you enjoyed the card for today as much as I enjoyed creating it to show you all, I think it's a very quick, but very effective card for the recipient of it.
Pop back next week when I will be sharing another card I've made using the same Dahlia Days bundle.

Until next time
Huge Crafty Hugs 
Natalie x

Please remember if shopping with myself and you live in the UK to use my current Host Code for the month, as this enables me to send you a small thankyou gift the following month 😊

G74SAESF
March host code

Product List
Paper Trimmer
[152392]
£23.00

Tuesday, 8 March 2022

Craftalong Tuesday - Let your dreams set sail


It's time for another Craftalong tuesday and I'm so glad you found time to hop on and see what I have for you this week.
I love using punches to make quick cards, I think they are really fun to use and this cute sailing boat punch is a delightful one to create with too, so let's see how we make this card...........

1. Cut yourself a piece of Misty Moonlight cardstock 14.8cm x 21cm score in half at 10.5cm this is for your card base. Cut 2 pieces of Basic White cardstock 10.2cm x 14.5cm attach one to the inside of the card and then emboss the other one using the Bark 3D embossing folder and attach this flat to the front of the card.
2. Die cut yourself one of the large tickets from the Sports event dies using white card. Stamp the boat reflection image onto the ticket then attach this to the front of the card using dimensionals.
3. Punch out one of the boats from white card stock and one from the blue patterned paper from the Harvest meadow papers. Glue flat the paper sails to the white card sails. Attach the mast and boat section to the ticket using dimesnionals cut up small, making sure it lines up with the reflection, then attach the sails also using dimensionals.
4. Loop a length of the misty moonlight ribbon from the combo pack and then tie it in the middle with a piece of the white bakers twine. Attach to the card front using glue dots.
5. Stamp the sentiment out using misty moonlight ink and then using your snips cut the words up as required and attach to the card front.
6. To finish the card off attach a few of the beautiful new Rhinestone waves basic jewels (159396) I forgot to add these to the product list.

Hope you enjoyed todays card, I really enjoyed making this one, it made a nice change to use a punch must do it more often!

Hope you can find time to join me next week for another Craftalong tuesday.
Until then take care
Huge Crafty hugs 
Natalie xx


March Host code G74SAESF
Please use this if shopping with me on line and you live in the UK so that I can send you a small gift the following month x


 Product List

Paper Trimmer
[152392]
£23.00
Paper Snips
[103579]
£9.25