About Me

My photo
My name is Natalie and I love anything to do with card/paper. I have been a papercrafter for many years now and I never get bored playing with all the wonderful products available. I've been married to my wonderful husband Nathan for 35years now and we are still very much in love with each other as the first day we met each other. We have 3 wonderful children and 5 gorgeous grandchildren so we have lots to be thankful for. Since joining Stampin' Up! in 2018 I've grown so much in confidence with myself and I even tackle technology, which for me is a huge step to have taken, but I'm getting there slowly.

Tuesday, 19 October 2021

Craftalong Tuesday - 4D Bauble


It's Tuesday and time for another Craftalong Tuesday again!!!

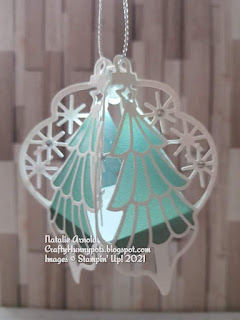
Hello and welcome. I have something a little bit different for you all today, it's a 4D bauble that I've made using the 'Delicate Baubles' dies, and I'm so happy with how it turned out, I think it would look geat hanging on a tree all lit up, you can even put a chocolate or a surprise inside before you close it up, or maybe a battery tea light instead of the sort of lights I've used (which I will give you the link for).

Anyway without going on any longer let's get started, or christmas will be here before we know it 😁.

I started bu die cutting 5 of the tree baubles out in total, and snipping one of the trees out from the centre, so that I could use it as a template for drawing round on the shimmer vellum, you will need 4 of these in total.


These are then all fussy cut out, now when drawing them remember to have the right side of the tree facing down, and the wrong side of the vellum facing up, this way when they are attached in place the shimmer of the vellum will show through.
Fussy cut all of th trees out using your snips/scissors and then on each of the die cut baubles (wrong side) dab very small amounts of glue around the tree, now lay the vellum tree wrong side down so that it matches up and gently press down, do this with all 4 and leave to dry for a while.
The tiny box for inside, which gives the whole finished bauble stability, is made from a piece of basic white card 2 1/4" x 2 1/4" and then on all 4 sides score at 1/4" 


Glue all of the tabs to the inside to form the corners.

Now take the 4 baubles that should be dry and glue the sides together on the large curved pieces only and only on 3 sides leave the bauble so it is open still so the box can be glued into place then the 4th side piece can be glued up.


You can see in the picture where the box needs to be glued, behind the vellum.

Now for the tiny light at the top, which is actually called a balloon light and all I did was I placed a glue dot onto each of the baubles top section and then placed the light in and squashed all the sides in, so that the glue dots grab the light, you can also put a small amount of glue here, I didn't the glue dots seemed to hold it in place.

The trim I attached through the top of the bauble so that it layed the same way as the tab that goes into the light (stops it coming on when not needed), this way it's easy to keep pulling it in and out when needed.
I then placed some small rhinestones in the centre of each snowflake on the bauble and it's finished!


Looks so pretty in the dark!


Hope you liked this project, I'm thinking of making a few for my tree this year or maybe hang on a garland ...... ooooo the choices, I love it!

Until next time 
Huge Crafty Hugs
Natalie x

OCTOBER HOST CODE
3EDQKF6R
Please use this code if shopping with myself and you live in the UK to receive a small thankyou gift from me the following month x

This is the link for the balloon lights I used.


 Product List

Paper Snips
[103579]
£9.25
Paper Trimmer
[152392]
£23.00


Wednesday, 13 October 2021

Blog hop touches of ink - Fall/Halloween


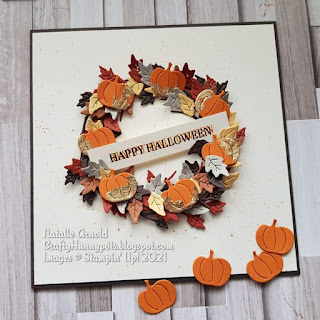
Hello everyone and welcome to another Touches of Ink blog hop. Hopefully you've just hopped over to my blog from the lovely Nina Unbehau, if not please do check her blog out and see what marvels she has for you to see! This month we could choose whatever bundle/suite we liked from either the annual or the mini catalogue, and as the theme is Fall/Halloween I chose to use the 'Sparkle of the season' bundle. This is a really lovely bundle which comprises of stamps and dies that can be used for - Autumn, Thanks giving, Halloween and Christmas, which is exactly why I chose to purchase this one!


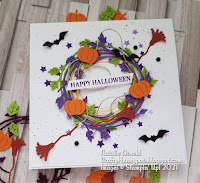
I loved playing with this bundle, using all of the autumnal colours to create a 'Fall' combined 'Halloween' card for you all to see. In my previous blog post you'll see that I've used this bundle also, but for that card I just created a Halloween card by using different colours.


It's such fun to play and have fun with a bundle that you really enjoy using!

For todays card I used a side folded square card, using early espresso cardstock and then added a very vanilla layer inside, for the front layer I flicked splashes of  ink over it, using my dark stampin' blends, before I attached it to the card front.


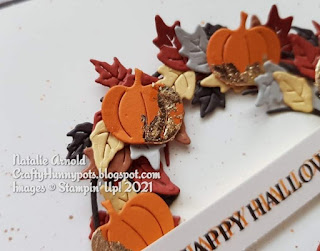
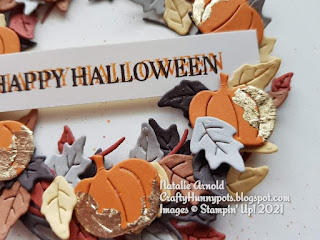
I die cut 2 of the leaf wreaths out and intwined them together, interlocking the leaves and branches. I then attached lots of the tiny die cut leaves (I cut lots in each of the colours). I used my silicone mat to apply glue to and dipped the leaves into it, this way I didn't apply too much glue and make them all sticky.
The whole wreath was then mounted onto the card front using dimensionals. 
The pumpkins were die cut using pumpkin pie cardstock (but of course). I then applied a small amount of glue to small areas. I left the glue to go tacky and then applied some of the gilded leafing, all of these were then attached to the wreath using dimensionals.
The sentiment I stamped once in early espresso and then gave it a double shadowy like image, stamping again but this time with pumpkin pie, this was then attached with a small amount of glue on either end.


That's my card finished, and I loved how it finished up looking. Hope you enjoyed my project for this time, now you need to hop over and see what the lovely  Sandra Nitschke      has in store for you.

Until next time 
Huge Crafty hugs
Natalie x


OCTOBER HOST CODE
3EDQKF6R
Please use this code if you live in the UK and shop on line with me to receive a small thankyou gift from me the following month x


Please find below the list of all the blog hop participants.


 Product List

Paper Trimmer
[152392]
£23.00


Tuesday, 12 October 2021

Gorgeous leaves -#CCC6


Hi everyone it's time for another CreativeColourChallenge and the colours for this week made me think of leaves as they fall onto the floor and start to lose their vibrant colours, so it had to be a 'Gorgeous leaves' card.


I chose to do another Dl card today as I wanted to be able to fit quite a few of the leaves across my card.
So I started off with a piece of thick basic white card 20cm x 20cm and scored it in half at 10cm. I used crumb cake card for the first front of ard layer and also for inside of the card too, these measured 9cm x 19cm, they were attached to the card flat.
The next layer which is white was about 2mm smaller all round. I stamped the dotty image with 2nd generation crumb cake ink, and then with 3rd and 4th generation for the larger dots all around the middle of the card piece. With my crushed curry and blushing bride stampin' write markers I flicked ink onto the card piece, just to add a bit more interest to the background, this piece was then glued flat to the front of the card.
For the leaves I stamped some in blushed bride ink and some in crushed curry, a few of them I inked up with blushing bride and then using a finger dauber a applied some of the crushed curry around the edges, this gives the leaves a different look to the others.
Crumb cake twine was attached to the front of the card using small amounts of glue to hold it in place. 
The leaves were all die cut out as were the crumb cake twigs. The leaves were attached to the card front some with glue others with dimensionals, the twigs were tucked under the leaves as I went.
Now when it came to the sentiment, the gorgeous leaves bundle doesn't have any, but I thought the sentiment from the 'Reflected in nature' stampset (yet to be used 😉) went really lovely with the leaves!

Hope you enjoyed what I made with the colour challenge, why not hop on over to the Creative Colour Challenges blog and see what other people have come up with for this combination of colours, or join in with the challenge yourself!

Until next time
Huge Crafty Hugs
Natalie x


Product List

Paper Trimmer
[152392]
£23.00