
About Me

My photo
My name is Natalie and I love anything to do with card/paper. I have been a papercrafter for many years now and I never get bored playing with all the wonderful products available. I've been married to my wonderful husband Nathan for 35years now and we are still very much in love with each other as the first day we met each other. We have 3 wonderful children and 5 gorgeous grandchildren so we have lots to be thankful for. Since joining Stampin' Up! in 2018 I've grown so much in confidence with myself and I even tackle technology, which for me is a huge step to have taken, but I'm getting there slowly.

Wednesday, 23 September 2020

SUOC#258 - Sea world/Triple stepper card


Hello everyone and welcome to yet another SUO challenge with the theme this time being - Nautical, Coastal, Sea world and Marine. And I thought what a great opportunity to use the really lovely Whale done collection, it's so lovely I just couldn't resist........
So without further a do lets get crafting and create a triple stepper card!!!

Materials needed:


Thick whisper white cardstock

1pc - 5" x 10" for the card base
1pc - approx 5/8" x 2 5/8" for the sentiment
Scrap piece for stamping and fussy cutting 3 x seahorses


Pool party cardstock

1pc -4 7/8" x 6 7/8" for matting and layering on the front of your card
1pc - approx  3/4" x 2 3/4" for the sentiment


Whale of a time DSP

1 sheet for the matting and layering on the front of your card (blue piece)
1 sheet with the turtles on to be fussy cut out
1 sheet for the fussy cutting to mat and layer onto the front of your card


Brights Stampin' write markers

Granny apple green and Pacific point for inking your stamps with


Flowers for every season gems

Some of the clear ones to look like bubbles on your card


Card recipe:

1. On the short side of your whisper white card base piece mark from top to bottom with a faint pencil mark (needs to be rubbed out) 2 1/2" and 4 3/4".
2. Cut, score and fold your card base as in the diagram (remember to have the 2 1/2" section at the top of your scoring board/trimmer).
You're scoring on the 3"and 6" to the first line the 8" to the second line, on the 4" and the 7" you just score the middle section and on the 5" you only score on the bottom section.
Now you cut where the diagram shows you.
Fold the 3 score lines on the left away from yourself, the next 2 towards yourself and the last score line away from yourself (this will form 2 mountain folds and a valley fold in the middle).
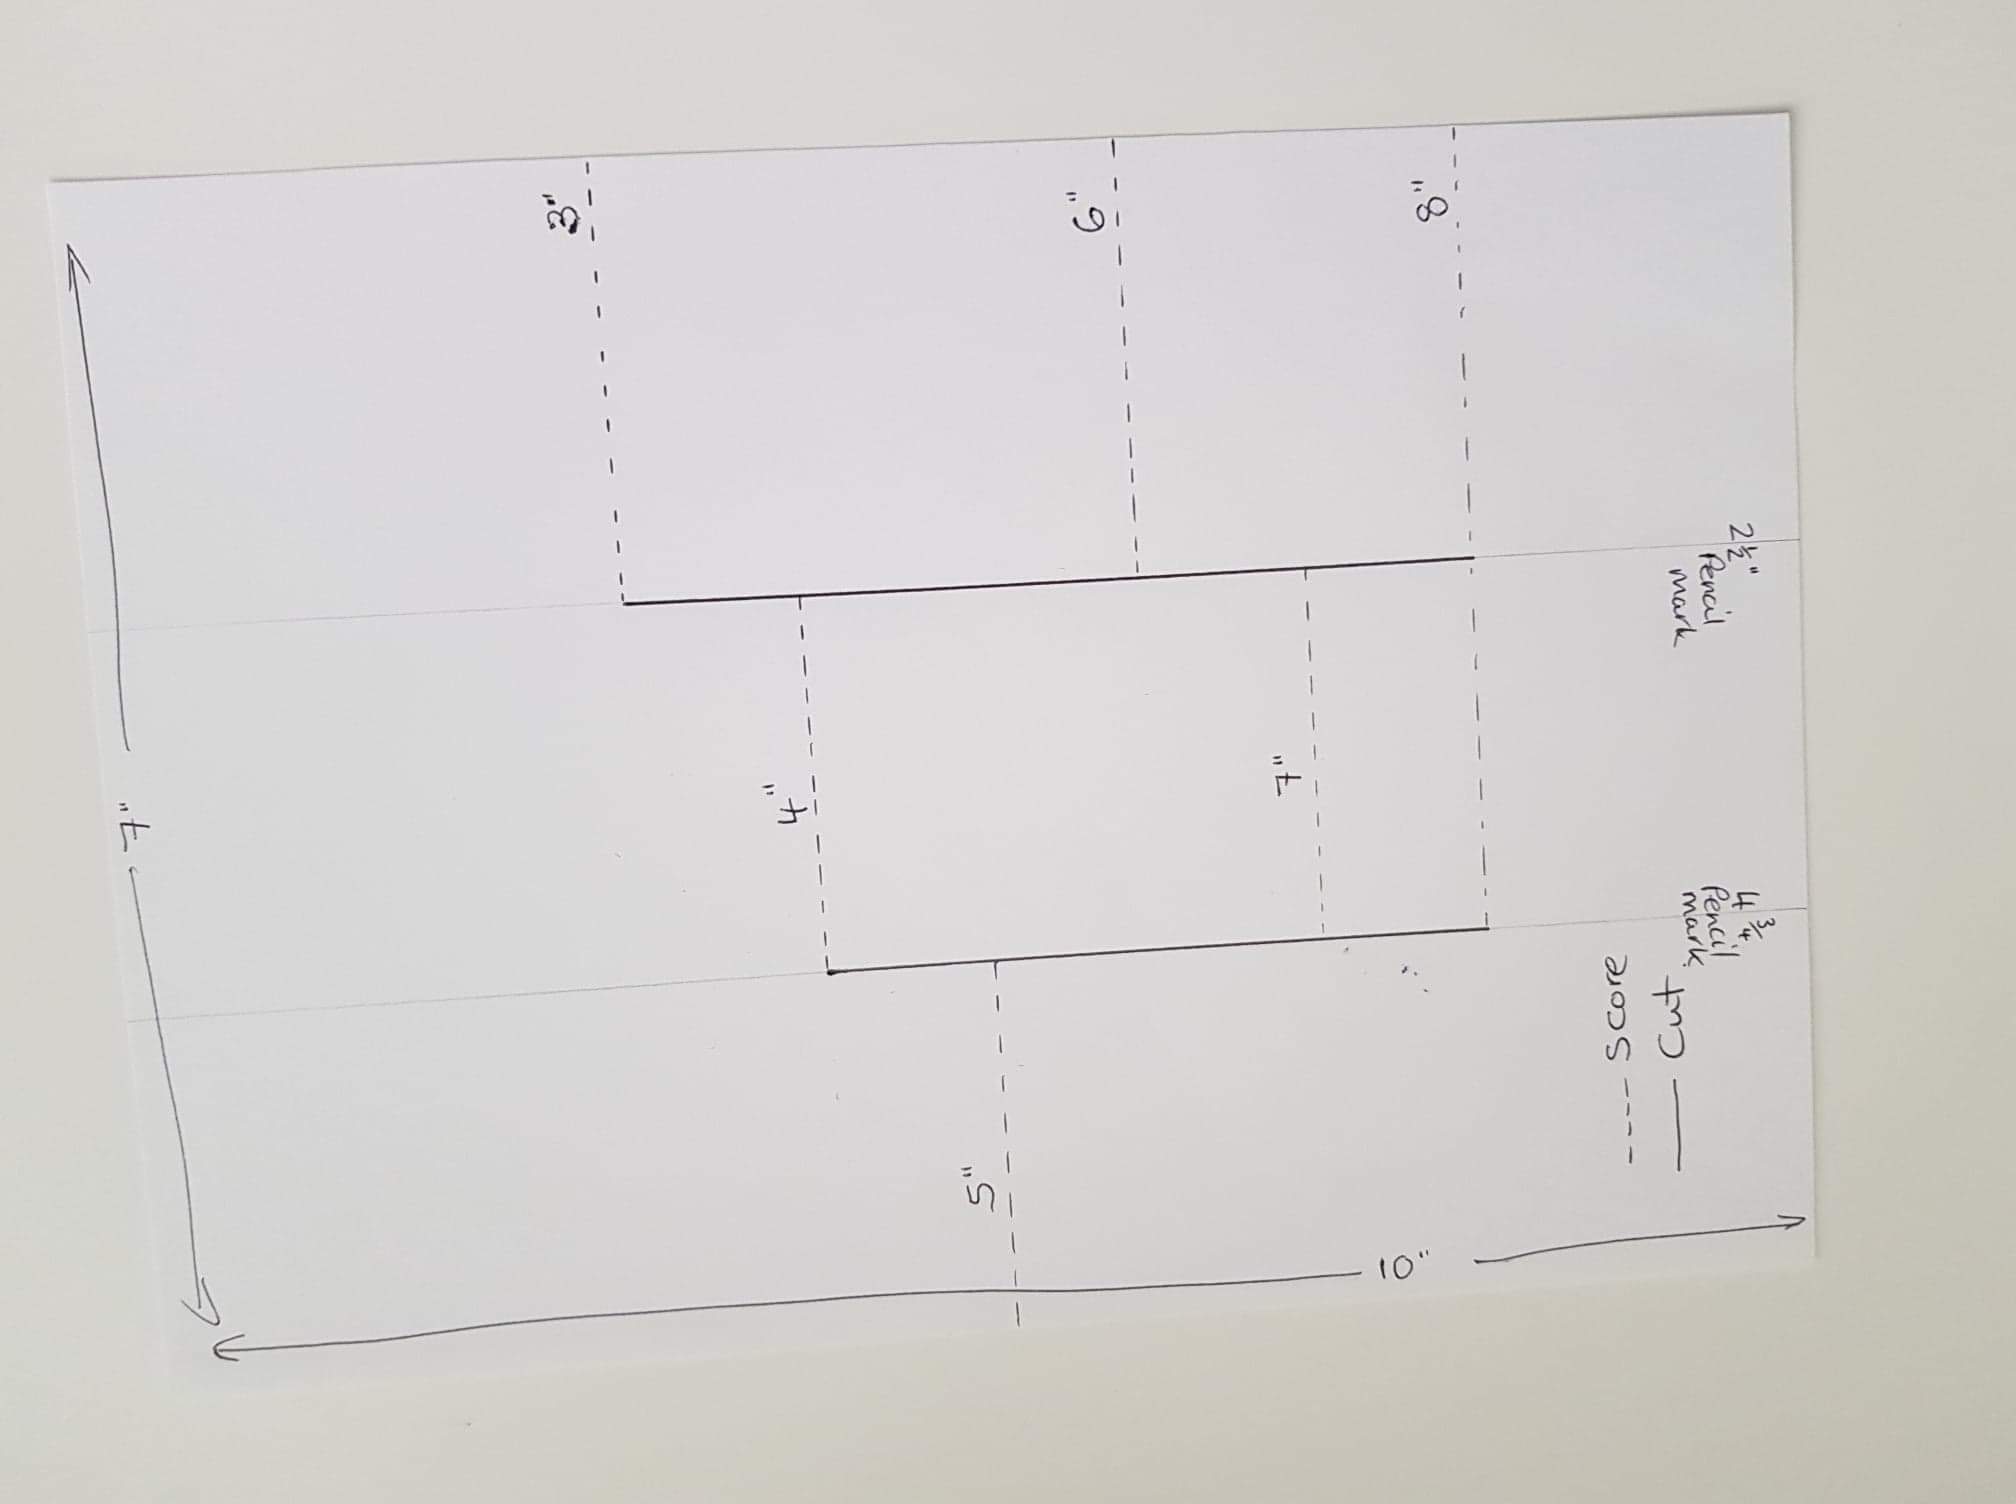

3. Cut your pool party piece of card as in the diagram and then glue on to each section where it fits.


4. Now cut your blue dsp piece as in the diagram and glue these pieces into place on to the pool party pieces.
(I've used copier paper so that the measurements show up better).


5. You now have your last piece of dsp to fussy cut and then you need to cut it into strips that fit on to your card and glue them into place.
(only the bottom of the sheet is used for this card).


6. Fussy cut all of your turtles out and glue them into place flat.
7. Stamp your seahorses and sentiment using your stampin' write markers (this is a lovely technique to use giving you lots of different colours mixed in), fussy cut your seahorses out and attach them to your card. Glue your sentiment onto your pool party piece flat and then attach to the front of your card using dimensionals.
8. Glue your clear gems into place using a very small amount of wet glue this will give the effect of bubbles rising up.


That's the card finished, I really hope that you liked making it and all of the fussy cutting didn't put you off as it's very satisfying once the card is complete, and I personally find fussy cutting quite therapeutic.
Thanks so much for hopping on to my blog and having a look I really appreciate it.

Please use my hostcode if your placing an on line order and it's under £150 and receive a small gift from me in the post the following month

SEPTEMBER HOST CODE
XXP6U9QZ


Product List

Tuesday, 22 September 2020

Seasons greetings in the pines


 Hello again everyone. Welcome to another blog on yet another gorgeous day here in the UK the weather for this time of the year is absolutely amazing and we're so lucky to have the sun shining towards the end of september I'm feeling very blessed in deed.
Today I thought I'd share with you a card that is so simple you won't believe it. I love when you can make lovley cards without much effort actually going into the process of doing it. So lets begin............

Materials needed:


Thick whisper white cardstock

1pc - 5" x 7" scored in half on the longside - cardbase
1pc - 3 1/4" x 4 3/4"  - inside of card layer
1pc - approx 2 3/4" x 4" - white oval front of card


Coastal cabana cardstock

2pc - 5/8" x 4 1/8" - strips for front of card
1pc - approx 3" x 4" - scallop oval front of card


Snowflake splendor DSP

2pc - 1/2" x 4" - strips for front of card


Pool party sheer ribbon

1pc - approx 8" - bow on front of card


In the pines bundle

For the die cutting of the tree
And for the sentiment stamping


Card recipe:

1. Cut score and burnish your card base.
2. Cut your card piece for the inside of your card and glue into place.
3. Cut your strip pieces of card and dsp and then glue the dsp onto the card strips, glue into place on the front of your card.
4. Stamp your sentiment onto your card, I've made sure that I only ink one word at a time on my stamp so that I can ink one word at the top and the other at the bottom of my card (make sure that you cean and dry the stamp in between stamping each word so you don't get a slight image still appearing where you don't want it to).
5. Die cut both of your ovals and then die cut your tree in the centre of the white oval (the die that you use doesn't cut the wole tree out it just cuts the apperture of the tree out).
6. Using dimensionals around the edge reverse side of the white oval (so they don't show through the apperture) and placing one in the middle where your bow will cover it up from showing, glue this onto the centre of the scallop oval and then using dimensionals again glue it into place on your card.
7. Tie a bow, place a glue dot onto the back of it and then glue it on top of the dimensional that is showing through on the centre of your tree.
8. Place a rhinestone on to your card and thats the card finished.

Hope you enjoyed this card as I said it was a simple but I think a very pretty little card to make.


If placing an order with myself on line (which I really do appreciate thankyou) then please use the host code for September - XXP6U9QZ if your order is under £150 .

Monday, 21 September 2020

Mini catalogue swap 2020

Well hello everyone and welcome to my blog. I've recently taken part in a mini catalogue swap with some of the Pootler's team members, and this is the card that I made for the group that I was in. We had to use products from the then new mini catalogue to give each other some ideas as to how we've used them. Hope you like the card I made, I certainly had a lot of fun making it.


Materials needed:


Thick whisper white cardstock

1pc - 4 1/8" x 11 5/8" scored on long side @ 5 13/16" - card base

2pc - 2 1/8" x 3 5/8" for 2 x die cut tags - 1 tag 

Scrap pieces to stamp and die cut 1 x snowman  2 x trees

1pc - 5/8" x 2 3/4" for the sentiment banner


Purple posy cardstock

1pc - 3 7/8" x 5 9/16" for front of card layer embossed 2" from the bottom

Scrap piece for die cutiing 1 x fern


Silver foil sheets

 piece for die cutting 3 x ferns


Snowflake splendor DSP

1pc - 2 1/8" x 3 5/8" for 1 x die cut tag

1pc - 1/2" x 3 7/8" for the strip on front of card


Whisper white cardstock

1pc - 4" x 5 11/16" for the inside of card - snowflakes stamped in all 4 corners


1 1/2" (3.8cm) Metallic mesh ribbon

1pc -approx 8" cut in half length ways for the tag bow (only half used)


Card recipe:

1. Cut, score and burnish your card base.

2. Cut, stamp and glue into place your inside of card layer.

3. Cut, emboss and glue to the front of your card your purple posy cardstock layer.

4. Cut and glue into place the dsp strip for the front of your card.

5. Die cut your 2 x white tags and emboss 1 of them. 

6. Die cut your dsp tag and then glue the other white tag that you've cut onto the reverse side (this makes the dsp tag stronger).

7. Stamp, die cut and colour your snowman, just die cut the trees they don't need colouring (stamp 1 x 1st generation ink and then 1 x 2nd generation ink).

8. Your 1st generation tree you need to cut into two seperate trees, glue the large one onto the embossed tag (over to the left side).

9. Glue your dsp tag over the embossed tag moving it to the right hand side a bit so that your tree shows.

10. Glue your snowman on to the tags using dimensionals, now glue the small tree under the snowman on the right hand side. Cut the 2nd generation tree in to two and glue the larger one under the snowman on the left hand side.

11. Take your piece of ribbon and thread it through the tag hole and tie it into a bow.

12. Glue the whole tag topper on to the front of your card using dimensionals.

13. Die cut all of your ferns and then gue them into place on the front of your card tucking them under the tag topper.

14. Cut your sentiment banner and stamp the sentiment on it, now using dimensionals glue this on the front of your card.

Hope you enjoyed the project, like I say I really loved making it the snowman is just so gorgeous. It's really hard for me to resist a snowman and when I saw it in the mini catalogue I just had to have it.

Take care till next time

Big Crafty Hugs

Natalie xx


Product list:


 Snow wonder bundle 155185

North pole wonder dies 153523

Winter snow embossing folder 153577

Thick whisper white cardstock 140490

Purple Posy cardstock 150887

Whisper white cardstock 106549

Silver foil sheets 132178

Snowflake splendor DSP 153512

Smoky slate classic stampin' pad 147113

Highland heather classic stampin' pad 147103

Neutrals stampin' write markers 147158

Regals stampin' write markers 147155

Balmy blue stampin' blends combo 154830

Highland heather stampin' blends combo 154887 

Just Jade stampin' blends combo 153107

Stampin' dimensionals 104430

Multi purpose liquid glue 154974

1 1/2" (3.8cm) Metallic mesh ribbon 153550


Tuesday, 15 September 2020

Snowflake wishes


 Hello again everyone hope you're all keeping well and having as much fun with all of your crafting projects as I am.  Those of you who know me will know that I absolutely love making christmas projects and here is another very quick and easy, but i think a very pretty little card.

Lets get started..........

So todays card starts with a piece of thick whisper white card which measures 4 1/8" x 8 1/4" scored on longside in half, giving you a very cute 4 1/8" square card. I've cut a piece of thick whisper white measuring 4" x 4" and stamped a few of the images from the 'Snowflake wishes' stampset on to it, then glued it flat to the inside of the card.


Now I've cut a piece of the Balmy blue glimmer paper so it measures 4" x 4" and then glued it flat to the front of your card. The next step is using a piece of thick whisper white cardstock and die cutting the large snowflake from the 'So many snowflakes' dies.


As you can see from the picture it's a die that leaves an apperture rather than cutting the whole snowflake out. Now I've placed dimensionals all over the back of the snowflake piece and then put a little wet glue onto the dimensional after the backing has been removed, this will just make sure that the dimensional gets a grip on to the glimmer paper. This whole piece is now attached to the front of the card flat with wet glue.                I've now cut myself a piece of thick whisper white cardstock that measures 3/4" x 4 1/8" and using balmy blue ink I,ve stamped the sentiment, now using the Banners pick a punch I've punched both ends of the card piece giving me a nice and even punched banner. I've now given this sentiment piece a slight curve and then attached it to the front of the card using wet glue just on the two ends giving it a bit of depth. I've used 1 of the largest beautiful 'Blue adhesive backed gems' and placed it into the middle of my snowflake. Card finished, it's a very quick and easy card to put together which if you have a lot of cards to make this christmas is going to be very helpful. Hope you liked the project, all the products I've used are listed below just click onto the highlighted links and it will take you straight to that item in my on line shop.
Thanks so much for popping by and taking a look at my blog, I really do appreciate it.
Big Crafty Hugs
Natalie xx


Products used:


SEPTEMBER host code - XXP6U9QZ for orders under £150


Monday, 14 September 2020

Tag Buffet project kit


 Hello everyone on this really glorious day, the sun is shining and it's an absolutely beautiful day, let's hope it carries on and we have an Indian summer here in the UK. Today I've been playing with the amazing project kit ' Tag Buffet' and I'm absolutely loving it. There is so much in it more than I had imagined there would be. The great thing is all you need to add is actually a stampset, dimensionals and ink and off you go, couldn't be easier. Those of you that know me will know that I like to put my own little twist on things when making them, so after having made one of each of the tags I thought let's make a card to match the tag...................


It's a very easy to acheive card so let's get started.......

The first thing I did was cut myself a Whisper white thick card base which measures            4 1/8" x A4 length (europe size) scored in half. Then I cut myself 2 pieces which both measure 4" x 5 3/4" which are glued to the front and the inside of your card base.                 Now I've cut myself a piece of the 'Heart warming hugs' dsp which measures 3 7/8" x          5 5/8" which is glued flat to the front of your card base. The next stage of the card is to assemble your tag for the front of your card and the full instructions of how to do this are within the project kit box, the only thing that is different is that I've used the poppy parade ribbon from the 'All the trimmings ribbon combo pack'. Now using the 'Itty bitty christmas' stampset stamp your seasons greetings in Garden green ink (I've used some of the card that is leftover from the pieces that have the die cut elements on them, this way it matches the other sentiment piece on your tag). Attach your tag card topper onto the front of your card base using dimensionals. For the sentiment inside the card I used garden green ink and the stampset is called 'Tag Buffet' stampset.


Hope you liked my quick and simple matching card and maybe you'll make some matching cards of your own, it's so easy to do. All of the products I've used for this project are listed below, just click on the highlighted links and it will take you straight to my on line shop where you can purchase it. Have a great rest of the day see you again soon x

Big Crafty Hugs

Natalie xx


Products used:


Tag Buffet project kit £28.00


Tag Buffet stampset £17.00


Red rhinestone basic jewels £6.50


SEPTEMBER host code - XXP6U9QZ
use this code if your order is under £150 if it's over then please use the rewards that you have xx


Monday, 7 September 2020

Kylie Bertuccis International Highlights - Beautiful Autumn


Hello again and welcome to Septembers International Blog Highlights. Can you believe it's actually September and now we enter the season of Autumn over here in the UK I thought I'd make a thankyou card this month using the 'Beautiful Autumn' collection.

I love when the Autumn comes and all the leaves start to fall from the trees in all of their beautiful array of colours and this card represents this to me, hope you like it and you hop on to the link to vote for me, I'd really appreciate it.

VOTE FOR ME HERE


So without going on any longer than is necessary let's get on with making my card.


Materials needed for this card:


Thick Very Vanilla cardstock

1pc - 5 1/2" x 11" scored on the longside at 5 1/2" - this is your card base

1pc - 5 1/4" x 5 1/4" - this is to glue onto the back of your dsp

1pc - approx 7/8" x 3 1/4" for your sentiment

1pc - 5 3/8" x 5 3/8" for the inside of card

Scrap piece to stamp and punch out some leaves, acorns etc.


Cajun Craze cardstock

1pc - 5 7/16" x 5 7/16" for the front of card layer that is embossed (brick & mortar 3D folder)

Scrap piece to stamp and punch out some leaves, etc.


Gilded Autumn speciality dsp

1pc - 5 1/4" x 5 1/4" for the front of card glued onto the ww piece for strength


Early espresso cardstock

Scrap piece to stamp and punch out some leaves, etc.


Mint macaron cardstock

1pc - approx  1" x 3 3/8" for layering behind the sentiment


Copper foil sheets

1pc - approx 2" x 3" for die cutting the sentiment label layer

Scrap piece for die cutting the ferns (these are from Celebration labels dies)


Basket weave & Metallic ribbon combo pack

2pc - for tieing a bow and for pulling into strands to use on front of card


Acorn trinkets

1 - for the front of card


Card recipe:


1. Cut, score and burnish your card base.

2. Cut your inside piece of card and glue to the inside of your card.

3. Cut your dsp piece and the piece of very vanilla  for strenghtening it, and glue them both together. Once the glue has dried you need to die cut the 3rd largest label from the centre of it.

4. Cut your cajun craze piece of card and laying the dsp piece on top make sure you line it all up straight, now lay your 2nd largest die through the apperture and centralize it, lift the dsp piece off and then run the cajun craze bit through your die cutting machine making sure th die stays in place.

5. Emboss your cajun craze piece now it has an apperture cut from the centre of it, (the reason you do it in this order is because if you die cut after you emboss it flattens the embossing) and then glue it flat onto the front of your card.

6. Place dimensionals over the reverse side of your dsp piece and then carefully glue to the front of your card, making sure you get nice even edges of the cajun craze showing.

7. Stamp all of your leaves etc, you stamp 1st generation for the outer leaves and then 2nd generation for the inner. The acorn you stamp outer 1st generation, the acorn base 3rd generation and the top 2nd generation, this just gives the acorn a realistic look to it, punch them all out. The ferns and and leaves that don't come with punches you need to stamp out and then fussy cut them out. The copper ferns are die cut out using the little dies within the celebration labels dies.

8. Die cut your copper label and glue into place using dimensionals.

9. Glue all of your leaves and ferns using wet glue into place, the acorns you need to just use one of the mini dimensionals for each.

10.  Stamp your sentiment and cut the piece of card at angles on each end, glue onto the mint macaron piece and then cut the edges to leave a small border all the way around the edges.

11. Tie your bow with one of your pieces ribbon, and pull the other piece into strands from one end and tie them all together in a knot (one of your strands keep back to thread through your acorn trinket).


12. Using glue dots glue the strands onto your card front first, tie the acorn onto the bow and then use another glue dot to glue it onto the strands.

13. Glue 6 of your leaves into the inside of your card as in the picture above.


Card is now finished hope you enjoyed it. Please vote for me if you did like it thanks so much for popping onto my blg and having a look I really do appreciate it.

Stay safe everyone and keep crafting

Big Crafty Hugs

Natalie xx

VOTE FOR ME HERE


Products used  for this card:

Click on the links to see the products

Gilded Autumn speciality dsp 153520

Beautiful Autumn bundle (english) 155189

Acorn trinkets 153552

Basket weave & Metallic ribbon combo pack 153553

Celebration labels dies 153570

Thick Very vanilla cardstock144238

Cajun craze cardstock 121683

Early espresso cardstock 121686

Mint macaron cardstock 138344

Mint macaron classic stampin' pad 147106

Crumb cake classic stampin' pad 147116

Early espresso classic stampin' pad 147114

Cajun craze classic stampin' pad 147085

Stampin' dimensionals 104430

Mini stampin' dimensionals 144108

Multipurpose liquid glue 154974

Mini glue dots 103683

Paper trimmer 152392