It's Tuesday and time for another Craftalong Tuesday again!!!
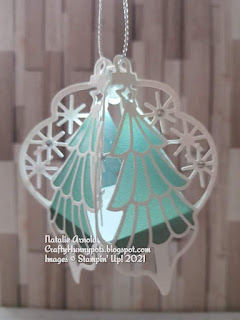
Hello and welcome. I have something a little bit different for you all today, it's a 4D bauble that I've made using the 'Delicate Baubles' dies, and I'm so happy with how it turned out, I think it would look geat hanging on a tree all lit up, you can even put a chocolate or a surprise inside before you close it up, or maybe a battery tea light instead of the sort of lights I've used (which I will give you the link for).
Anyway without going on any longer let's get started, or christmas will be here before we know it 😁.
I started bu die cutting 5 of the tree baubles out in total, and snipping one of the trees out from the centre, so that I could use it as a template for drawing round on the shimmer vellum, you will need 4 of these in total.
These are then all fussy cut out, now when drawing them remember to have the right side of the tree facing down, and the wrong side of the vellum facing up, this way when they are attached in place the shimmer of the vellum will show through.
Fussy cut all of th trees out using your snips/scissors and then on each of the die cut baubles (wrong side) dab very small amounts of glue around the tree, now lay the vellum tree wrong side down so that it matches up and gently press down, do this with all 4 and leave to dry for a while.
The tiny box for inside, which gives the whole finished bauble stability, is made from a piece of basic white card 2 1/4" x 2 1/4" and then on all 4 sides score at 1/4"
Glue all of the tabs to the inside to form the corners.
Now take the 4 baubles that should be dry and glue the sides together on the large curved pieces only and only on 3 sides leave the bauble so it is open still so the box can be glued into place then the 4th side piece can be glued up.
You can see in the picture where the box needs to be glued, behind the vellum.
Now for the tiny light at the top, which is actually called a balloon light and all I did was I placed a glue dot onto each of the baubles top section and then placed the light in and squashed all the sides in, so that the glue dots grab the light, you can also put a small amount of glue here, I didn't the glue dots seemed to hold it in place.
The trim I attached through the top of the bauble so that it layed the same way as the tab that goes into the light (stops it coming on when not needed), this way it's easy to keep pulling it in and out when needed.
I then placed some small rhinestones in the centre of each snowflake on the bauble and it's finished!
Looks so pretty in the dark!
Hope you liked this project, I'm thinking of making a few for my tree this year or maybe hang on a garland ...... ooooo the choices, I love it!
Until next time
Huge Crafty Hugs
Natalie x
OCTOBER HOST CODE
3EDQKF6R
Please use this code if shopping with myself and you live in the UK to receive a small thankyou gift from me the following month x
This is the link for the balloon lights I used.
Product List


Awww how super cute is this tree ornament, love it! What a fabulous keepsake for your tree! Many thanks for sharing :) x
ReplyDeleteThankyou so much Anne it was such a quick and simple make and fun to create definitely a lovely keepsake x
DeleteIs there any chance you could share more pictures of the process? I am not understanding how the square piece of white card stock fits into the project. I don't know if it just has to do with how tired I am tonight or what, but I am just not making good sense after cutting out the pieces with the dies =(
ReplyDeleteNatalie, it was definitely me and not your directions! I just took another long look at your beautiful ornament and all of the sudden I could see everything you were saying! Thank you so much for sharing your beautiful design! You are certainly a talented person!
ReplyDeleteOff to bed for that much needed sleep!
Thankyou so much Marianne hope you managed to get some good sleep and then you manage to make one of these they are quite simple once you know how :) Thanks for your lovely comment hope you have fun making them!
Delete