It's with great excitement that I'm taking part in this months International Blog Highlights with Kylie Bertucci. I'm feeling very blessed to be able to take part in such an amazing blog.
The theme for the month of June was 'Thankyou Projects' and the card below is what I've come up with, although the card design fold is not my own, it has been around for a while now, this is the card I've made using it. I watched a lady by the name of Angie who goes under ChicnScratch to watch her make one of these cards click on the link below:
https://youtu.be/cbsZ5mfZMlw
This style card is known as a 'Twist and turn' card and I've really enjoyed making this. Here's how I've done it:
Cut your card base 8" x A4 length and score as shown in the diagram below.
This style card is known as a 'Twist and turn' card and I've really enjoyed making this. Here's how I've done it:
Cut your card base 8" x A4 length and score as shown in the diagram below.
Fold all of the score lines and burnish with your bone folder carefully both ways to give the card fibres a new memory and making it easier to fold and twist, but make sure you're not too rough or you will tear your card at the edges.
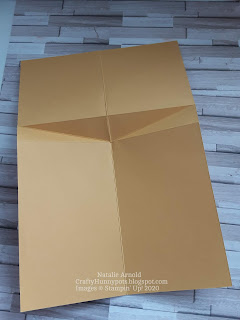
Fold the long centre crease and burnish it well, then fold the other 2 straight creases the opposite way burnishing well, now fold the creases that are at angles the same way as the long centre fold. Now you should be able to fold and twist your card in to shape. This is where you might need to look at the video link above.
This is how it looks once you've creased it and burnished it ready to fold.
And this is what it should look like from different angles.
Your card and dsp layers will all be cut 1/8" smaller than the layer before, for example the square top twist bit of your card measures 4" x 4" so therefore your whisper white card needs to be 3 7/8" x 3 7/8" the black piece 3 3/4" x 3 3/4" the Bumble bee card 3 5/8" x 3 5/8". This is the same for the rectangle front of your card, just replacing the Bumble bee card for Dsp. The strip for the sentiment on the front of your card is bumble bee card 1" x 6" (the length of the Dsp layer underneath). It's stamped and then embossed with the embossing folder. (Make sure your ink is dry before you emboss not like me learn by my mistakes).
Everything is glued flat to each other.
The square piece with the sunflower on it measures as follows:
Dsp 3 1/4" x 3 1/4" and the whisper white piece is just a fraction bigger maybe 1/16" all round (this piece is not glued on yet).
The inside of the card is the same measurement as the whisper white card piece for the rectangle front of card piece. Adding a piece that I had leftover from the Dsp which was 1" x fraction smaller than white card.
The beautiful sunflower is cut out as above, I glued 4 of the flower centres (black pieces) together and stuck them behind the flower middle to give the flower a bit more depth. Then I just glued the back of this middle piece to the white cut out sunflower, and then gave the top sunflower piece a little curl at the edges to give the flower depth.
Finally the flower is glued to the square patterned piece of card the leaves are added and then this is all glued on using stampin' dimensionals, I twisted it round so it gave the card front more of an interesting look.
This card is a bit bigger than the one in the video link and it fits in to a UK size C5 envelope which is 6.4" x 9".
Hope you've enjoyed the card I've made and you will give me a like on the link below thanks for stopping by and taking a look I really appreciate it.
Big crafty hugs
Natalie x
Materials used
Bumble bee card - 153082
Whisper white thick card - 140490
Basic black card - 121688
Old olive card - 106576
Flowers for every season dsp - 152486
Celebrate sunflowers bundle - 154065
Greenery embossing folders - 152716
Flowers for every season ribbon combo pack - 153620
Memento black ink - 132708
Old olive classic stampin' pad - 147090


Very interesting and beautiful!
ReplyDeleteThankyou x
Deletestunning card Natalie xxx
ReplyDeleteThanks so much Amanda x
DeleteWow, Natalie, stunning card, I love a fun fold and this one is so cute, the sunflower is a gorgeous focal piece, love the colour too! :) many thanks for sharing :) x
ReplyDeleteThanks for such a lovely comment Anne the sunflower is beautiful and adds a great touch to any card xx
DeleteFabulous card Natalie, love it xx
ReplyDeleteThanks so much Karen for your comment x
DeleteBrill card
ReplyDeleteThankyou x
DeleteBrilliant card. Great instruction Natalie
ReplyDeleteThankyou so much x
DeleteGreat twist and turn card and Love the sunflower. Thanks Natalie for being part of my international blog highlights this month and all the best with the voting!
ReplyDeleteAhh thanks Kylie and thankyou for letting me take part in such a wonderful thing I feel very priveleged to be part of this x
ReplyDeleteLove sunflowers!
ReplyDeleteThey are beautiful flowers for sure x
Delete