About Me

My photo
My name is Natalie and I love anything to do with card/paper. I have been a papercrafter for many years now and I never get bored playing with all the wonderful products available. I've been married to my wonderful husband Nathan for 35years now and we are still very much in love with each other as the first day we met each other. We have 3 wonderful children and 5 gorgeous grandchildren so we have lots to be thankful for. Since joining Stampin' Up! in 2018 I've grown so much in confidence with myself and I even tackle technology, which for me is a huge step to have taken, but I'm getting there slowly.

Tuesday, 12 April 2022

SUOC#299 - Favourite suite/bundle in any current catalogue


Hi everyone, it's time for another SUOChallenge and this week I was really excited as the challenge was to use one our favourite suites/bundles from any of the current catalogues! I just had to use one of my absolute favourites, which is from the mini catalogue, so if you like this bundle too then you need to grab it before it goes at the end of June 2022, I'm going to be very sad to see it go, I know it's going to be staying in my stash for a very long time!

It's the amazing 'Seas the day' bundle.

Now I've made this card, not only for this challenge, but also for my eldest grandsons birthday, which happens to be in April, so this is definitely a win win card for me. I get to use one of my favourite bundles and make a cute fun fold card too!


I'm hoping you can see my template for the card, it's really hard to know whats best for helping those that would like to give it a go, hopefully this will help you.
Card measured 10.5cm x A4 (UK size) and I went in on each side at 3cm and on the top and bottom of the card it was 2cm.
__________ cut lines
--------------- score lines
After having cut and scored my card base, which I did in Pacific Point cardstock, I then cut all of my dsp to the sizes needed (each cut was 3mm smaller than the section measured), I used some of the amazing 'Waves of the Ocean' for mine and attached them all flat on the card base. 
I cut myself some basic white pieces and stamped images on to them, and also stamped and die cut lots of the images from the bundle, using Pacific point, calypso coral and coastal cabana ink. Then the fun began assembling it, getting the look I wanted. All I had to remember was that the card could still fold up onto itself to fit in an envelope.

Folded for inside envelope.

Left side opened out.

Both sides opened out.

Inside right side.

Inside left side.

Inside back panel.

Right side front of card.

Left side front of card.

Card from above.

Card when standing open.

I had so much fun creating this card, the sentiment I used were from the fabulous stampset 'A Grand Kid' which I'm so happy to see carrying over, as I love this stampset it's so useful when you have 5 grandchildren to make for 😊.

I hope you had fun looking at what I created for you all, hopefully you got some inspiration from it and you go and make yourself one, you'll have loads of fun doing it I'm sure!
Now pop over to the SUOChallenge#299 and see what all the other design members have made and maybe join in with the challenge yourself, we love seeing all of the different creations that you all come up with. 

Stay well until next time
Huge Crafty hugs 
Natalie x

Oh and please remember to use my Host code for April 2022 if you're shopping with me on line and you live in the UK to receive a small gift from me the following month x

MN3KKHYB

 Product List

Paper Trimmer
[152392]
£23.00
Paper Snips
[103579]
£9.25


Craftalong tuesday - Beautiful shapes dies


Hi everyone, and welcome to another Craftalong tuesday with me. Hope you're all keeping well and finding plenty to do in this not so very nice weather we've been having, and there was me thinking it was the start of spring, hopefully it's going to arrive soon!
Well what have I got for you all today?
I decided to use the rather lovely dies called 'Beautiful shapes' I'm loving the hexagonal shapes that are within this set and there is actually a stampset togo with these dies called 'Hello beautiful' but for this week, and the next I chose to just use the dies, to show you how useful they are to have in our collection of dies, so let's see how I created this weeks card.....................

Materials 
Basic white thick card - 10.5cm x  A4 length(uk) scored in half at 14.8 for card base
Basic white card -2 x 10cm x 13.8cm
Basci white card - scrap piece for 3 x hexagons and a strip for the sentiment
Just Jade card - scrap piece for 2 x leaves
Abstract beauty dsp - 3 different sheets for hexagons
Linen thread - loop behind sentiment
Gilded gems - 3 x for front of card

Tools 
Beautiful shapes dies
Bough punch
Best year cling stampset
Abstract beauty dsp
Tuxedo black memento ink pad
Paper trimmer
Mini Stampin' cut & emboss machine

Adhesives
Multi purpose liquid glue
Tear & Tape
Dimensionals

Instructions
1. Fold and burnish the basic white card base, this is a side opening card.
2. Glue one of the basic white layers to the inside of the card base.
3. Die cut all of the hexagons needed, I had 4 yellow pattern, 5 blue, 4 flowery pattern and 3 white card.
4. Attach the 3 white card hexagons to the reverse side of the patterned hexagons, I used 1 from each pattern.
5. Starting at the top left corner start attaching the hexagons with glue onto the other white card layer, the second blue, third yellow and third flowery one of mine are attached using dimensionals. The hexagons can hang over the edge of the card layer and once finished the excess can be cut off.
6. Attach this layer to the front of the card base using glue.
7.  Punch 2 of the leaves out and attach to the layer tucking them under the hexagons, you may need to snip a small bit off to get them to fit under nicely.
8. Stamp the sentiment onto the white piece of card using the black ink, cut to the size required, curl it slightly with a bone folder then using tear & tape attach the linen thread to the back and then attach to the card front using dimensionals, but only in the centre so that it retains it's curve.
9. To finish the card off add some of the gilded gems.

Adding card and dimensionals to the reverse side of 3 hexagons helps when tucking things underneath, and it also adds a bit more dimension to the card.

Hope you enjoyed todays make and found it as fun to make as I did, it was a quick and simple card to assemble, but you would be able to make it using any of your patterned dsp and these lovely, and useful dies. 
Pop back next week to see what I make using the same dies and stampset.

Huge Crafty Hugs
Natalie x


MN3KKHYB
Please use this code for April if shopping with me through my on line shop and you live in the UK to receive a small thankyou from me the following month x


  Product List


Linen Thread
[104199]
£4.75
Gilded Gems
[152478]
£6.50
Bough Punch
[157711]
£17.00
Paper Trimmer
[152392]
£23.00


Tuesday, 5 April 2022

Craftalong Tuesday - Sending hugs


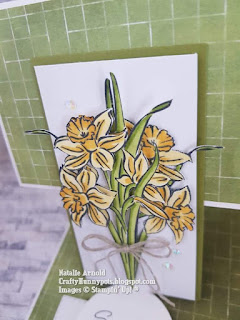
Hi everyone thanks for dropping in to see what I've made for you to see this week. As promised I've made another card using the beautiful Daffodil daydream bundle, and this week I have a beautiful fun fold card for you all. I first saw this fold having seen it on a session of Cards & a cuppa, which is a weekly group on facebook with the lovely Emma Goddard from Coastal crafters and well worth joining as it's so much fun.
This is an easel card but with a little twist as it stands slightly different to normal, but, it still folds down flat to fit in your envelope. So let's see how I made this one...........

1. Cut a piece of basic white thick cardstock - 10.5cm x A4 length and on the long side score at 7.4cm and 14.8cm fold and burnish the score lines. The card when folded will look like below.


2. Cut 2 pieces of the flowering fields dsp - 1 piece 10.2cm x 14.5cm and the other 10.2cm x 7.2cm. Glue these pieces flat to the first section and the third section of the card base, making sure they are both glued to the same side of the card base.
3. Cut a piece of old olive cardstock 6cm x 11cm and a piece of basic white 5.5cm x 10.5cm these get stuck together using dimensionals.
4. Stamp, using memento ink and die cut/ fussy cut out (which is what I did using my paper snips and a craft knife for the pieces in the middle sections, but then that's because I'm fussy 😊) one of the large daffodil image. You will need to stamp another one onto a silicone craft sheet layed on the stamparatus/stamping platform, then carefully place a piece of basic white cardstock on top of the inked section and press the image on top again, this helps to transfer the ink onto the reverse of your piece of card, giving a mirror image! This can still be die cut out by using the top image as a guide. It's the 2 whole daffodils on the right hand side that I then fussy cut out again (these will sit on the left side of the mirrored image which you will cut out) to lay behind the bud section to the back, making it look like a fuller bunch of daffodils.


Hopefully you can see in the image above how I assembled my bunch of daffodils(using diemsionals) but you can just have the whole image on it's own as it still looks beautiful.

5. Attach the daffodil bunch onto the old olive/white layer, using dimensionals, and then attach this to the top section, by applying glue just on the top half. The easiest way to make sure you get this in the centre is to have the card folded flat and then you can see where it needs to lay.
6. Tie a bow using the linen thread and attach to the stems using a glue dot.
7. Die cut one of the stitched rectangles and the circles using basic white card stock, stamp the sentiment using memento ink, onto the circle, I used the sentiment from the Eden's garden stampset. Attach the circle to the rectangle using dimensionals and then attach the whole thing to the base of the card (this is going to be the stopper for the easel section of the card), I measured up from the base about 4cm and attached it above this.
8. Finish the card off with a few of the beautiful irredescent rhinestones and then you will have a beautifully elegant card, using a really lovely card fold!

Hope you enjoyed this weeks make and you'll join me next week for another Craftalong tuesday.
Huge crafty hugs
Natalie x 

APRIL HOST CODE
MN3KKHYB
Please use this code if shopping with myself on line and you live in the UK to receive a small thankyou gift through the post the following month from me x


Product List
Linen Thread
[104199]
£4.75
Paper Snips
[103579]
£9.25
Paper Trimmer
[152392]
£23.00
Stamparatus
[148187]
£46.00