
About Me

My photo
My name is Natalie and I love anything to do with card/paper. I have been a papercrafter for many years now and I never get bored playing with all the wonderful products available. I've been married to my wonderful husband Nathan for 35years now and we are still very much in love with each other as the first day we met each other. We have 3 wonderful children and 5 gorgeous grandchildren so we have lots to be thankful for. Since joining Stampin' Up! in 2018 I've grown so much in confidence with myself and I even tackle technology, which for me is a huge step to have taken, but I'm getting there slowly.

Wednesday, 20 January 2021

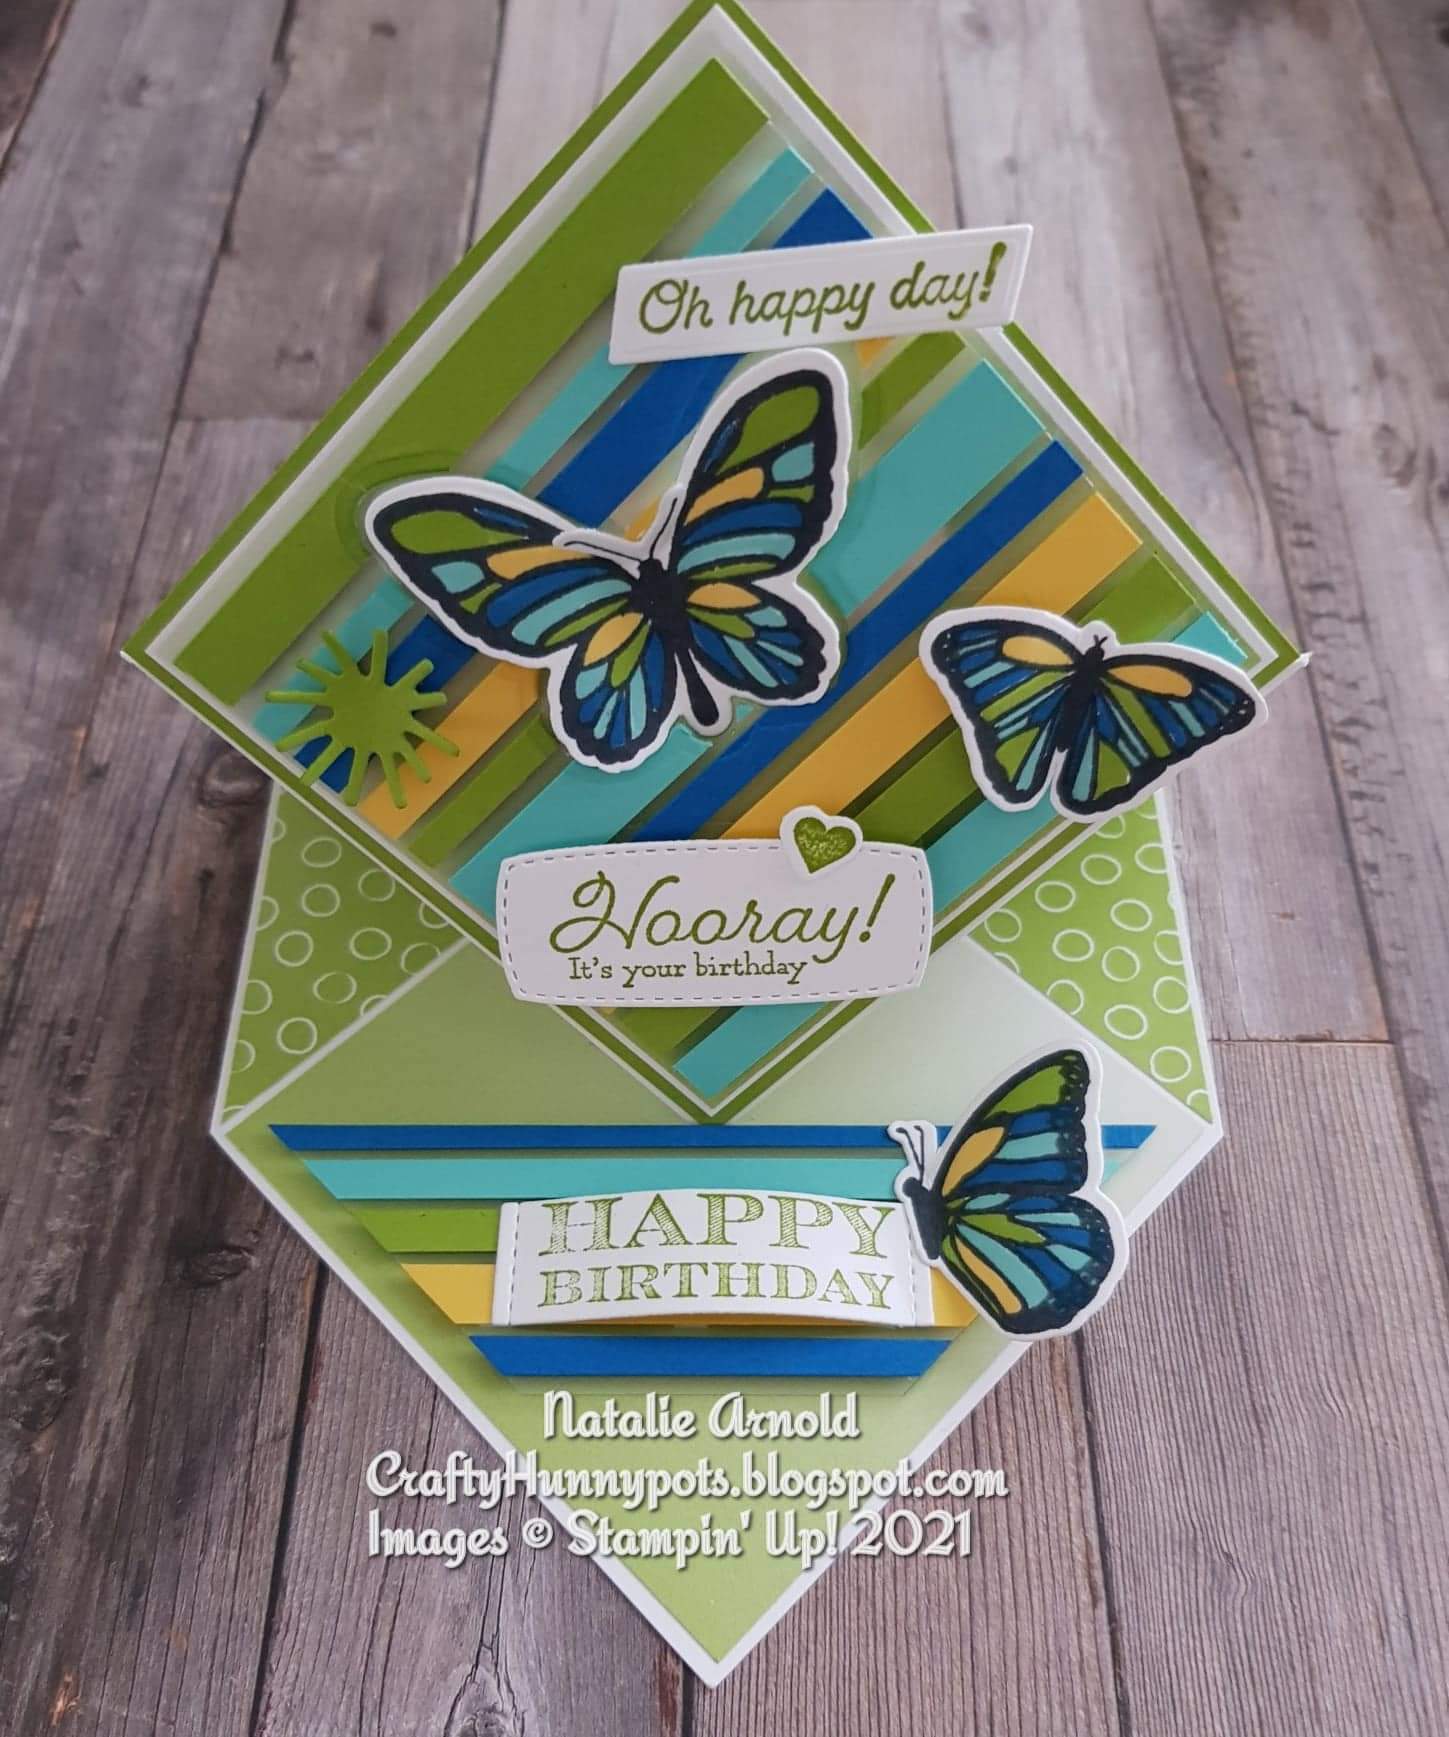
Floating and fluttering diamond fold card


Hello again, well today I'm sharing a project that I absolutely loved putting together, and I hope you'll all have a go and make one too.

I've made a floating card which is where you apply strips of card or paper onto a piece of window sheet leaving small gaps, using tear n tape (double sided adhesive tape), then you cut it to the size you require and die cut a shape into it, then when you adhere it to your main card using dimensionals the whole thing looks like it's floating on the surface. It's hard to see the effect that it gives in the photo but it's really lovely in reality.

So lets get started.........

Materials used:


Basic white thick cardstock   

1pc - 4-1/2" x 9" score on longside at 2-1/4 and 4-1/2" 

1pc - 3" x 3"  - (diamond section layer)

1pc - Big enough to stamp and die cut the many messages

1pc - Big enough to stamp and die cut the multiple of butterflies 


Granny apple green cardstock

1pc -3-1/8" x 3-1/8" - (diamond section layer)

Strips in different thicknesses to the length required


Daffodil delight, Coastal cabana and Pacific point cardstock

Strips of different thicknesses and to the length required


Oh so ombre dsp - (free sale a bration item) I've used granny apple green 3 sheets in total

2pc - 2-1/8" x 4-3/8"  - 1st sheet (middle front and back section)

1pc - 2-1/8 X 2-1/8" - 2nd sheet (diagonally cut for bottom section)


1pc - 2-15/16" x 2-15/16"  - 3rd sheet (diamond section layer)

1pc - 3-1/16" x 3-1/16" - 3rd sheet ( bottom section)


Window sheet

1pc - 4" x 4" cut to sizes required:

2-15/16" x 2-15/16"  - diamond section layer

1-7/8" (along the bottom) x 3-7/8" (along the top) - bottom section layer


Card recipe:

1. With your white piece of card cut and scored you now need to find the middle point on the short side that you have scored at 2-1/4" and then cut from this point to the score line on each side, then fold it over and cut the other side the same using the first side as a guide.


2. Glue all of your dsp pieces into place like in the picture below,  the small square piece of dsp (from the 2nd sheet) is cut in half diagonally to give you 2 triangles and these get glued to the bottom piece of your card.


Above - middle front and bottom section

Above - back section

3. Adjere all of your strips of card to the window sheet and cut all the edges if they hang over. Now cut the square piece that is needed for the diamond front of card. With the leftover piece you can cut the section that is needed to act as your stopper to hold the easel part in place, on the bottom section (for this piece cut it so that it measures 3-7/8" long now decide which side is going to be the top and which is the bottom and along the bottom go in 1" from each end and cut to the top corner).

4. Die cut the butterfly out of the window/card piece place dimensionals on the reverse and then after you have glued your green, white and dsp squares (for the diamond section) together adhere the window/card piece to it.

5. Stamp and die cut all of your butterflies and your many messages, I use the stamparatus for this as it makes it alot easier to stamp ( I used memento tuxedo black ink - 132708 ).Die cut them all out and using stampin write markers colour the butterflies in and then use your snips (scisssors) to seperate each butterfly. 

6. Choose which sentiment you'd like to use and glue them into place on the diamond section using wet glue or dimensionals, your choice, give the butterflies a slight curl using the bone folder and attach these with wet glue (placing the large butterfly into the recess section of the window sheet piece).

7. Apply glue to the reverse side of the diamond section making sure you only apply it where you need it (otherwise your card will glue together shut), adhere the piece for the stopper to the bottom of the card and add the sentiment and butterfly.

8. Finally I added a small heart which comes from the many messages when die cut, and the stamen, which I thought added a bit of dimension, which comes from the 'Perenial petals' dies.

And that is the card finished. I'd love if you made a version of this card if you shared it with us all over on our new facebook crafting group which is 

Chatterbox crafters

Take care everyone and happy crafting!!

Huge Crafty Hugs

Natalie x

Remember if shopping with myself to use my host code if your order is under £150 so that I can send you a card and a small gift in the post but if your order is over then please claim the rewards yourself

JANUARY HOST CODE

3K2SWYSB

If you'd like to come and join my team I'd love to have you. I'm here if you need to contact me and talk about the great offers that Stampin' Up! have on at the moment, or alternatively click on the side bar of my blog that says 'Shop with me' and then click on join!

One of the offers which is amazing, is along with everything else that you get, you also during Sale a Bration get yourself  5 lots of 6" x 6" dsp packs which is a grand total of 200 sheets of new papers not available to purchase until later on this year! 

So come and join in all the fun you won't regret it x


Super selection of stunning papers!

 Product List

Stamparatus
[148187]
£46.00
Paper Trimmer
[152392]
£23.00
Paper Snips
[103579]
£9.25
Bone Folder
[102300]
£6.50

Tuesday, 19 January 2021

SUOC#267 - Love


Hello again everyone, hope you're all keeping well and enjoying the release of the new mini catalogue. Welcome to the SUOC#267which this time is LOVE and I couldn't resist using some of the new products from the gorgeous new suite called ' Love you always' and oh my I'm in love with it........ there are so many different stamps and dies and such exquisite foil paper within this suite it's fabulous!

The card I've chosen to make for this challenge uses a few of these products....................... so let's get started.


I've first cut myself a cardbase with the new Basic white thick cardstock which measures 5" x 11 1/2" and then scored it at 5" on the longside so that I have a card which has a smaller front than the back.

I've got a Basic white thick layer 4 7/8" x 4 7/8" and layered a piece of the beautiful speciality dsp that measures  1/8" smaller and glued them together flat. Once it's dry I then die cut the heart floral shape out of the foil , lay it onto the front of this card/dsp layer and draw around the inside of the heart which I then cut out using my craft knife, if you prefer you can use the paper snips to cut it out. I then lay this onto the card base front and very lightly draw a pencil mark around the inside of the apperture so that I can lightly ink the area using the blending brushes and the blushing bride ink, you can if you prefer just ink the middle of the card front but if you have a shape to work with you can bring the ink in from the outside of the heart into the centre, this will make the outside a bit darker.

I've stamped the WITH image where it needed to go, over where I've applied ink and then left this all to dry.

I've then glued the foil heart die cut piece into place on the card/dsp layer so that the apperture that I've cut out is lined up with it (I've only put glue on the inside rim of the heart so I can give the outer a bit of a curl upwards to give it depth). Using the foam sheets I've cut myself some big pieces to place onto the reverse side of the whole layer as this gives the piece alot more support, and it's easier than using lots of dimensionals, I've then attached this whole layer to the front of the card with the WITH sentiment lining up within the heart apperture.

The foil heart that is cut out from the centre of the heart shape die is now used on the side using pieces of the foam sheet to raise it where necessary. The LOVE is die cut out using a piece of blushing bride cardstock with the adhesive sheet adhered to the back making it so much easier to glue onto the heart (I prefer to use the adhesive sheet for glueing pieces onto foil as the wet glue usually bleeds out the side for me and then it spoils the foil look).

I've now got my piece of blushing bride cardstock which measures 4 7/8" x 6 3/8" for the centre of my card and dry embossed just the side using the dainty diamonds folder, then I've glued the ribbon round the side of this piece using a glue dot on each end to adhere the ribbon onto the back securely, this is now glued into place on the card, then I've attached the ALWAYS into place the same way I did the LOVE die cut, tied a length of twine to draw the middle of the ribbon in, tied a bow and used glue dots to glue it into place.


I've stamped 3 x flowers using blushing bride ink and then softly blended some of the ink into them using the blending brushes and then die cut out, these are now given a quick curl using my bone folder and then glued into place along with all of the small foilage and flowers.


That's my card finished and I was really pleased with how it turned out. I really hope you can take part in theSUOC#267I'd love to see what you come up with.

Until next time stay safe and happy crafting!!

Huge Crafty Hugs

Natalie x


Please remember if shopping with me to use my host code for orders under £150 and receive a small gift from myself the following month, but please if your order is over then don't use my host code claim the rewards for yourself and grab yourself some free products.

JANUARY HOST CODE

3K2SWYSB

Don't forget through to februaury 28th for every £45 spend you can claim saleabration products when you place your order.


Product List

Paper Snips
[103579]
£9.25
Bone Folder
[102300]
£6.50
Paper Trimmer
[152392]
£23.00