About Me

My photo
My name is Natalie and I love anything to do with card/paper. I have been a papercrafter for many years now and I never get bored playing with all the wonderful products available. I've been married to my wonderful husband Nathan for 35years now and we are still very much in love with each other as the first day we met each other. We have 3 wonderful children and 5 gorgeous grandchildren so we have lots to be thankful for. Since joining Stampin' Up! in 2018 I've grown so much in confidence with myself and I even tackle technology, which for me is a huge step to have taken, but I'm getting there slowly.

Friday, 24 July 2020

SUOC 254 - Colouring


Hello everyone and welcome to another challenge blog. This is the SUOC 254 challenge and the theme for this month is Colouring.
So I thought to myself what can I do to include colouring, this is what I've come up with, I hope you like it.
I,ve used a really pretty little stampset that carried over from last years annual catalogue called Daisy lane, it was one of my favourite stampsets last year and I just couldn't resist bringing it out and having a play with it again.
So let's get on and make the card.

Materials needed:

Whisper white thick cardstock

1pc - 21cm x 14.8cm scored on the long side @ 10.5cm  this is the card base
1pc - 7cm x 14.4cm for the front layer
2pc - 10.1cm x 14.4cm for the inside of card
1pc - 1.3cm x 5.8cm for the sentiment
Scrap piece for 6 x daisies to be stamped on and punched out

Rainbow glimmer paper

1.5cm x 6cm for the sentiment layer

Length of seam binding ribbon to tie round the card in a bow at the front


Card recipe:

1. Cut, score and burnish your card base piece of card.
2. Cut your piece of card for the front layer and the 2 pieces for the inside of your card.glue the inside back piece into place, not the piece that goes on the reverse of your front at this stage.
3. The front layer piece you need to use your sponges to ink it up blending the 2 colours into each other as this gives it a lovely effect, glue this piece into place once its dry, you can give it a quick blast with your heat tool to speed up the process if you so wish.
4. Ink your daisy stamp up using the stampin' write markers, use the brush end to place the colour where you would like it, this is another great way of getting great results with colours, now you can stamp the image onto your scrap piece of card. You need to repeat this step 6 times and then punch your daisies out.
5. Glue 2 of your daisies together (3 times) and then glue them into position on your card front.
6. Using your stampin' blends and the brush end colour your ribbon, alternating the colours, this will pretty much dry instantly, you can now tie it round your card front and tie a bow at the front. Now you can glue your other inside piece of card into place and this will cover up your ribbon. You can if you wish place a glue dot under your bow to keep it in place.
7. Cut your piece of rainbow glimmer paper and your piece for the sentiment, stamp your sentiment and glue these 2 pieces together, glue to the front of your card using dimensionals.
8. The last thing you need to do now is colour your gold glitter enamel dots using dark bermuda bay stampin' blend and then place them onto your card where you would like them to be. 
That's the card finished hope you liked it, I certainly enjoyed getting my daisy stamp out and using it again.
Thanks for dropping by and taking a look at my blog I really do appreciate it. Any questions please don't hesitate to contact me I'm only too happy to help you.
Take care till next time

Big Crafty Hugs
Natalie x


Products used:


JULY host code for orders undr £150
WPSMKEK9

Tuesday, 21 July 2020

3D Cube pop up card


Hello again and welcome to another tuesday make.
We've been having some really lovely weather here in Essex the last few days and I don't know about you, but I do struggle a little to get motivated when the weather is hot!!!! 
Anyway I managed to get this little card done for you all, hope you like it.

 I wanted to share with you all a card I've made in the past but thought it was time to bring it back again. The style of the card we're making today is known as a 3D cube pop up box card, and it's perfect for fitting in an envelope as it folds flat.
So let's get started.........

Materials needed:


Soft seafoam cardstock

2pc - 4" x 8 1/2 both scored on the long side at 2", 4", 6" and 8" back cube
1 of these pieces you now need to cut in half on the 4" side @ 2" these pieces form the 2 smaller cubes for the front of your card.
1pc - 1 3/4" x 1 3/4" embossed and then cut in half corner to corner giving you 2 x triangles for the front cubes.
Scrap piece to die cut 2 x ferns.

Forever greenery dsp
4pc - 1 7/8" x 3 7/8" these pieces go on the inside of the back cube
12pc - 1 7/8" x 1 7/8"   -   6 pieces for the inside panels of your smaller cubes (bottom, front and back not top as it doesn't show), the other 6 pieces are for the outer of your cubes and the 2 sides above the smaller cubes.
2pc - 1/2" x approx 1 1/2" to be folded in half and used to glue your large sentiment circle onto the inside of your cube.

Gold foil sheets
Scrap pieces to die cut 2 scallop circles and 1 stitched circle plus 4 tiny ferns.

Whisper white thick cardstock
Scrap pieces for die cutting 2 small circles and 1 larger circle to mount on your gold circles.

Shaded spruce cardsock
Scrap piece to die cut 2 ferns


Card recipe:

1. Cut, score and burnish you soft seafoam pieces for your cubes. The small 1/2" section that is at one end you need to mitre the corners slightly add glue, and fold the card onto itself to form your cubes.
2. Cut all of your dsp pieces and glue the inner back cube pieces into place.
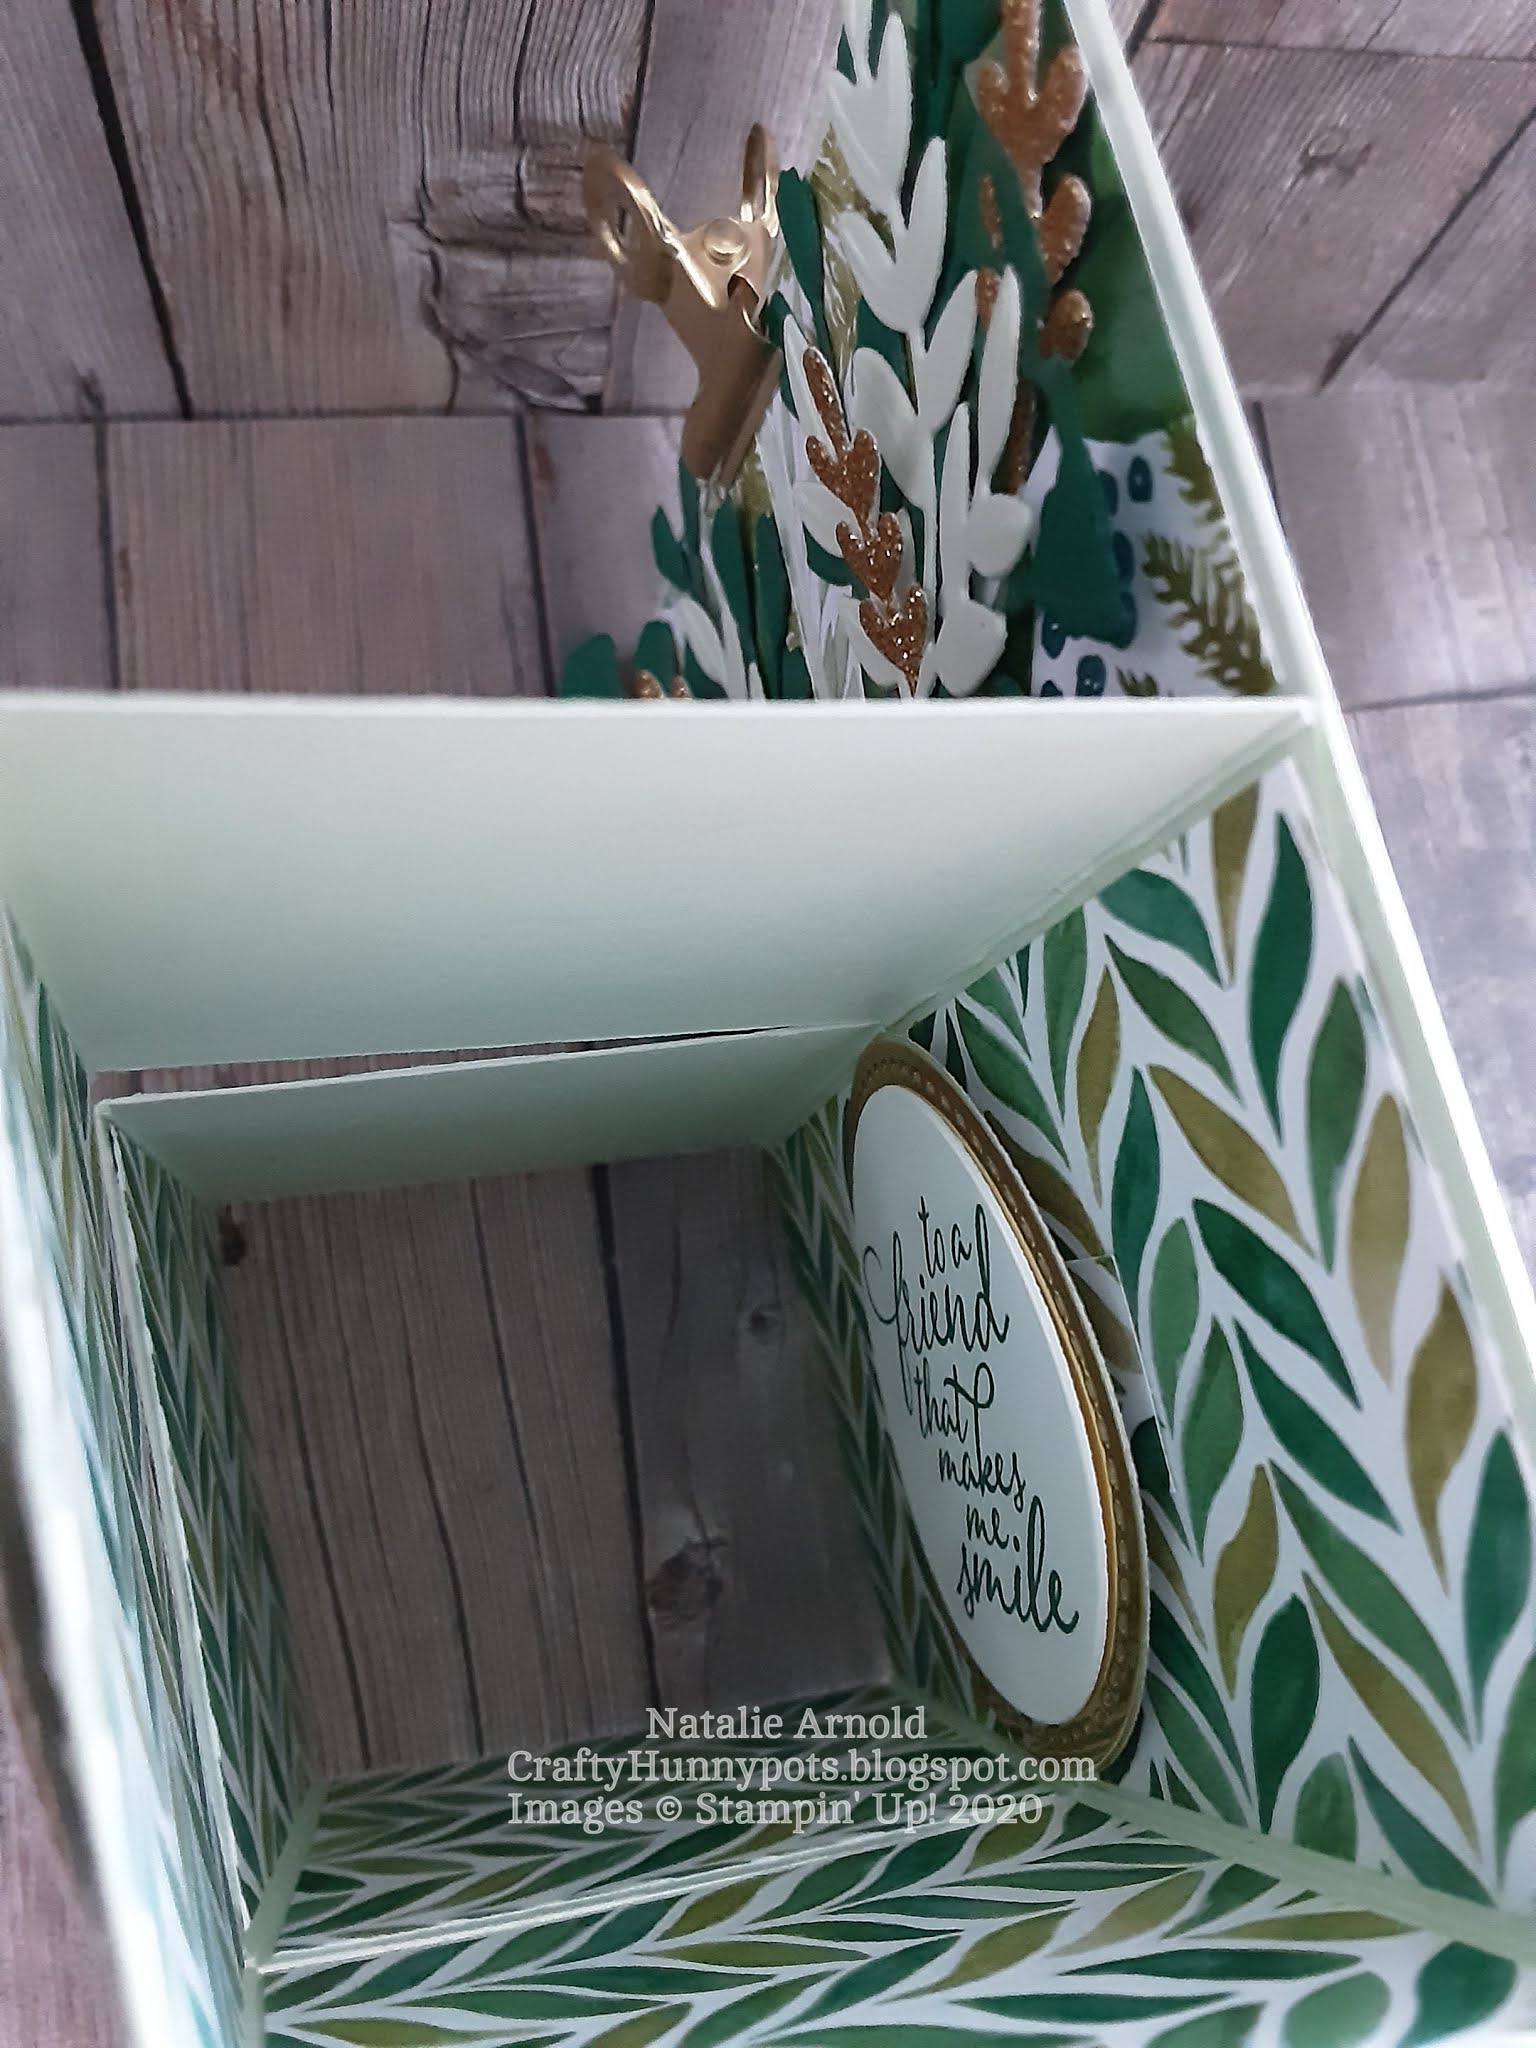
3. Now glue all of your pieces to the insides of your smaller cubes (only 3 in each), glue these cubes to the back cube, making sure the section inside the smaller cubes without dsp on it is in the top position . Make sure you have everything lined up nice and squarely otherwise your card will not stand up very well.
4. Glue the rest of your dsp pieces into place ( one on each side of the smaller cubes and one on the side above the smaller cube ontothe back cube.
5. Now the next piece is a bit tricky but you have to do this when you have all of your cubes glued together. I've attached a picture for you to see below you just have to imagine that it's the all of the cubes stuck together.


With your 2 pieces of 1/2" x 1 1/2" strips folded in half you need to glue one side of each of them to the sides of the cube having it flush with the edge of the cube, they will meet in the middle, you can now place glue carefully onto the othersides of the dsp ( the sides that are loose in the picture), and glue your sentiment ( you will need to stamp sentiment and glue the circle layers together first) into place. You can very careully fold the back cube flat on itself giving you something to push your sentiment on to, making it a bit easier, try nd get it central with everything as it makes it alot easier to fold it all flat on itself.
Hopefully the pictures below will help.


6. Now once you've done the rest of your stamping and die cutting of circles and ferns, and the embossing of your 2 squares, which are then cut into triangles, you can glue them all into place, everything is glued flat into place except for the 2 sentiments which once both of the circles have been glued flat together you glue them onto the card using stampin' dimensionals.

The back cube will fold flat with the 2 smaller cubes folding up and flat making it easy to place into an envelope.
Hope you enjoyed the project and you give it a go, please do contact me if you have any questions about the project or joing my team at Stampin' Up I'm always here to help so please drop me an email nataliearn50@hotmail.com


Products used:


JULY host code for orders under £150 
WPSMKEK9

Tuesday, 14 July 2020

Christmas in July


Hello again everyone, can you believe it's tuesday again!!!!!!.
 Well it is and this week I thought we'd do something different, and do Christmas in July. Yes I know it's only July but those of you that know me, will know that I absolutely LOVE making christmas cards, and as a Stampin' Up! demonstrator I get to pre order items from the August - December catalogue, which will be released to all of you lovely followers on 4th August. If like myself you love getting your hands on products early then why not join my team, and you could order some of the new bits for your starter kit. If you're interested then please don't hesitate to contact me and I can tell you how.

I was so excited when I received my pre - order that I had to get making, and this is the first card I've made using a really lovely bundle called Snowflake wishes, after all who doesn't love a snowflake on a christmas card? I've also used the Snowflake dsp which is absolutely exquisite.

Let's get started with this very easy to assemble but very gorgeous christmas card.

Materials needed:


Highland heather cardstock

1pc - 10 1/2cm x A4 length (uk) scored in half for card base
1pc - 10.1cm x 14.5cm front panel of card


Whisper white thick cardstock

1pc - 10.1cm x 14.5cm for inside card panel


Snowflake dsp - coming soon

1pc - 9cm x 12.2 cm for under front card panel


Balmy blue glimmer paper - coming soon

1pc - approx  5cm x 9cm for die cutting 2 snowflakes


Snowflake splendor 1/4" ribbon - coming soon

1pc - approx  14cm long


Snowflake adhesive - backed embellishments - coming soon


Card recipe:

1. Cut, score and burnish card base
2. With your 2 panles for the inside and front of your card cut to size, you now need to die cut using the die that makes an apperture on your card piece, making sure that you do this centrally on both of your card pieces.
3. With the white piece of cardstock, for the inside of your card you need to emboss some snowflakes on two of the corners, using the embossing die form the Snow time dies (see picture below). Glue this piece to the inside of your card.


4. Having cut your dsp to size you now need to lay it with the front die cut panel piece sitting on top and do the stamping of your sentiment onto the dsp through the apperture making sure you get it lined up centrally, you can if you prefer mark through the apperture where you need to stamp and then take the front panel piece away before stamping, it's whatever is easiest for you to do.
5. Your dsp piece can be glued flat onto the front of your card base.
6. Glue your apperture panel over the top of the dsp piece using dimensionals so that it's raised, giving the panel depth and interest.
7. Die cut 2 x snowflakes from your glimmer paper and then glue these on flat.
8. Attach your ribbon using 3 glue dots one either end and one in the middle.
9. All that remains left to do now is placing 5 x Snowflake adhesive - backed embellishments onto your card front.

This is as I said an easy card to assemble but I really loved th finish of it. 
Hope you liked the card, I'm sure when the products are available you're going to love them as much as I do.
Thanks for popping by and checking out my blog post take care and stay safe till next time.
Big crafty hugs
Natalie xx


July Host code for orders under £150 on line

WPSMKEK9 

Monday, 13 July 2020

SUOC 253 : Animals Whale of a time


Hello again everyone and thankyou so much for sparing the time to pop on to my blog and have a look at my project today, I really do appreciate it.
Well today I've made this gorgeous little card for the SUOC 253 challenge and the theme for this month was animals. I thought it would be a great chance to play with this gorgeous suite again called ' Whale of a time '. The card is a relatively easy card to make so let me show you how.

Materials needed:


Whisper white thick cardstock

1p - 4 1/8" x A4 length (UK) scored in half at 5 7/8" for card base
1pc - 3/4" x 1 5/8" for sentiment 
1pc - 4" x 5 3/4" for inside of card
1pc - 1" x 5 5/8" for the embossed waterbrushed front strip


Pretty peacock cardstock

1pc - 4" x 5 3/4" for front layer


Whale of a time dsp

1pc - 3 7/8" x 5 5/8" for the front layer
1pc - 3/4" x 5 3/4" for the inside of card


Card recipe:

1. Cut, score and burnish your card base.
2. Cut the pretty peacock card piece and the dsp piece and glue onto the front of your card base.
3. Cut your strip of whisper white cardstock and emboss it through your die cutting machine using your embossing folder. Now with the large water brush apply a couple of drops of Coastal cabana ink refill onto a stampin block and water it down using the brush, now brush it all over your card piece (being careful not to wet the card too much) once your happy with the look let it dry a bit. 
4. Once the card piece is dry you can now use some daubers and just apply a little bit of Pacific point from your inkpad and Coastal cabana also, by just gently rubbing the daubers in the areas you wish to colour.
5. Glue some of the ribbon round the front of your card attaching either side onto the reverse ( less ribbon is used this way).
See the picture below.


Now you can tie yourself a ribbon and glue using a glue dot on top of the wrapped around ribbon (I made a triple bow by tying it round my fingers in a figure of eight 3 times).
6. Glue this piece using wet glue to the front of your card.
7.Cut out 3 x turtles from one of the sheets of dsp that have the turtles on and attach to the front of the card.
8. Having cut your sentiment piece of card you can now ink your sentiment stamp up using the stampin' write marker pens, I've used granny apple green, coastal cabana and pacific point for my sentiment. Just rub the brush end of the pen over the section of the stamp that you want to be that colour. Glue this on with stampin' seal.
9. Now all that is left to do is the inside, so cut your inside whisper white piece of card, glue the piece of dsp for the inside of the card to the bottom of it and then attach to the inside of your card.
 

Hope you liked the card as much as I liked making it, stay safe and keep crafting till next time.
Thankyou
Big Crafty Hugs
Natalie xx
          

Products used:


JULY host code for on line orders under £150 
WPSMKEK9