About Me

My photo
My name is Natalie and I love anything to do with card/paper. I have been a papercrafter for many years now and I never get bored playing with all the wonderful products available. I've been married to my wonderful husband Nathan for 35years now and we are still very much in love with each other as the first day we met each other. We have 3 wonderful children and 5 gorgeous grandchildren so we have lots to be thankful for. Since joining Stampin' Up! in 2018 I've grown so much in confidence with myself and I even tackle technology, which for me is a huge step to have taken, but I'm getting there slowly.

Tuesday, 11 May 2021

SUOC 275 - Hydrangea Haven Colour challenge


Hello again all, and welcome to the SUOC#275  which this time it's a colour challenge, and I don't know about everyone else but I do love a colour challenge! 
Hydrangea Haven colours are:-
Gorgeous Grape
Highland Heather
Misty Moonlight
Mossy Meadow
Old Olive 
Rococo Rose (sadly this is retired)
Seaside spray (sadly this is retired)
Whisper White ( which is now Basic White)

Lots of choice, but I was a bit overwhelmed with trying to use all of them lol, so I've chosen to use just 5 for my card.............


I've made an easel card this time, one of my favourite folds for a card, I thnk it makes the card stand proud and gives alot of dimension to it too............
And it's created by taking a card base and folding the front of it in half, and then adding an additionally part on for the easel section, very easy to create and it


makes the card look very 3D from the side, but the great thing is it still folds flat for posting, well as long as you don't put too much decoration on the base part, I think my ribbon would probably make this a large letter if you were posting it!

I've used one of the brand new bundles from the new annual catalogue, which is called 'Color & Contour' this is such a great bundle, you get an amazing amount of dies with it, I've used 2 of the topper dies for this card (the base one is glued flat to the card front and the top one is attached with dimensionals) and the die that cuts out the beautiful stemmed flower. 

The in fill stamps are the disinktive stamps and they don't fit perfectly within the stamped image, they are designed to look like water colouring, I think they look beautiful when used and I absolutely love this new bundle. The colours I've used for my stampin are Old Olive and Highland Heather for the background stamping I've used 2nd generation ink and for the sentiment I've used Gorgeous Grape and then fussy cut the words out individually (my favourite thing to do with sentiments it makes them look so different).

The new Highland Heather ribbon is just so pretty and acts as a great stopper for the easel part of the card when tied into a bow and adhered using glue dots. I've used the Seaside Spray pastel pearls which is my forth colour and Basic White for the card base being my 5th. 

Hope you enjoyed looking at my blog today, please don't forget to pop over and look at all of the other design teams wonderful creations, and maybe join in with the challenge and share what you make over on SUOC#275 I'd love to see what you all come up with.

Take care see you on the next challenge 

Huge Crafty Hugs

Natalie x

MAY HOST CODE

XRBMP6UP

Please use this code if shopping with myself online and your order is under £150 this will enable me to send you a small gift of thanks and a card in the post the following month x


Product List

Clear Block E
[118484]
£11.25
Paper Trimmer
[152392]
£23.00
Paper Snips
[103579]
£9.25
Bone Folder
[102300]
£6.50


Craftalong Tuesday - Quiet Meadow


Craftalong Tuesday again can you believe a week has passed already! What an amazing week it has been too with the launch of the new catalogue, those of you who have received a catalogue, whether it be through myself or your own demonstrator, or maybe you're a demonstrator yourself, I think you will all agree with me when I say WOW amazing new products LOVE so many of them lol!!!!
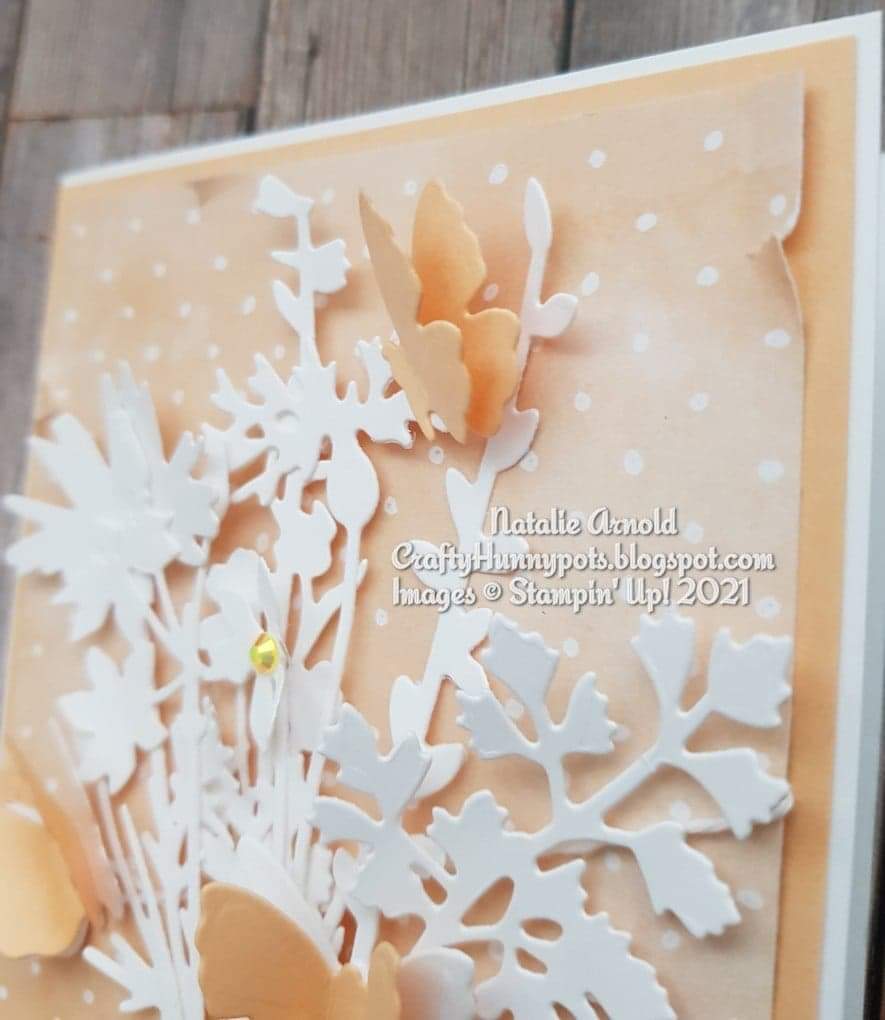
Todays card is using one of the new bundles called 'Quiet meadow' and oh my it has such beautiful dies within it that I think I used nearly all of them just on this one card......... just coudn't decide which ones to use............ and I think you will agree that they do look pretty amazing together. 


I wanted to create a bouquet of wildflowers, I love to see wildflowers, we've planted a whole border of wild flower seeds in our garden and they are just starting to come to life can't wait for them all to burst into their different colours.....

Materials needed

Basic white thick cardstock
1pc  14.85cm x 21cm scored on the longside at 10.5cm for the cardbase

Basic white cardstock
1pc 10cm x 14.35 for the inside of card layer
Half an A4 sheet to die cut all the elements out - 1 of each flower, 2 large butterflies and 1 small tag

Pale Papaya cardstock
1pc 10cm x 14.35cm for the front of card layer
Scrap piece to die cut the elements out - 2 large butterflies and 2 smaller butterflies

Hand Penned dsp
1pc 9.5cm x 13.85cm for the front of card layer - tear and rough up the edges

Snail mail twine
Length long enough to wrap around the front of card layers, tie a bow and wrap around the bouquet holding it together

2021 - 2023 In color jewels
1 Pale papaya for the centre of the flower

Pale Papaya classic stampin' pad


Card Instructions

Fold and burnish the cardbase using the bone folder.

Glue the inside layer to the card.

Tear the edges of the dsp just by carefully ripping it and then using your finger just ruffle them up a bit to make it look distressed (I like doing this with dsp it adds a bit of dimension to your card). Wrap the twine around the dsp being careful not to pull it too tight as you don't want to rip the dsp, fix to the back of the dsp using tear n tape adhesive, apply glue all over and  adhere it to the pale papya layer and then glue them both flat to the front of the card.

Having die cut all of the elements out, form the flower stems all into a bouquet by holding them and then wrap some of the twine around the stems, place a glue dot onto the reverse to hold the twine in place, attach more glue dots and in some places attach mini dimensionals, so that it gives the bouquet depth when attached to the card front, adhere to the card.

Stamp the sentiment onto the tag and then attach it to the twine with another piece of twine tying a bow whilst attaching.

Give the butterflies a slight curve using the bone folder and attach them to the card front using glue.


Attach the jewel onto the flower, use more if you wish I thought it only needed to have one to add a little bit of sparkle to the card........

Hope you enjoyed todays project, I loved making this card it just seemed to fall into place and I have to say that I LOVE it!!!!!

Huge Crafty Hugs
Natalie x

MAY HOST CODE
XRBMP6U7
Please use this code if shopping with me and your order is under £150


Don't forget the amazing joining offer that is available throughout May!
You could start your amazing journey with Stampin' Up! and join my team of Craftyhunnypots. I'd love to help you start your journey of fun filled crafting and friendship. Please do contact me if you have any questions I'd love to help.

Tuesday, 4 May 2021

Craftalong Tuesday - Pansy Petals/ Happy Birthday card


Hello again everyone and welcome to another Craftalong Tuesday. I hope all of you are keeping well and enjoyed the bank holiday weekend that we have just had here in the UK. 
I have a rather lovey little card for you this week using one of the brand new products from the new annual catalogue 2021, which as of today gone live, which means that anything from it can now be ordered, and as you can all probably guess........ YES my order has already gone in lol.......
So on to todays project , which I have made mine using one of the beautiful new in colours 2021 - 2023, Polished Pink and I have to say I absolutely love along with all of the other colours too............

Materials needed:

Polished Pink cardstock
1 piece 5 7/8" x 8 1/4" scored at 4 1/8" for the card base
1 piece 4" x 5 3/4" for the front of card embossed layer

Basic White thick cardstock
1 piece 4" x 5 3/4" for the inside of card stamped layer
1 piece approx 2 1/8" x 4 1/8" for the die cutting of front of card tag

Pansy Petals DSP
 1 sheet with the flowers on for die cutting out
1 sheet with the leaves on for die cutting out and the reverse side for the front of card strip 3/8" x 4"

Polished Pink Open Weave Ribbon
Piece about 5" for tying through the tags

2021 - 2023 In Colour Shimmer Vellum
1 piece approx 2 1/8" x 4 1/8" for the die cutting of front of card tag

Greenery embossing folders
Embossing part of the polished pink front of card layer

Bumble Bee Trinkets - 155568
1 for the front of card

Ice cream  Corner Sprinkles
3 x yellow ones for the centres of the pansies

Evening Evergreen classic stampin' pad
For stamping of the front and inside of card sentiments

Card Instructions

Fold and burnish the card base using the bone folder.
Stamp the inside of card image onto the white layer and glue to the card.
Stamp the sentiment onto the die cut white tag and then using the ribbon piece tie the two tags together and put a glue dot in between them just to keep them secure when on the card.
After die cutting 1 x large pansy, 2 x small ones and 3 x leaves give them a slight curve using the bone folder and then using a small amount of glue in the centre of each of them
 (reverse side) attach them to the tags. Slide the leaves under the flowers where they need
 to go and add a small amount of glue to hold them in place.
Apply small dots of glue to the inside of the pansies and using the take your pick tool attach the 3 small ice cream sprinkles.
Using a glue dot attach the cute Bumble Bee trinket onto the corner of the vellum tag.
Now using the embossing folder (that to me looks a bit like a basket weave), and emboss the front of card layer having the embossing folder laying flush with the bottom end of card. Attach the dsp strip using glue along the top of the embossed section covering up the line impression that has been left. Glue this whole piece to the front of the card.
Using dimensionals attach the tags to the card and that's the card finished for today. 
Hope you enjoyed the card, I made two other cards the same but just used the other two colours from the new in colours just to show you what they looked like. 

Fresh Freesia

Pale Papaya

Inside of the cards

Remember today there is a great joining offer which runs from 4th May - 31st May 2021 which is a starter kit all of your own choice up to the value of £154 but you only have to pay £99 you also get free postage so that's another saving of £4.95. You don't have to be a business demonstrator you can just enjoy the discount thereafter as long as you meet the minimum quarterly spend. I'd love if you joined my team and became a member of the CraftyHunnypots. Interested? Need help? Please do contact me I'm here to help with whatever I can x

Huge Crafty Hugs
Natalie x


MAY HOST CODE
XRBMP6U7

Please use this code if shopping on line with myself and your order is under £150

Product List

Paper Trimmer
[152392]
£23.00
Bone Folder
[102300]
£6.50
Paper Snips
[103579]
£9.25