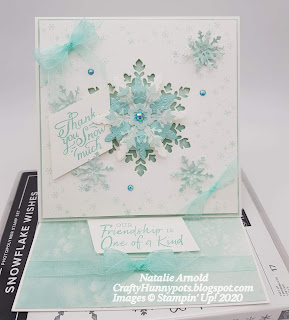
Hi everyone and welcome to another Blog Highlights. I love this time of the month when we all take part in this amazing blog, anxiously waiting to see if your votes have got us into the top ten, which then enables us to take part in Kylies blog hop.......... Oooooooo it's exciting. So this month I've chosen to use a christmas favourite of mine ' Snowflake wishes' as this has a really lovely sentiment in it that says thanks........
Let's get started...
Materials needed:
Whisper white thick cardstock
1pc - 5 1/2" x 11" scored on longside at 5 1/2" and 8 1/4" this is the card base
1pc - 5 1/2" x 5 1/2" for the front of card piece
2pc - 5 3/8" x 5 3/8" for matting underneath your dsp
1pc - 5 1/4" x 5 1/4" for the snowflake apperture
1pc - 1 5/8" x 2 1/2" for the stamping the thanks sentiment
1pc - 1 1/8" x 2 7/8" for the stamping the other sentiment
1pc - 1 1/4" x 3" for matting underneath your dsp for under friendship sentiment
Scrap piece for die cutting 1 snowflake
Snowflake splendor dsp
2pc - 5 3/8" x 5 3/8" for matting onto whisper white pieces
1pc - 1 1/4" x 3" for matting onto whisper white piece for the friendship senitment
Scrap pieces for die cutting snowflakes 6 in total
Pool party cardstock
Scrap piece for die cutting 1 x snowflake and then embossing using winter snow folder
Pool party sheer ribbon
A length long enough to tie on 2 corners, around the bottom of card and 2 double bows which are tied onto the card using a piece of extra ribbon
Blue adhesive backed gems
3 x small and 1 x large for front of card
Pool party classic ink pad
For stamping small snowflakes onto the snowflake apperture piece
3 x large in total and 5 x small
Card recipe:
1. Cut, score and burnish (where necessary) all of your pieces of cardstock and dsp.
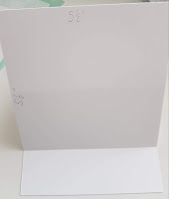
This is how your card base will look when you've folded and burnished it, this is whats know as an easel card.
2. Now glue the piece of whisper white cardstock that measures 5 1/2" x 5 1/2" to the card base.
3. Glue your 2 - 5 3/8" x 5 3/8" dsp pieces to the whisper white cardstock pieces (the reason I like to do this is because you give your dsp depth without using dimensionals) that measure the same and then glue them both to the front of the easel and the base (first wrap your ribbon piece to the base piece).
4. Die cut the large snowflake apperture out of your whisper white piece ( find the centre edge of your card and then measure in 1" from both opposite ends).
5. Now using pool party ink, stamp small snowflakes around the edges of this card piece, then wrap ribbon round 2 corners as in picture and tie extra piece only on the bottom one. The top corner you will need to tie a double bow and then tie this on to the other corner using another extra piece of ribbon.
6. Attach this piece onto the front of the card using dimensionals (make sure you have one in the middle of your snowflake so it doesn't sink).
7. Die cut all of your snowflakes, embossing the pool party one and curl them a bit using a bone folder, glue them together where necessary and attach to the card front. The main large snowflake is attached using just 1 dimensional all the small ones are attached flat with wet glue.
8. Stamp your 2 x sentiments , glue the dsp piece to the whisper white piece ( this is for matting your friendship sentiment onto), cut them all at an angle. Place dimensionals onto the back of the friendship piece and attach it to the dsp/card piece.
9. Glue flat the base sentiment, use 1 x dimensional to glue the front sentiment into place.
10. Attach your gems and your card is finished.
Hope you enjoyed todays card, it's a fun card fold to make so give it a go youself.
I'd really appreciate if you like my card to give me a vote I'd love to be able to take part in Kylies blog hop.
Just go on the vote for me link below but don't forget you have 5 votes to use and there are some amazing cards from all of the other lovely crafters, thanks in advance.


The soft colours and textures make this a stunning card Natalie! Thanks for being part of my International Highlights this month! All the best with the voting.
ReplyDeleteThanks Kylie I love taking part in your International Highlights thanks for giving me the opportunity to participate x
DeleteFabulous card, Natalie, beautiful pastel colours and great sentiment for a seasonal thank you :)
ReplyDeleteThanks Anne I love these colours and the snowflake wishes is one if my favourite thanks for commenting x
DeleteThe snowflakes are beautiful and such a lovely colour choice for the card. Very pretty :) .
ReplyDeleteMany thanks Rachael I do love snowflakes and the colours I think are my favourite for using with them x
DeleteLove this card - it looks so classy. I have voted x
ReplyDeleteMany thanks Jane x
DeleteStunning card Natalie all the best with the voting xx
ReplyDeleteThanks Ruth x
DeleteYour card is stunning, Natalie! I love the colours you used! ~ Kim Kroeker
ReplyDeleteThankyou so much Kim for your lovely comment really appreciate it x
DeleteAnother stunning card, just love those colours. Have voted too
ReplyDeleteThanks Debbie for your lovely comment and your vote x
Delete