Hi everyone. it's tuesday again and I cannot believe I'm going to say that it's also now November!!!!
Today I'm sharing with you a really lovely card that is so easy to achieve and you can make this with any of your leftover pieces of dsp, which means no need to waste any of those papers!
Materials needed:
Whisper white thick cardstock
1pc - 4 1/8" x 11 1/2" scored at 5 3/4" on the longside this is the cardbase
1pc - 3" x 5" for the layering of the card topper section
1pc - approx 2 1/4" x 2 1/4" for the sentiment die cut piece
Real red cardstock
2pc - 4" x 5 5/8" for the front and inside of the card - 1pc embossed
1pc - approx 2 1/4" x 2 1/4" for the sentiment die cut circle piece
Mossy meadow cardstock
1pc - 2 7/8" x 4 7/8" for the layering of the card topper section
Heartwarming hugs dsp
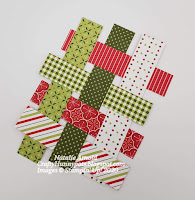
3 strips in different patterns - 3/4" x 4 3/4" for the paper weaving section
3 strips in different patterns - 3/4" x 3 5/8" for the paper weaving section
Mossy meadow 3/8" striped ribbon
1 piece long enough to tie a bow
Gilded gems
3 for the card front
Real red basic jewels
5 for the card front
Card recipe:
1. Cut, score and burnish the cardbase.
2. Cut the real red card pieces and emboss one of them, glue them to the front and inside of the card base making sure you glue the embossed piece to the front of card.
3. Cut your whisper white and mossy meadow pieces for the card topper and glue them together flat.
4. Cut all of the paper pieces that are needed and weave them together as in the picture below.
5. Now push the pieces close together leaving them all at different lengths, turn them over carefully and place a few strips of tear n tape to hold them all together.
6. Now glue the paper pieces flat onto the mossy meadow/ whisper white topper piece as below (mine isn't glued down yet make sure you glue your piece straight). You will notice that the paper pieces will hang over the edge, don't worry this is how I've made mine to look.
7. Using dimensionals glue this whole topper piece onto the front of the card making sure you get it in the centre.
8. Stamp your sentiment using mossy meadow ink and then die cut it out. Die cut the real red circle out, and then using dimensionals glue the sentiment piece to it.
9. Glue the whole sentiment piece flat to the card.
10. Tie a bow and glue it to the card using glue dots, and then place all of your gems and jewels onto the card front.
Card finished.
Hope you enjoyed todays project I loved making this because as I said it uses up leftover pieces of dsp, but actually makes a nice card.
Thanks for hopping onto my blog and having a little look I really appreciate it. Take care, stay safe and happy crafting.
Big crafty hugs
Natalie xx
If shopping on line with myself this month please do remember to use my host code so that I can send you a little gift in the post the following month to say thankyou xx
November Host Code
NW3UKEYE
Product List


A wonderful paper weaving card x
ReplyDeleteLove a bit of paper weaving and saving waste Jane. Thanks very much for commenting x Natalie
DeleteAnother great way of using those scraps that none of us like to just throw away...brilliant idea
ReplyDeleteNo one likes to waste those scraps - me especially lol thanks Debbie x
DeleteAnother great way of using those scraps that none of us like to just throw away...brilliant idea
ReplyDeleteWhat a fabulous curvy card - love the design xx
ReplyDeleteThanks Jane x
Delete