Hello and welcome again to my blog. Thanks for taking the time to hop on and have a look I really appreciate it.
Today I'm quickly showing you how I've made this card for a group challenge over in Chatterbox crafters facebook group, which is a new group that myself and two of my dear friends have started up for like minded crafters to join in with and show us what you've all been making. Every week myself, Anne and Ruth take it in turns to set a challenge for each other, last week Ruth challenged us all to make a Hidden flap card, she gave us some measurements to get us started and quickly explained how to make it. So I will quickly give you the measurements and a quick explanation so that you might have a go and find us on facebook and show us what you make, as we would love to see.
My card that I've chosen to make, is made using a really gorgeous stampset, which when you place an order through Stampin' Up to the value of £90+, is free during the saleabration period which is from 5 January - 28 Februaruy 2021 - I have listed all the products I've used below.
The first thing you need to do is cut some card for the card base - I've used melon mambo for mine and the measurements are:
1pc - 14.8cm x 25cm score longside @ 10.5cm and 21cm - cardbase
1pc - 12cm x 18cm score longside @ 7.5cm, 8.5cm, 9.5cm and 17cm - inner flap card
Then you need to fold and burnish them using a bone folder.
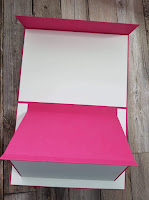
The above picture is the card base.
The lower picture becomes the inner flap card.
Glue the middle folded section together so that it becomes like a flat book spine.
You will now need to make yourself 2 x A4 white one sheet wonders - which basically are plain cardstock inked all over with different images and different colours, which is like having your own designer paper. These need to be cut to the sizes you require to fit on the card as below (you will have some remaining for use on other cards), and then you will glue the inner flap card to the centre of the inside of card base (I've used plain card just to show you but yours will already be patterned).
Above picture shows the book like spine and the side fold.
Picture above shows the side fold on inner flapcard being attached to the centre of the card base. The uncovered melon mambo is basically the back of the inner flap card and won't show when it's finished. The spine piece is now at the top of the picture making it hard to see.
Picture above shows the inner flap card being folded over on to itself, with the spine now laying flat up the top of picture.
Now all that remains to do is to stick the end panel down like below and then decorate as required.
Picture above shows just to put the glue down the 2 sides and to make sure you have your inner flap card closed with the spine facing in towards the glued piece.
Picture above shows the side fold with the glue on it folded over and this has enclosed the spine part so that now the inner flap card will open but will not come out.
Pictures above are from my completed card with all of the beautiful images stamped on it.
I've layered different colour and sized pieces on to the front of the card having a layer of the one sheet wonder cardstock on the top and then decorating it using the butterfly and hummingbird, having been stamped and then fussy cut out.
For the inside of the card I've die cut a scalloped oval from the 'Layered oval' dies - 151771 and then cutting a 1/2" wide piece of bermuda bay cardstock and placing each end into the 'Banners pick a punch' - 153608 (forgot to add these on my product list ooops).
I've also used my stamparatus (you can use any stamping platform) to stamp myself the sentiment stamps, which come as one huge stamp, one in each colour of ink that matches in with my colour scheme, and then die cut them out using the huge die, this way you can choose which sentiment , colour and tag shape you like for the card your using, and it also gives you a lot more sentiments for other projects and they'll all be stamped and die cut ready all in one go!............LOVE this bundle 'Many messages' great buy.
Hope you enjoyed the project and it made sense if you have any problems do please contact me and I will be only too happy to help you.
As always please use my host code for orders under £150 and receive a small gift from myself the following month but if it's over please claim the rewards yourself and don't use my code.
JANUARY HOST CODE
3K2SWYSB
Happy crafting everyone and don't forget to join us on our new facebook page
Take care see you again very soon
Huge Crafty Hugs
Natalie x


Wowzer, Natalie, an absolutely stunning card, love your own stamped paper - it is gorgeous, a really fun design with great colours. Many thanks for sharing :) x
ReplyDelete