Hello again and welcome to another craft tuesday. Today I thought I'd use the 'Playing with patterns' suite. This is a really great suite as it contains a delightful alphabet die set which I absolutely love for adding words to the front of a card or a project, it's not too big and you get to make any word that you desire. So let's begin with this very retro looking card which I feel you could make in to a male card as well as a female card and you could even make a childs card, just by changing the dsp that you use and maybe leaving out the bow.
Materials needed:
Whisper white thick cardstock
1pc - 14.8cm x 21cm score on longside at 10.5cm for the cardbase
1pc - 10.1cm x 14.4cm for the front of card layer
1pc - 1.5cm x 10.1cm for the front of card strip
Coastal cabana cardstock
1pc - 10.1cm x 14.4cm for the inside of card
1pc - 10.3cm x 14.6cm for the front of card layer
1pc - 1.8cm x 10.1cm for the front of card strip
Playing with patterns 6" x 6" dsp
3 different patterned sheets for the die cutting of 3 x circles
Calypso coral cardstock
1pc - 2.5cm x 8cm for the die cut 'HAPPY'
Foam adhesive sheets
1pc - 2.5cm x 8cm for the die cut 'HAPPY'
Playing with patterns resin dots
5 x for the front of card
Playing with patterns ribbon combo pack
1pc - Coastal cabana ribbon long enough to tie a bow
Card recipe:
1. Cut, score and burnish where necessary all of the pieces of cardstock for the cardbase and the inside and outside of the card. Glue them all in to place.
2. Die cut 3 x circles you need to use the 3 largest dies in 3 different patterns.
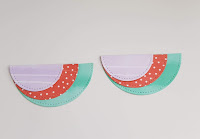
3. Now cut all of these circles in half, I folded mine in half and nipped the edges then I could see where I needed to cut them. Glue the circles flat to each other as in the picture below.
4. Now find the middle of the card front and glue the 2 circle halves (3 glued together x 2) on to it, like below.
5. Stamp across the white strip for the front of card using one of the Pattern play stamps, using Calypso coral ink. Glue this flat to the Coastal cabana strip and then glue flat to the front of card, covering up where the 2 circle halves meet.
6. Take one of the backings off of the foam adhesive sheet piece, and stick this on to the calpso coral piece of cardstock. Lay the 'HAPPY' dies on to it and run it through a die cutting machine, you might need to run it through a few times as it has to cut through the foam as well as the card.
7. Carefully remove the letters, peel off the backing and glue flat on to the strip across the front of the card.
8. Now stamp up the word 'Birthday' I've used the one from 'Here's a card' stampset 149438 which I forgot to add to the product list below. I've used a stampin' write marker pen to do this as it enables you to just ink the word that you want to use. I've used calypso coral to match in with the colour of the stamped strip piece, again I forgot to add this to the list below 147156.
9. Now all that is left to do is tie a bow and attach to the card using mini glue dots, place the resin dots on to the front of card and that is the card finished.
Hope you enjoyed todays project. I loved the way the card finished off today in all the subtle colours, hope you find time to make one of these cards yourself and enjoy doing so.
Take card and stay safe
Big Crafty hugs
Natalie xx
Please remember when placing an on line order with myself to use the host code for orders under £150 so that I can send you a small thankyou gift the following month in the post.
NOVEMBER HOST CODE
NW3UKEYE
Product List


Another great card Natalie....how clever is that using halved circles. Genius, at first glance I thought I was a curvey die. Super colours
ReplyDeleteThanks Debbie it's such an easy but quite an effective card to make I think it would be great for any occassion x
ReplyDelete