About Me

My photo
My name is Natalie and I love anything to do with card/paper. I have been a papercrafter for many years now and I never get bored playing with all the wonderful products available. I've been married to my wonderful husband Nathan for 35years now and we are still very much in love with each other as the first day we met each other. We have 3 wonderful children and 5 gorgeous grandchildren so we have lots to be thankful for. Since joining Stampin' Up! in 2018 I've grown so much in confidence with myself and I even tackle technology, which for me is a huge step to have taken, but I'm getting there slowly.

Tuesday, 15 February 2022

Craftalong Tuesday - Case the catalogue


Hi everyone, I have a great card to share with you today, which I have case'd from the mini catalogue. I know you're probably asking what does that mean, well it's basically 'Copy and Share Everything'. Now when the new mini catalogue first came out, I absolutely loved seeing this card, which you can find on page 42, and I thought to myself I have got to case it, so as you will see I haven't made it completely the same but the basis of it is there........

mini catalogue page 42

I changed a few bits and added some other bits, but you can still see where the card basis came from.............. so let's begin!

1. Cut a piece of Evening Evergreen cardstock 14.8cm x 21cm score in half at 10.5cm fold and burnish.
2. Cut a piece of the dsp and a piece of the basic white cardstock 8.5cm x 12.5cm and glue them together. Attach to the front of the card base tilting it at a slight angle using glue.
3. Cut a piece of basic white cardstock 7cm x 11cm and using Evening Evergreen ink stamp one of the hedgerow images just above the middle, over to the left side. Using black memento ink stamp the bird image to the top right side, I only inked up 4 of the birds there are actually 7 on the image, but I thought for the size card I only needed 4.
4. Take a length of the Misty Moonlight ribbon from the combo pack, fold this into 2 loops, having one loop and an end on each side of the ribbon. Attach to the card layer using tear n' tape.
5. Die cut the shape that goes with the wooden planks image, one in basic white and one in the dsp, glue them together. 
6. Stamp the wooden planks image onto basic white cardstock using Crumb Cake ink and then die cut the largest gate out of it. Glue this to the dsp shape layer.  Die cut 2 green dsp hedgerow pieces out, attach one of them to a die cut white one (makes it more stable on the card front). Glue the one without the white behind onto the card layer, over the stamped image.
7. Glue the dsp shaped layer over the ribbon. Attach the other die cut hedgerow onto the gate and add some of the pebbles.
8. Stamp the sentiment image onto basic white cardstock using Evening Evergreen ink. Fussy cut the words out and attach to the card layer. Attach the whole layer to the card base using dimensionals.
9. To finish the card off add a basic white layer 10.2cm x 14.5cm to the inside of the card base.

I just love the whole look and feel of this card, I'm so glad to have case'd it adding my own touch!
 
Hope you enjoyed todays card and had as much fun as I did putting it together, please do come back next week as I have another card I've made using this gorgeous bundle again, only this time it will be a fancy fold that I have to share with you.

Until next time
Huge Crafty Hugs
Natalie xx

If shopping with me during February and you live in the UK please do use my Host Code 2CST62PU  
This enables me to send you a small gift the following month to say thanks and share the love of Stampin' Up! 
Thanks to all who shop with me in advance xx

List of all products used for this project can be found below.


 Product List

Paper Trimmer
[152392]
£23.00


Tuesday, 8 February 2022

Rainbow of Happiness


Hi everyone and welcome back to the second card made using the 'Rainbow of Happiness', I'm loving how versatile these dies are, making the cards for these two projects has been so much fun!

For this weeks card I'm using the stampset that goes with the dies and the beautiful 'Sunshine & Rainbow' papers that are free........ yes free during the sale a-bration with a qualifyling spend of £45 (not including p&p), but you need to be quick as this is only on until 28th feb 2022!......... The great thing about these papers is they match up with the rainbow dies (157726) and also the cloud punch (157749) making creating such fun!  So let's see how I created this weeks card.........

1. Cut a piece of basic white thick cardstock 14.8cm x 21cm score in half at 10.5cm. Cut a piece of basic white 10.2cm x 14.5cm and attach to the inside of the card using glue.

2. Cut 2 pieces of the dsp, I've used the stripey pattern, 14.8cm x 2cm and attach them to efront of card either side.

3. Cut a piece of bermuda bay cardstock 14.8cm x 8.9cm.  Cut a piece of basic white cardstock 14.8cm x 8.3cm emboss this using the splatters EF then attach this flat to the bermuda bay piece. Wrap a length of the ribbon around this piece and tie a bow at the edge.

4. Cut a rainbow out from the dsp using the matching die. Draw around the outer edge of the die onto basic white using a pencil then cut out, cutting on the inside of the pencil lines. Glue the rainbow pieces onto this leaving a small border in between each piece. Apply wink of stella to the coloured sections. Glue this flat to the embossed layer.


This adds a subtle glisten to the rainbow.

5. Cut a basic white strip approx 1.5cm x 8.3cm stamp the sentiment using magenta madness stampin' pad attach to the card, under the rainbow using dimensionals.

6. Die cut some of the small clouds out using  pool party cardstock and attach to the embossed layer, some flat and some on dimensionals.

7. Die cut a rainbow border out using magenta madness cardstock and attach flat to the base of the embossed layer.

8. Add some of the coastal cabana artistry bloom sequins to finish the card off.

Hope you enjoyed todays card as much as I did making it to share with you all, you'll find all of the products I've used for this project below.

Until next time

Huge Crafty Hugs

Natalie xx

Februaury Host code

 For on line orders with myself

2CST62PU


 Product List

Paper Trimmer
[152392]
£23.00


Thursday, 3 February 2022

The Stamping Cove Challenge - Colour challenge


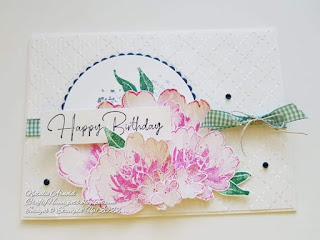
Hi again, and welcome to another Stamping Cove challenge! This time the challenge was a colour challenge using Magenta madness, Night of Navy and Just Jade

I loved using these colours they look really pretty together and the card I made I was very pleased with, the stampset used (Flowing flowers) is just gorgeous to use,  so let's see how I made it.

I took a Baisc White thick cardbase (10.5cm x 29.6 scored in half at 14.8cm), this makes a side opening card and had a basic white layer (10.2cm x 14.5cm) embossed using the Gingham EF, some of the Just Jade Gingham ribbon attached round it, then glued flat to the front. 

Night of Navy and Basic White layering circles (largest of both) were die cut out. The white one had the images stamped on it using the stampin' write markers to ink the sections of the stamp up. Both circles were attached together flat using glue and then attached to the card front using dimensionals.

A small piece of the Just Jade Gingham ribbon was tied to the already attached piece of ribbon on one side and then a piece of the linen thread was tied to this tying it into a bow.

Flowers were stamped using the Magenta Madness classic ink pad and then fussy cut out. Leaves were stamped using the markers again and these too were fussy cut out. All of these pieces were attached using glue for some and dimensionals for others. The leaves were tucked under the flowers using glue.

Night of Navy ink was used for the sentiment and then it was cut into a banner and attached to the card front using glue.

3 of the Night of Navy rhinestones were attached and the card is finished.

Hope you liked the make and maybe you will give it a go yourself. This stampset is just so beautiful and very enjoyable to create with, I'm sure that I'll get lots of use and fun with it.

Until next time

Huge Crafty Hugs

Natalie xx

All of the products used for my card are listed below.

Please remember to use my host code for February  2CST62PU  if shopping with myself and you live in the UK.

 Product List

Linen Thread
[104199]
£4.75
Paper Trimmer
[152392]
£23.00
Paper Snips
[103579]
£9.25