Wow can't believe it's Craftalong tuesday again where are the weeks going? Well this week I've made a card using the really beautiful 'Garden wishes' bundle, now I've had this bundle for a little while but I haven't really used it alot, but I'm so glad I decided to use it for this weeks craftalong. So without going on any longer let's get started with the project.......
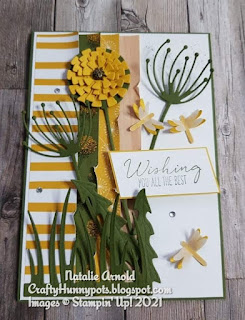
As you can see the card is made in shades of yellow and green and I'm so pleased with how it turned out, hope you like it too?
Materials needed:
Mossy meadow cardstock
1 piece 4-1/8" x A4 length (UK) scored at 5-7/8" and 6-3/8" - for the cardbase
Scrap pieces for die cutting all of the flower elements, leaves and grass out
Basic white cardstock
1 piece 4" x 5-3/4" - for front of card layer
1 piece 4" x 5-1/8" - for inside of card
1 piece approx 7/8" x 2-1/4" - for sentiment
Bumblebee cardstock
1 piece approx 1" x 2-3/8" - for sentiment layer
Scrap pieces for die cutting flower head elements
Scrap piece for punching out 3 x small dragonflies
Dandy garden dsp
3 pieces of different designs 1" x 5- 5/8" - front of card strips
Natural touch speciality paper
1 piece 1" x 5-5/8" - front of card strips
White vellum cardstock
Scrap piece for punching out 3 x small dragonflies
Rhinestone basic jewels
Dimensionals
Mossy meadow classic stampin' pad
Bone folder - for giving all of the flower, leaves and grass depth
Card Instructions
Fold and burnish the card base in half, the other score line is going to be the back of the cardbase where you will apply Tear n' tape adhesive (see below). This helps the card to stand up and not slide open. Adhere the white card to the inside of the card.
Take the strips of dsp and on the longside down one of the edges add a few little tears, I like to do this with dsp sometimes as it gives the card more dimension. Now take the first strip and apply glue down the non torn edge and attach it to the front of card white layer leaving a small border, take the second piece of dsp place glue on this piece the same as before and slide it under the first piece to attach it to the layer. Repeat this step with the other two strips.
Using mossy meadow ink stamp a few of the dandelion seeds onto the card layer and then attach to the card front flat.
Having die cut all of the flower elements, leaves and grass out, attach them to the front of the card, but don't glue the whole of the backs of them as you want them to look 3D. The flower head pieces are all glued together flat, but only apply glue to their centres so that the petals can be lifted up. Attach to the mossy meadow flower head on the front of the card and then using a glue dot attach the Ladybug trinket.
Punch out all of the small dragonflies and then using glue attach the vellum ones onto the bumblebee ones, only place a small amount of glue on the body part, and in this case it doesn't matter if the glue shows as it makes the rest of it look just like the dragonflies wings. These can now be glued to the front of the card.
Stamp the sentiment onto the white piece of card, angle the edges and attach to the bumblebee piece of card, cuting the edges so you have a small border of the yellow showing. This is attached to the card front using dimensionals.
Add some basic jewels to the card front and that's the card finished!!
Hope you enjoyed todays project, I'm really loving the colours that these papers have within them I think they look so nice together. I'd love if you like the card if you would spend a few minutes and leave me a comment. Until next time take care and keep crafting!!
Huge crafty hugs
Natalie xx
MARCH HOST CODE
UHRH 3YRC
Please use this host code if shopping with myself on line this will enable me to send you a small thankyou gift in the post the following month x
Product List - all products used for this project


Lovely and spring like with that yellow....and I’ve just the person for this lovely card. Looks like I’m going to be having fun this afternoon
ReplyDeleteGorgeous card, Natalie, love the texture of the die cut flowers, they really pop off the page, lovely colours and patterned papers, I like the three panels, many thanks for sharing :) x
ReplyDelete