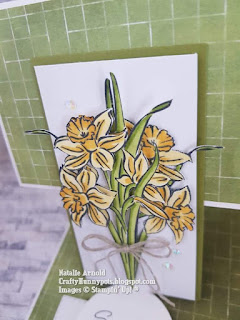
Hi everyone thanks for dropping in to see what I've made for you to see this week. As promised I've made another card using the beautiful Daffodil daydream bundle, and this week I have a beautiful fun fold card for you all. I first saw this fold having seen it on a session of Cards & a cuppa, which is a weekly group on facebook with the lovely Emma Goddard from Coastal crafters and well worth joining as it's so much fun.
This is an easel card but with a little twist as it stands slightly different to normal, but, it still folds down flat to fit in your envelope. So let's see how I made this one...........
1. Cut a piece of basic white thick cardstock - 10.5cm x A4 length and on the long side score at 7.4cm and 14.8cm fold and burnish the score lines. The card when folded will look like below.
2. Cut 2 pieces of the flowering fields dsp - 1 piece 10.2cm x 14.5cm and the other 10.2cm x 7.2cm. Glue these pieces flat to the first section and the third section of the card base, making sure they are both glued to the same side of the card base.
3. Cut a piece of old olive cardstock 6cm x 11cm and a piece of basic white 5.5cm x 10.5cm these get stuck together using dimensionals.
4. Stamp, using memento ink and die cut/ fussy cut out (which is what I did using my paper snips and a craft knife for the pieces in the middle sections, but then that's because I'm fussy 😊) one of the large daffodil image. You will need to stamp another one onto a silicone craft sheet layed on the stamparatus/stamping platform, then carefully place a piece of basic white cardstock on top of the inked section and press the image on top again, this helps to transfer the ink onto the reverse of your piece of card, giving a mirror image! This can still be die cut out by using the top image as a guide. It's the 2 whole daffodils on the right hand side that I then fussy cut out again (these will sit on the left side of the mirrored image which you will cut out) to lay behind the bud section to the back, making it look like a fuller bunch of daffodils.
Hopefully you can see in the image above how I assembled my bunch of daffodils(using diemsionals) but you can just have the whole image on it's own as it still looks beautiful.
5. Attach the daffodil bunch onto the old olive/white layer, using dimensionals, and then attach this to the top section, by applying glue just on the top half. The easiest way to make sure you get this in the centre is to have the card folded flat and then you can see where it needs to lay.
6. Tie a bow using the linen thread and attach to the stems using a glue dot.
7. Die cut one of the stitched rectangles and the circles using basic white card stock, stamp the sentiment using memento ink, onto the circle, I used the sentiment from the Eden's garden stampset. Attach the circle to the rectangle using dimensionals and then attach the whole thing to the base of the card (this is going to be the stopper for the easel section of the card), I measured up from the base about 4cm and attached it above this.
8. Finish the card off with a few of the beautiful irredescent rhinestones and then you will have a beautifully elegant card, using a really lovely card fold!
Hope you enjoyed this weeks make and you'll join me next week for another Craftalong tuesday.
Huge crafty hugs
Natalie x
APRIL HOST CODE
MN3KKHYB
Please use this code if shopping with myself on line and you live in the UK to receive a small thankyou gift through the post the following month from me x


Absolutely stunning card Natalie, I always love a fun fold and the daffodils! Very unusual and fabulous colours, many thanks for sharing, I will definitely give this fun fold a try! x
ReplyDeleteThanks Anne I had so much fun making this card I just love these daffodils x Natalie
Delete