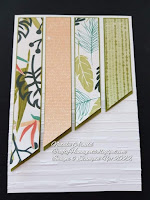
Hi everyone, and welcome to this weeks craftalong! This week I thought we would have a play with the 'Artfully layered' bundle and some of the products that go with this bundle too.
I've tried to use lots of different layers and textures within this card, along with the gorgeous leaves cut out from the dies, so let's see how we make it...........
Cut a piece of Old Olive cardstock 14.8cm x 21cm scored in half at 10.5cm for the cardbase.
Cut two pieces of Basic White cardstock 10.2cm x 14.5cm attach one to the inside of the cardbase, emboss the lower section of the other piece using the Stripes EF (this is attached to the front of the cardbase once finished).
Cut a piece of Old Olive cardstock 8.8cm x 12.7cm and then with the 8.8cm sitting at the bottom measure up the right side and mark at 6cm. Cut from the mark down to the left side corner and then cut the remaining piece, with the short straight edge flush with the top of the trimmer, into strips that measure 2.2cm.
Cut a piece of the Basic White cardstock 8cm x 12.4cm and then cut the same way as the Old Olive measuring 6cm up the right and cutting into left side corner, this time do not cut into strips (this is going to be a template to use for the angle cutting of the DSP).
Cut 4 strips of the DSP about 13cm long x 2cm, place each different patterned strip onto the white template and cut to the required length and angle.
Curl the ends of the paper strips slightly, using a bone folder and then attach to the Old Olive strips using glue, only applying glue to the top section, this will give depth to the papers.
Attach these strips flat to the Basic white embossed piece of cardstock applying glue to the backs of them.
Cut a piece of Basic White cardstock 2.2cm x 10.2cm.
Cut a strip of Old Olive cardstock 0.7cm x 10.2cm.
Cut a length of the ribbon approx 11.5cm and fray one end, keep fraying until you have a section about 1cm not frayed, cut the length of thread frayed off.
Apply some tear n tape to the reverse side of the Old Olive strip and wrap the loose thread around about three times, making sure the tear n tape catches it.Apply glue to the reverse side and attach to the upper section of the white card piece.
Cut a piece of the GOLD Brushed Metallic cardstock 1cm x approx 10.2cm, die cut using the border die from the bundle, you will have another piece leftover from die cutting with a zig zag edge, it just won't have the stitched effect on it, but it can still be used on a different card. Glue the stitched edge border to the opposite edge of the white card piece.
Place tear n tape onto both sides of the top unfrayed section of ribbon, take backing off one side and attach the leaves to it. Remove backing from other side and attach to the piece just prepared with the gold border on. Attach this to the embossed piece of cardstock, leaving a small section of the papers showing at the top.
Attach the whole embossed piece to the front of the cardbase using dimensionals.
Stamp the sentiment using Evening Evergreen ink and Basic White cardstock and cut into a banner.
Cut a piece of Pale Papaya cardstock slightly thinner but longer than the sentiment piece, glue these together and attach to the card front using dimensionals.
Attach three of the pale green Faux Sea Glass shapes to the card front to finish the card off.
Hope you enjoyed todays project, I loved how these leaves looked so pretty on top of the frayed ribbon giving lots of depth and texture to the card front.
Until next time
Huge Crafty Hugs
Natalie x
List of all the products used are below please if ordering on line from me and you live in the UK remember to use my Host Code for January x
CRSJV44P
Product List


Fabulous card Natalie, love this set , gorgeous colours and foliage :)
ReplyDeleteThankyou Anne yes it is a lovely set the colours are so pretty x Natalie
Delete