Hello everyone and welcome to another Kylie Bertuccis monthly International Blog Highlights with the theme of Thankyou. Can you believe we are now into the second blog highlights of 2021 already, it doesn't seem possible........
Anyway the card I've made for you today is one that I've also made for a challenge which myself and 2 other fellow demonstrators set for each other each week, this one was a colour challenge using - Night of Navy/Misty Moonlight and Daffodil Delight. Having started the card I thought it would be a really lovely 'Thankyou' card and so therefore have used it for this months Highlight Blog too, hope you like it and hop over and give me a vote!
Materials needed:
Night of Navy cardstock
1pc- 5" x 11-1/2" scored at 5" card base
True Love dsp
1pc - 6-1/4" x 4-3/4" Inside of card
1pc - 4-3/4" x 4-3/4" Front of card
1 sheet for fussy cutting and colouring of flowers
Basic white cardstock
1pc - 6-1/4" x 4-3/4" for backing of dsp piece
1pc - 4-3/4" x 4-3/4" for backing of dsp piece
1pc - approx 3/4" x 3" for front of card sentiment
1pc - 3-3/4" x 3-3/4" for inside of card
Misty Moonlight cardstock
1pc - 2" x 4-3/4" for banner
White vellum cardstock
1pc - 2" x 4-1/2" for banner
Daffodil Delight cardstock
1pc - approx 1" x 3-1/8" for front of card sentiment
Night of Navy twine
Approx 30" for wrapping around banner 5 times and for tying a bow
Card Recipe:
1. Fold and burnish the card base.
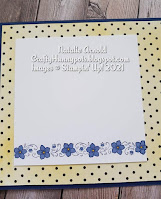
2. Using a blending brush softly blend daffodil delight ink all over the 2 dsp pieces and then glue them flat to the white pieces of cardstock (this gives a small amount of depth to the dsp without using dimensionals). Glue these 2 pieces onto the front and the inside sections of the card base.
3. On the white card piece for the inside of card stamp the image using Night of Navy ink and colour in using the light Misty Moonlight and the dark Daffodil delight Stampin' blend pens. Glue this flat to the inside of the card.
4. Fussy cut out all of the flowers that are needed for the front and the side of the card and colour them in, again using the Stampin' blend pens this time I've used both the light and dark of the Misty moonlight ones. Leave these to one side to dry off.
5. Punch the Misty moonlight and the vellum banners using the Banner triple punch and glue them together using glue dots but only where the twine is going to be, so it covers up the glue which will show through the vellum.
6. Wrap the twine around the banners I've done it 5 times and then glue the ends onto the reverse side using adhesive tape.
7. Place glue onto the back of the banners and attach to the card front.
8. Using a bone folder give all of the flowers a slight curl on the edges, to give them depth, and then attach with wet glue to the card front and the card side.
That's the card finished apart from an envelope as it is an 'unusual size card' I hear you all say........... so using my envelope punch board, which I'm affraid has now retired, I used a 9-1/4" x 9-1/4" piece of Misty moonlight cardstock from the In colours 12" x 12" cardstock 153076 and started at the 4" mark and proceeded to make my envelope...
Once made I then stamped the same image from the inside of the card and coloured it in, onto a 3-1/8" x 4-7/8" piece of white cardstock and then glued it to the front of the envelope.
Hope you enjoyed the project, would love if you could leave me a comment and maybe if you like my card you could hop over and give me your vote, but don't forget to look at all of the other lovely projects that have been made by some very talented people.
Stay safe and keep crafting till next time
Huge Crafty Hugs
Natalie xx
FEBRUARY HOST CODE
Y6P2CXDV
Product List


Gorgeous card, Natalie, I always love a fun fold :) lovely papers, colours and design :) good luck with the voting, you have certainly have mine :) x
ReplyDeleteThankyou so much Anne I love a fun fold card myself thanks for voting for me x
DeleteSuch an eye-catching card Natalie! Thanks for being part of my International Blog Highlights this month and all the best with voting!
ReplyDeleteMany thanks Kylie love taking part in your monthly highlights and seeing all of the other amazing entries it's always hard to choose x Natalie
DeleteBeautiful card design. I love this color combination
ReplyDeleteThankyou so much Tricia very kind of you to say x Natalie
Delete