Hello again everyone I've been a bit abscent lately as it was my birhtday last week and also my husbands and we have been busy re designing our garden, not leaving me much time to concentrate on my crafting. Hubby is back to work today so I'm hoping to get back into the swing of things again yayyyyyy............ I do love my crafting and I miss it when I don't have time to get anything done..............
I've made a card using the really lovely 'Sweetest time' bundle which is great for cutting borders down the sides of your cards. So let's get started...... hope you enjoy.
Materials needed:
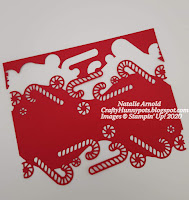
Whisper white thick cardstock
1pc - 6" x 8 1/4" score on the longside at 4 1/8" this is your card base
(I know your probably thinking why 6" well it's because I wanted to fit all of the die cut border in without any of it getting chopped off, your card will still fit into the Stampin' Up! C6 envelopes).
1pc - 15/16" x 3 1/4" for the sentiment
Scrap piece for stamping and die cutting 3 x berries
Real red cardstock
1pc - 6" x 4 1/8" to die cut your border along both long edges for the front of card
Scrap piece to die cut 2 extra candy canes and circle sweets to add depth to your card
1pc - 3 7/8" x 5 3/4" for the inside of card
Shaded spruce cardstock
Scrap pieces to die cut 6 small leaves and 3 large leaves
Pear pizzazz cardstock
1pc - 1" x 3 3/4" for the sentiment
Scrap piece to die cut 3 x ferns
Real red sheer ribbon for tying 3 bows
Wonderful gems
2 x red/gold and 3 x clear/gold for front of card
Card recipe:
1. Cut, score and burnish your card base.
2. Cut both of your pieces of real red for the front and inside of your card, glue the inside piece into your card.
3. Die cut both edges of your front of card piece of real red card as in the picture below.
4. Glue this piece flat to the front of your card base now using wet glue.
5. Die cut the 2 x candy canes and 2 x circle sweets, give them a slight curl using a round pencil or something and glue them into place onto the front of your card, they go on either side of your card.
6. Die cut all of your leaves and ferns, stamp and die cut your berries using real red ink and then use wet glue to glue them into place on the front of your card.
7. Cut your pieces for the sentiment and give them both a slight angle at either end, stamp your sentiment using garden green ink and then give the piece with the sentiment stamped on a slight curl so you just need to place wet glue onto either end of your card piece, attach it to the green piece and this gives the senitment a bit of depth. Attach this whole piece flat with wet glue onto the front of your card.
8. Tie yourself 3 x bows with the ribbon and then glue these into place onto the candy sticks using mini glue dots. (you can if you prefer just tie 3 x knots instead).
9. Now place your gems into place on your card (I placed the clear ones in the middle of the circle sweets but you can place yours wherever you like).
That's the card complete I hope you enjoyed it, this bundle is a fun set to use I've made 2 other cards using it which are below for you to see and hopefully give you a bit of inspiration.
Thanks for hopping onto my blog today I really appreciate it happy crafting everyone.
Big Crafty hugs
Natalie xx
Please remember if you're placing an on line order with myself to use the Host code for the month that you're shopping many thanks x
OCTOBER HOST CODE
DDBJMKQC
Product List


No comments:
Post a Comment