Wednesday, 28 July 2021

Colour challenge birthday card


Hello everyone! I've made this very quick card for a colour challenge over on Chatterbox crafters which is a facebook group run by myself, Anne Ronsky and Ruth Blackett, it's for people to share all of their crafty makes with everyone, in a friendly environment....... pop over and join us via the link and share some of your makes, it's not a selling group just a sharing group!
So the challenge for last week was set by Ruth, and we had to use Polisehed pink, Granny apple green, Balmy blue and Bumblebee, and I was, I'm sorry to say very late in joining in, but this is the card I came up with...... hope you like it!

Materials needed:

Basic white thick cardstock
1pc - 21cm x 14.8cm scored on longside at 10.5cm for the cardbase
1pc - 7.8cm x 10cm for front of card speckled layer

Basic white cardstock
2pc - 10cm x 14.3cm for front and inside of card layers
1pc - 1.1cm x approx 7.5cm for the sentiment
Scrap piece for the stamping and die cutting of the flowers and leaves

Bumblebee cardstock
1pc - 8.1cm x 10.3cm for front of card layer

Bumblebee gingham ribbon - for front of card


Instructions:

1. Fold and burnish the cardbase and attach the inside of card layer.
2. Attach the ribbon to the front of card white layer and attach to the cardbase.
3. Stamp the speckled images onto the smaller white layer of cardstock using 2nd and 3rd generation of balmy blue ink. This image is from the Color and Contour stampset.
4. Stamp all of the flowers using Polished pink ink and the leaves in Granny apple green ink and then die cut them all out. The flowers are from the Color and Contour stampset and the leaves from the Artistically Inked stampset. Die cut all of these out.
5. Attach all of the flowers/leaves to the card layer that has speckles stamped on it, two flowers I have attached using glue just on the centre, the third flower is on a dimensional to give it more depth and then the leaves are just tucked under using glue.
6. Stamp the sentiment using Balmy Blue ink again and then angle the two ends and attach using dimensionals just in the centre part.
7. This whole layer can now be attached to the Bumblebee layer using dimensionals and then to the front of the carbase using glue.

Card finished, as I said very quick, simple but fun to make.

Hope you enjoyed this and give it a go yourself, I think this would look great in many different colours....... so go have some fun and enjoy creating while crafting!


JULY HOST CODE FOR ON LINE ORDERS
UNDER £150

SUE3G9GF
Please use this code to receive a small thankyou gift 
the following month from myself x


Product List

Paper Trimmer
[152392]
£23.00
Bone Folder
[102300]
£6.50


Tuesday, 27 July 2021

Craftalong Tuesday - Tidings of Christmas part 2


Hi everyone, and welcome to part 2 of the Tidings of Christmas. Last week we made a box, which as I said could be for a gift to go in, maybe some sweeties for the chocolate lovers.... mmmmmm.... amongst us, or maybe a cute card even. Well as this is part 2,  I thought we'd make a cute easel card, so that it's like a gift in a card in a box phew that was a mouthful lol .............. hope you enjoy it.

Materials needed:

Evening Evergreen cardstock - 1pc cut to 9.5cm x 19cm scored on longside at 4.75cm &                                                                9.5cm for the card base
                                                          1pc cut to 9cm x 9cm for the card front
                                                         Scrap piece for die cutting 10 Holly leaves out
Basic white thick cardstock   -    1pc cut to 9cm x 9cm for the easel part of card section Basic white cardstock       -          1pc cut to 9.2cm x 9.2cm for the bottom part of the card
                                                          1pc 2.8cm x 9.4cm for the sentiment
                                                           Scrap pieces for die cutting 2 stars out and fussy cutting
                                                           the top sentiment
Cherry Cobbler cardstock     -      1pc cut to 3cm x 9.2cm for the sentiment base layer
                                                           Scrap piece to die cut the 2 smaller stars together
Soft Succulents cardstock      -     1pc 7.5cm x 7.5cm for the embossed layer on easel part
Gold foil sheets              -                Scrap piece for die cutting the larger detailed star
Tidings of Christmas dsp       -      1pc cut 5.5cm x 5.5cm and then cut corner to corner
                                                            giving 2 triangles
Linen thread                -                   Length for tying a bow
Holiday Rhinestones          -            1 x cherry cobbler for the base of easel card


Instructions :

1. Fold and burnish the cardbase, the folds both go the same way.
2. Attach the evening evergreen piece to the  thick basic white piece, and then glue the dsp triangles into place,  use your bone folder to slightly curve the corners which don't need glue on, and then attach this with glue to the front part of the easel.

This is how it looks from the side.

3. Having embossed the Soft Succulents piece of cardstock, using the wintry 3D embossing folders ( use the pineneedle looking one) attach this to the front of the easel card using dimensionals.
4. Attach the basic white piece of cardstock to the base part of the card and then glue the cherry cobbler strip onto it, this is going to form the stopper which enables the card to stand like an easel.
5. Stamp the sentiment onto the basic white strip, I've used Cherry cobbler ink for mine, and as this piece is 2mm longer than the other pieces, it will enable you to give it a slight curve in the middle using your bone folder, and then glueing it only on the ends to attach on top of the red piece. The rhinestone and bow are added to this part.


6. Having die cut all of your different elements for the card you can begin to assemble them.
The large white star is attached using dimensionals.
The gold detailed star has small amounts of glue added to the middle section and the attached to the white star.
The smaller white star is going to act as a base for the holly leaves to be glued to, 1 on each point and then in the middle sections, this is then attached to the other stars using dimensionals.
The red star which is die cut out using the 2 smaller stars both at the same time, this gives you a detailed star and a star frame, these are attached to the holly star with glue.
The sentiment I stamped again using cherry cobbler ink and fussy cut around it, then attached it to the card front using dimensionals. Card finished.

The card then fits perfectly into the small box we made together last week, as it folds down flat. I think this is a really special card to be given to that extra special person for christmas. Hope you enjoyed making this with me and found plenty of inspiration to go and make some more of these in all of your different papers, for all sorts of different occasions, and all those special people in your lives.

Until next time
Huge Crafty hugs
Natalie xx


 JULY HOST CODE FOR ALL ON LINE ORDERS UNDER £150


IF SHOPPING WITH ME TO RECEIVE A SMALL THANKYOU GIFT IN THE POST THE FOLLOWING MONTH 


 Selected papers still on 15% off including the Tidings of christmas papers so grab yours now whilst they're on offer only until 2nd August 2021.                                             

Product List

Linen Thread
[104199]
£4.75
Paper Trimmer
[152392]
£23.00
Bone Folder
[102300]
£6.50
Paper Snips
[103579]
£9.25

Natalie Arnold - Independent Stampin' Up! demonstrator in the UK


Tuesday, 20 July 2021

SUOC#280 - Christmas in July


Hello all and welcome back to another wonderful SUO challenge this time for the SUOC#280 the challenge is - Christmas in July .......yayyyy my favourite cards to make, so you can imagine how excited I was when I saw this weeks theme.
I'm even more excited as the time draws ever nearer to the launch of the new mini catalogue - 3rd August and all of you lovely and probably very excited crafters can start ordering from it..... I have so many projects that I can't wait to start sharing with you all.

 For today though I thought I'd use the really delightful bundle that's already available to order from the annual catalogue, and this is called  'Tidings and trimmings' bundle.
I'm loving this bundle I've already made quite a few cards with it..... in fact I posted on 6th July the cards I made using a OSW 6" x 6" dsp from this set, so if you'd like a bit of inspiration hop on over and take a peek, I made 4 cards in total.

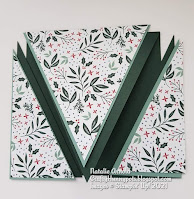
Anyway back to todays project, where I have made a lovely fold card called a 'Triple point crossover' card and I had so much fun making this, and it is infact  a whole lot easier than you might first think.........

You start off with a square card base (mine is in evening evergreen), mine was a 14cm x 28cm scored on longside at 14cm to give me a square card.
The next step is to find the centre of the bottom of card, this is a top folding card so the fold is always to the top. Once the centre is found mark it (7cm is my centre), then place in the trimmer, or use a rule and craft knife the choice is yours, and cut on both sides from the point you have marked in the centre to the top corner on the folded edge, this will leave you with a card base that has a triangle to the front of it. The two triangles that have been cut away from the card base are going to be used as these form the crossover section.


Now I chose soft succulents cardstock and Tiding's of christmas dsp for my layers, each different layer measures 0.5cm smaller than the one before. On both of these layers find the middle of one side (if the patterned paper is directional then the mark needs to be on the bottom side of the paper) and mark it in the centre. Now again cut from the mark to the top corners on both sides, this will give you 3 triangles that will be adhered to the cardbase, and the triangles cut from the card base.


Once all of the different layers are adhered together using wet glue the card can be adhered together.


Each of the triangles at the side of the card are going to be crossed over and adhered to the card base, I found it easiest to know where to place the glue, by holding the 2 sections together and drawing a line on the reverse where they cross over, then you can place the glue in the exact place you want it to be, not going over the line and therefore not having a card that is glued together shut!!!.....do this for each side of the card.


The last thing that is needed for the card base is a piece of cardstock for the inside of the card.


And now the fun begins with all of the die cutting and the assembling. For the star section I used the largest die from the 'Stitched stars' and the 2 largest dies from the bundle, and all of these different elements were adhered together, using dimensionals for the 2 plain layers, and a small amount of glue for the intricate layer (just on the middle section), this just enabled me to tuck all of the stamped and die cut images underneath which I think is really pleasing to the eye!

Loved how it looked when it was finished...... well I do love making Christmas cards!


That's the card finished.

Thanks so much for popping on to have a look at my project for this theme, please do hop on over to the SUOC#280 and take a look at what all of the other design team members have made for your inspiration, I think you will be blown away!

Until next time 
Huge Crafty Hugs
Natalie xx


JULY HOST CODE FOR ORDERS ON LINE UNDER £150


PLEASE USE THIS CODE IF SHOPPING WITH ME ON LINE!


 Product List

Paper Trimmer
[152392]
£23.00
Paper Snips
[103579]
£9.25
Bone Folder
[102300]
£6.50