Friday, 29 May 2020

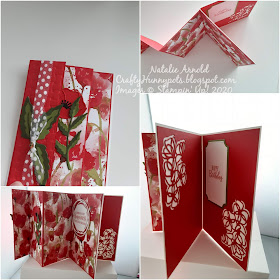
Blossoms in bloom tri fold card


Good morning everyone, what a beautiful day we have again here in Essex.
Today I thought I'd share with you all a really easy folding card.
The card fold is a tri fold there are many different ways of doing this fold, you can if you like cut the panel that stands out at the front right across the card, but I chose to just cut across the first 2 panels, I thought it turned out quite nice, hopefully you think so too and you'll give it a go.


This is what the card looks like from above. I have got a few pictures for you to see, hopefully this will make it a bit easier to follow.
 The great thing about this card is you only need card, ink and a stampset, oh and of course glue.
 The stampset I've used for this card is a beautiful stamp called Blossoms in Bloom that is coming in the new catalogue on June 3rd it comes with a die set but for this card you only need the stamps.


        The first thing you need to do is cut and score your card base, I've used Blackberry Bliss for mine as I love the richness of this colour.
All measurements for all cutting and folding are in the diagram above.


Now with a piece of whisper white card cut to 26.8cm x 9.7cm you need to stamp all over it using one stamp and one colour at a time, the colours I used are above. I started with the large flower stamp first and then filled in the gaps with the smaller stamps.


Now cut your pieces as above, I started from the left and worked across, but it's not going to be any different whichever side you start from, as we've already cut the piece to the exact size for what we need. (You can if you like cover a whole sheet of A4 cardstock with your stamped images and then cut out what you need.


These are the 2 colours I used for the sentiment pieces which are:

Pumpkin pie cardstock
2pc - 4.1cm x 4.6cm

Whisper white cardstock
2pc - 3.7cm x 4.2cm

Now all you nee to do is glue all of your pieces in to place and that's the card finished. This card will fold flat and should fit in to a 4" x 4" envelope.

Hope you enjoyed this project any questions please do contact me, I'll be very happy to help you.

Enjoy the rest of your friday

Take care, stay safe and keep crafting

Big crafty hugs
Natalie x


MAY Host code is CDV7BST4 for orders under £150 on my on line shop to receive a small gift from me the following month when code used. Please don't use the code if your order is over £150 as you receive rewards yourself then. Thanks x


Thursday, 28 May 2020

Pretty little flower pot card

Today I thought I'd share with you all how I made the little flower pot card. It's a relatively easy project to acheive but  very pleasing to the eye never the less. I must just say though that I case'd this idea from a lovely lady called Amanda Charlesworth, when I was taking part in a challenge on one of our team scrimpy challenges.


Most of the products I've used for this project will be going live on my Stampin' Up! shop from the 3rd June, so I won't be giving you the product codes for these at this moment.

Materials I've used are as follows:

Cinnamon cider cardstock - new in colour
1pc 3 1/2" x 9" scored on the long side at 2" and 5 1/2" for card base
1pc 2" x 3 7/8 scored on long side at 3 1/2" for the back stand
1pc 2" x 3" scored on long side at 1 1/2" for the back stand
1pc 2 7/8" x 4 7/8" for the inside card
Scrap piece for leaves

Whisper white cardstock 
1pc 2 3/4" x 4 3/4" for the inside card

Just Jade cardstock - For the leaves
Garden green cardstock - For the leaves

Forever gold speciality dsp 
1 element cut in half for the top righthand side of inside card

Flowers for every season dsp
2 different small pieces for die cutting the flower border for front of the
flower pot and leaves paper for die cutting the leaves out

Blossoms in bloom stampset
For the sentiment on front of card

Ornate borders dies
For the flower border across the front of pot
and for the lace look edge on your pot

Greenery embossing folders
For the front of flower pot panel 

Field of flowers border punch
For the tiny flowers dotted about on the card

Forever flourishing dies
For all of the leaves and ferns

Pearl basic jewels
For along the border edge punched out on front of flower pot

Bumble bee gingham ribbon
To tie round the flower pot to keep shut

Paper snips

Multi purpose liquid glue


 First cut and score your card base. Folding the scores so you end up with a valley fold and then a mountain fold. The smaller fold is the lip of your flower pot where you're going to use your border punch to cut the edge. The other fold with the creased edge in it (this is going to be the bottom of your card), and you are going to need to make a mark 1/4" from each side of the creased edge, then as in the picture above you need to cut from the top edge (centre fold) down to your marks on both sides. This gives the look of the flower pot shape. You DO NOT cut the flower pot lip edge this stays as it is, and then you just die cut the lace border across this edge.


Emboss the middle panel of your card base, fold everything in to place to form the flower pot and tie a piece of ribbon round to keep it all together.
You now need to fold and burnish your 2 pieces for the stand, having the smaller piece glued just on the edges so that it glues to the inside bottom of your stand and then to the bottom of the reverse side of your pot, the small piece that is glued on the larger stand piece (as in picture above) will be glued centrally to the inside of your flower pot at the back. ( I added this to have the card stand freely but you don't necessarily have to add it ).


After glueing your 2 pieces for the inside together ( this is for your message ), you can now cut out a selection of leaves, some of them can be actually cut out from the dsp as the dies co-ordinate with some of the leaves within the papers. Just be aware not to glue the elements too far down as it will interfere with the card sliding in and out easily.
Having cut the gold element in half as in the picture above this will enable you to get 2 of these cards out of 1 gold element.
Have fun decorating your card to look how you want it.

Hope you enjoyed this project and understood it if you have any questions please do contact me or leave me a comment and I will get back to you. 

Have a lovely rest of the day
Big crafty hugs
Natalie x

Tuesday, 26 May 2020

Follow Your Art


Good morning to you all,
I hope you're all having a wonderful tuesday, haven't we been having some amazing weather here in the lovely sunny Essex.
Well today I thought I'd use some products which are soon going to be retiring, which is quite sad to me as this has been one of my favourite sets in the 2019 - 2020 catalogue, but there are as always lots of  amazing new products releasing in the new 2020 - 2021 catalogue, which launches 3rd June, so not long to wait, and I don't know about yourselves, but I'm very excited. Being a demonstrator one of the benefits of this is that I get to pre order some of the new products a whole month before it goes live to yourselves, I love this along with my discount it's a win win to me.
If you'd like information on how you can be a demonstrator either a business one or someone who likes to get the discounts for your own pleasure, then please do contact me and I would be more than happy to tell you how.

Now the project for today is as follows:


I thought I'd use up some of my soon to retire papers, using a great technique, which is known as " Scrappy strips technique".

Materials I've used:

Thick Whisper white cardstock 140490  For card base
1pc  -   8 1/4" x 5 5/8"  scored on longside at 4 1/8"
2pc  -  4"  x  5 1/2" For inside and outside of Pacific point card base

Pacific point cardstock 116202  For card base
1pc  -  11 1/4" x  4 1/8"  scored on longside at 5 5/8"
2pc  -  4"  x  5 1/2" For the inside and outside of white card base

Follow your art dsp 149489  discounted and soon retiring
2pc  -  3 7/8"  x 5" for cutting your strips

Scraps of Pacific point cardstock 116202 for die cut buttons and sentiment
Scraps of Coastal cabana cardstock 131302 for die cut buttons and sentiment
Scraps of Crushed curry cardstock 131288 for die cut buttons
Scraps of whisper white cardstock 106549 for sentiment on both cards

Here's a card stampset 149438 for both cards wording

Arts and crafts dies 149580 for buttons

Pacific point classic stampin' pad 147098


Have both of your pieces of dsp together and carefully cut them in to strips making sure that you cut them at angles with the top end being thick and the bottom end being thinner, and then alternate having thin at top and thick at the bottom. I cut 8 strips for mine you can have less or more if you like.
Now you can as in the top pictures above lay them out into seperate pieces, so you can see the 2 pieces of paper lining up the patterns.
You now have to mix and match carefully, swap the 2nd strip from the top pattern, with the 2nd strip of the bottom pattern flip them both round revealing different patterns and repeat this step with every alternate strip, this gives you 2 completely different pattern pieces for the front of both of your cards.
Glue your paper strips on to the card pieces for the fronts of your cards and then you can glue these pieces on to the front of your card bases.
Having cut out all of your buttons and your sentiment die cuts, stamp your sentiment on to the white pieces, these are raised on stampin' dimensionals, and now glue all of your elements in to place.
This is a relatively easy card to make, but a great technique for using up your dsp and I think it makes great easy to achieve, very different cards.


Here I've made 2 smaller square cards, in exactly the same way as above just scaled down, enabling you to use up smaller pieces of your dsp.
The paper piece for these cards was cut to measure 3 1/2" x 3 3/4" 
The card base is a 4" x 4" card and the piece of card to glue your strips to is
3 7/8" x 3 7/8".

Hope you enjoyed the make today. Have a great rest of the day stay safe and take care.

Big crafty hugs
Natalie xx


Monthly Host code for May is CDV7BST4  please use this for orders with my on line shop, under £150
and I will send to you the following month a small thankyou gift.


Monday, 25 May 2020

Split card technique


Hi everyone what an amazing day it has been today in Essex, beautiful blue skies, very sunny and a slight breeze, what more could we ask for.
I've been busy today using a few of the new products ready to be released on 3rd June.
I made 2 cards last week using the technique called Split card technique, I never however blogged what I'd made, so I thought I enjoyed doing it so much that I'd do it again, using a different set.
I've used the beautiful Celebrate Sunflowers bundle along with the Greenery Embossing folders.
This time I've stepped it up a little bit from before and used an embossing folder to add a little bit more definition to my cards.


Materials:

Old olive cardstock
1pc - 11 3/4" x 4 1/8" scored on long side at 5 7/8" for base card

1pc - 8 1/4" x 5 7/8" scored on longside at 4 1/8" for base card

Scrap pieces for die cutting your leaves

Whisper white thick cardstock
1pc - 8" x 5 3/4" emboss both sides of the shorter ends with embossing folder

Whisper white cardstock
Scrap pieces to do all your stamping on before die cutting

Celebrate sunflowers
For stamping and die cutting

Old olive classic stampin' pad
Early espresso classic stampin' pad
Crushed curry classic stampin' pad

Sponge daubers for adding different colour to the centre of your sunflower and the leaves.


On your embossed piece of card down the centre you need to place and glue all of your die cut pieces, they go on top of each other to cover the white card underneath up. Just try and be aware that when you eventually cut this piece of card right through all of the die cuts (when dry) you need to have them layed out and glued so that you get bits on both sides of the middle.
Stamp your sentiment on to the front of your cards, I've chosen to do mine at an angle as it fits in between the embossed leaves. Glue each piece to the front of your cards add a few pearl gems job done.
I'm loving this technique as you get 2 cards at one time and I think it gives a lovely finish to a card.
Thanks for dropping by and taking a look.
Take care, stay safe and keep crafting.

Big crafty hugs
Natalie x


Saturday, 23 May 2020

Fathers' day card with Country club bundle - mini catalogue 2020


Good morning all, and welcome to another Team Scrimpy blog hop. 
This months theme is Mini catalogue faves. I have actually had quite a few faves and am sad to see them go, as we approach a new catalogue launch, which if you love craft as much as I do, then this is probably a very exciting time for you all.
One of my favourite bundles that are sadly retiring is the  'Country club'. It is an amazing bundle for men and women so it's a very versatile bundle to have.
With Fathers' day fast approaching us here in the UK I thought what better bundle to use for an amazing card for all those golfing dads out there. You can also get all the matching papers, twine and elements to match this bundle, there is also a matching embossing folder which is the only piece in this whole suite that is carrying over and it's called 'Absolutely argyle'.
Anyway I think I've gone on long enough now and it's probably time to stop talking and get on with the card, hope you enjoy xx
Please don't forget when you've finished looking at my blog to leave a comment I'd really appreciate it. Also don't forget to hop over and look at the other ladies blogs on the links all below my post thanks.


This is a fun fold card which I've CASE'd from a lovely lady called Karen Titus. I've changed the measurements that were used and I've converted them all in to cm as I know lots of you like to use cm instead of inches.
The thing I love the most about this card is that it's actually made using 1 sheet of dsp and a small amount of card.


Materials needed:


1pc  - 12" x 12" country club dsp (151314)  cut to 28cm x 28cm


Thick whisper white card (140490)

2pc - 10.5cm x 10cm inside of card
1pc - 5.5cm x 5.5cm for front card panel
Scrap piece for die cutting element for card front


Night of navy card (106577)

1pc - 5cm x 5cm for front card panel


Crushed curry card (131288)

Scrap piece for die cutting element for card front


Night of navy stamp pad (147110)
Poppy parade stamp pad (147050)
Garden green stamp pad (147089)
Multi purpose liquid glue (110755)
Clubhouse bundle (153816)
Country club twine combo pack (151318)


Instructions:


The first thing you need to do is fold your dsp in half corner to corner and give it a reall good burnish with your bone folder to make a nice crisp edge.
Now as shown in the pictures above you need to score away from your creased edge at 10.8cm , I've used my stampin trimmer as I find it easier to score when you need a small measurement like .8cm , just make sure that both the top and the bottom of your dsp are lined up with the 10.8cm otherwise you will score wonky.
Now with the creased edge of dsp up the top you are going to score at 8.2cm and 14cm in from each end. 
The next step is to fold and burnish all of your score lines and give them all nice crisp edges. You now need to cut away the 2 small triangles that are shown in the picture above.
Fold the inner creases in to form valley folds and then fold the other creases back over to form mountain folds (when opened back out). You then need to take the triangles at the ends of your folds and fold them out to form a square (as below. It looks a bit like a birds beak). You will form a square on either side.


These squares sit one behind the other, and the top part of your dsp will then be folded one piece to the front tucking into your front square, and the other piece will fold over the back.
You can now do all your stamping onto your whisper white card pieces, glue them to your garden green pieces, glue 2 of the triangle pieces of dsp that you cut out from main piece into 2 of the corners (as shown in pictures), and then glue into the middle of your card.
The front of your card has the Night of navy piece glued to the top of the Whisper white piece and then glued to the front square of your card.
Glue the 3 x crushed curry die cut pieces together to form a thick die cut, which stands out when glued to the front piece, the sentiment piece is stamped and then just part of it is die cut from it and glued flat inside your crushed curry piece.
Finally I used a piece of the garden green twine from the combo pack to tie the card shut. This will fit in a 5" x 5" envelope.


Hope you enjoyed the card I think it makes a nice change to have a card to give that isn't just made from card. You can if you like place a piece of card onto the inside of your back triangle flap, which will enable it to stand up, when closed.


If you have any questions about the card or products I've used to make this card please don't hesitate to contact me.


Thanks so much for stopping by, shall look forward to next months blog hop until then take care stay safe and keep crafting.

Big crafty hugs
Natalie xx


Please don't forget to jump over to the other ladies blogs on the hop and see what amazing projects they have to share with you all. Links are all below xx

Karen Egan                       
https://craftykarendesigns.blogspot.com/2020/05/?m=0

Helen Chandler               
http://helensheartcreations.com/2020/05/23/beautiful-hand-crafted-cards-with-mountain-air/

Victoria Littlewood       
https://vickieloudesigns.blogspot.com/2020/05/breathtaking-bouquet-thin-lidded-gift.html

Amanda Charlesworth
https://scrimpingmommy1.blogspot.com/2020/05/team-scrimpy-blog-hop-mini-catalogue.html

Donna Lester             
https://taffycrafting.blogspot.com/2020/05/my-favourite-mini-catalogue-products.html

Karen McClure       
https://karamiasu.blogspot.com/2020/05/stamping-up-with-karamia-team-scrimpy.html


Tuesday, 19 May 2020

Twisted easel card


Hello everyone,

Happy tuesday again, hope everyone is keeping well and staying safe. 
Today I've got another fun fold card for you all to try out. I recently saw a beautiful 'Twisted easel card' on a fellow demonstrators blog and thought it was so beautiful, that I'd make my own with a little twist on it. The ladies blog is
CraftyKarenDesigns.blogspot.com please take a look as she has some amazing projects to look at.

I'm using the really lovely die set called Smooth sailing, this will be carrying over in to the new catalogue, however if you fancy the stampset and the dies as a bundle, this will not be carrying over, therefore you won't get a 10% saving.

Materials needed:

Night of navy cardstock 106577

1pc 5" x 10" scored on longside at 5"
scrap pieces for all the die cut elements 


Whisper white thick cardstock 140490

1pc 4 7/8" x 4 7/8" for the front of card


Whisper white cardstock 106549

1pc 4 7/8" x 4 7/8" for the inside of the card (or in this case the base of card)
1pc 4 3/4" x 2 3/4" for the embossed waves piece
scrap piece for die cut sentiment


Come sail away dsp 149481 soon retiring

1pc 4 3/4" x 3" for front of card top
1pc rope pattern for using across the top of waves


Bakers twine 149483 soon retiring

3pc about 5" long for front top of card
1pc for tying a bow


Scrap pieces of cardstock for die cut elements in:

Mossy meadow 133683
Smoky slate 131291
Soft suede 119982
Old olive 106576

Happiness blooms enamel dots 148805 soon retiring


Night of navy classic stampin' pad 147110 for stamping the sentiment

High seas 3d embossing folder 149577 soon retiring


On the front panel of your card base score from top right corner down to left bottom corner as in the picture above, add glue to the half that is folded over, not right up to the edges though, and glue your thick whisper white card on to the triangle leaving a small border all the way round the 2 edges (as in pictures above).


Glue your 3 strands of bakers twine across the top of your dsp (as above) and then cut the ends off if too long, then tie a bow and glue it on top using a glue dot. Now you can glue this dsp on to the font of your card (as above).


Glue 2 die cut ropes to the top and bottom of your whisper white card piece, glue 2 more ropes together on top of each other, and then glue them on the side, over the top of the other 2 ropes, this gives a thicker rope piece to hold your card up when on display. Now glue this piece to your card base (as above).


Run your piece of cardstock for embossing through your die cutting machine, and now cut along the waves (as above) giving you 2 pieces, The top piece is going to be glued flat on to the front of your card, just going over the top of your dsp a little. Then you need to glue the rope dsp piece on to the waves to cover up the straightness of the card, you will need to adjust it a bit to fit nicely (as above). The bottom piece you're going to glue all of your seaweed elements, that you've die cut out of all the different colours, on to the back of it and then glue it to the front of your card giving it a border all the way round the straight edges (as above).


Cut your night of navy die cut element (as above) and then glue to the back of your whisper white die cut element, having already stamped your sentiment on. Glue to the front of your card using dimensionals, glue your steering wheel on to your card and then add some enamel dots. Card finished.

Hope you enjoyed the card today,  any questions please do contact me. Leave a comment on my blog if you can as it's always great to receive comments.
Stay safe everyone keep crafting.

Sending big crafty hugs
Natalie xxx


May host code CDV7BST4 for orders under £150 to receive a small gift the following month from me in the post.


Thursday, 14 May 2020

Timeless tropical


Hello again everyone,

Today I'm showing you a very quick project that I made using a technique called the
 "Inlaid embossing technique". It's a very simple technique, basically you stamp onto your card and then emboss using an embossing folder. You can also if you like glue dsp and die cuts to your card before you emboss it, there are lots of ways of doing it.

Materials needed for card I've made:

Old olive card 106576

1pc 4 1/8" x A4 length scored @ 5 7/8" for card base
1pc 4" x 5 3/4" for the front of card piece
small scrap piece for sentiment die cut
small scrap piece to stamp and die cut 3 x leaves


Whisper white card 106549

1pc 4" x 5 3/4" for inside of card
small scrap piece for sentiment die cut
small scrap piece to stamp and die cut 3 x flowers


Tropical oasis dsp 151252 retiring soon

2pc 4" x 1/2" for on front of card


Braided burlap trim 151254 retiring soon

1pc 4" long for front of card (on dsp)


Tropical oasis trinkets 151253 retiring soon
Gilded gems 152478
Old olive stampin' pad 147090
Timeless tropical bundle 153811 (not available after 2nd June as a bundle with 10% discount)
Coastal weave 3d embossing folder 151503 retiring soon
Mini glue dots 103683
Multi purpose liquid glue 154974
Label me fancy punch 151297


With the stamps you need to stamp all over the piece of 4" x 5 3/4" card with the same colour ink as your using for the card, I've used old olive for mine.
Then you can if you wish glue your 2 strips of dsp along the bottom of your card piece as shown in picture below. I haven't, but if I'm honest with you all it's because I forgot !!! Then you run it through your die cutting machine having it placed into your embossing folder. 


You need to stamp all of your flowers and die cut them as well as your leaves, then I embossed the flowers only, but you could if you wish run the leaves through as well, I think it will still look very nice.

Place glue dots all along the back of your piece of burlap and glue it to the dsp on the front of your card piece (as in first picture).  Now glue the whole piece to the front of your card base.
Glue the whisper white piece of card into the centre of your card.


Stamp your sentiment and punch it out, punch a white one out too and cut as in picture above and then glue the 2 pieces on to the back side of your sentiment, giving it a little white border, then glue on to the front of your card.
Now just glue all of your flowers into place, carefully folding them to give them dimension, but don't do it too hard as you will fold out your embossing pattern on them. Glue your leaves under the flowers and then place all of your trinkets on with mini glue dots, place your gilded gems where you'd like them, and your card is finished.


Hope you liked the card and you give it a go it is a fun technique to do, so go and have some fun.

Any questions about the card or the products that I've used (remember lots of them will be retiring so get them whilst you can) please don't hesitate to contact me. Stay safe, take care and keep crafting.

Big crafty hugs
Natalie xx


May host code for orders under £150 to receive a small gift the following month in the post from me is CDV7BST4

Tuesday, 12 May 2020

Using up retiring dsp


Hello again everyone,

Well it is again Tuesday it seems to come round very quickly, and I've got another card (it's actually 2 for the price of 1 as they say), which I've made using up dsp that is going to be retiring as of end of 2nd June, so if you really like it you need to get it whilst you still can.
The cards are very simple to assemble but quite pleasing I think to the eye, and you can use this idea with any of your papers that you have, I just think it's nice to use up retiring dsp.
We're going to be using 1pc - 3" x 6" and getting 2 cards out of it.
So let's get started and have some fun!


Materials used:


Purple posy cardstock 150887
Mint macaron cardstock 138344

1pc - 4 1/8" x A4 length scored on long side @ 5 7/8" and 6 3/8"
1pc - 3" x 4 3/4" Purple posy (front of purple card)
1pc - 4" x 5 1/8" Purple posy(inside of purple card)
1pc - 3" x 3"Mint macaron (front of green card) cut this piece into 5 strips  1/4" wide as in picture below (there will be some leftover)

Gorgeous grape cardstock 147011

1pc - 3 1/8" x 4 7/8" (front of purple card)
1pc - 2 3/8" x  3 1/8" (for die cut scallop oval - purple card)


Gorgeous grape stampin' pad 147099
Mint macaron stampin' pad 147106 


Whisper white cardstock 106549

1pc - 2" x 3"  (for die cut oval - purple card)
scrap piece for die cutting element for front of purple card
1pc - 4" x 5 5/8" (for front of green card)
1pc - 4" x 5 1/8"(inside of green card)
Scrap piece for all butterflies both cards

Best dressed dsp 1pc 3" x 6"

1pc - 3" x 3" cut corner to corner as in picture below (purple card)
1pc - 3" x 3" cut into 6 strips of  1/2" wide as in picture below (green card)

Best dressed dsp 151319
Here's a card stampset 149438
Positive thoughts stampset 151490
Nature's thoughts dies (currently not available but will be carrying over)
Versamark ink pad 102283
Tear and tape adhesive 138995
Wink of stella glitter brush (for butterfly) 141897
Whisper white flax ribbon 148764
Rhinestone basic jewels 144220
Stampin' dimensionals 104430


For the purple card you need to use the leaf stamp from ' Positve thoughts' and stamp with the versamark ink pad all over the front of the base card and the purple posy piece that you're going to mount onto the gorgeous grape, this just gives it a very subtle watermark and is very useful if you don't have an ink that matches your card.
Everything is glued flat onto the card except for the ovals which are glued together, then mounted onto dimensionals for a little depth. the butterfly after you've glued the 2 together (only the body part), you can then add some wink of stella to give a little sparkle. Tie your flax ribbon into a knot and using a couple of mini glue dots glue it to the die cut element.


For the green card you need to glue your strips of dsp to the front of your card moving each piece up by about 1/2" space them out equally, glue into place once your happy, then glue your mint macaron strips in between each piece of dsp moving them all up equally (I did this by eye). Everything is glued flat to the card even the butterflies (only the bodies) then you can give them all depth by lifting their wings, the middle butterfly is as purple card,  glueing 2 together and using your wink of stella to give a little sparkle.


The happy birthday sentiments come from the 'Here's a card' stampset. The sentiment inside the cards come from 'Positive thoughts' stampset.
As shown in the pictures below you need to place tear and tape onto the inside of your card, I like to do this and then when your ready to send your card you can take the backing of tape off, this will make the card less likely to split apart (and lay flat) when the recipient of the card displays it. This is where your second score line comes into use.


Well I hope you enjoyed the cards, as I said they are quite simple cards, both quite different from each other, even though we have used the same paper and stampsets, it's all about different layouts.
Thanks for stopping by again, please leave a comment I'd really appreciate it, and if you have any queries about the card or the products used, please don't hesitate to contact me.
Sending big crafty hugs
Stay safe
Natalie xx


May host code for orders under £150 placed with myself on line, enabling me to send you a small thankyou gift the following month in the post.
CDV7BST4


Tuesday, 5 May 2020

Fun fold card using Painted poppies

Good morning everyone I hope you're all well and keeping safe. Well we're into yet another week so I thought as it's tuesday I'd share with you all a lovely project I've been working on.
It's a fun fold card, not sure what it's called really, I've seen over the past few weeks a few people use this fold, so the idea isn't mine, but I thought I'd just change it up a little for extra added fun.


The above card is the one I'm showing you today, but underneath is another one I've made using the same papers but a different pattern.


Hope you enjoy seeing what I've made, if at the end you have any questions please don't hesitate to contact me, and I'll be only too happy to help you.


Materials:


Thick Whisper white card 140490

1pc - 5 3/4" x 8 1/4" scored on longside at 4 1/8" (this is your base card)


Whisper white card 106549

Scrap pieces for die cutting sentiment pieces


Poppy parade card 121694

1pc - 5 3/4" x 11 3/4" score on longside at 1 3/4", 4 3/4" and 7 3/4"
(this piece is your main fold for on front of base card).

2pc - 5 5/8" x 4" (these pieces are going to be die cut and put on the inside of your base card.

1pc - 5 3/4 x 1 5/8" ( this piece is embossed and goes on to the front fold section as in picture below).


Peaceful Poppies DSP 151324 (soon retiring)

Cut one piece of 12" x 12" at 5 5/8" making sure the pattern is going to be up the right way, then you need to cut this piece into sections for inside your folds. To make sure the pattern flows nicely and matches up, turn your paper so the side your not using is facing you and cut as follows:

1pc - 5 5/8" x 3 7/8"
2pc - 5 5/8" x 2 7/8"
1pc - 5 5/8" x 1 5/8"


Old olive card 106576

Scrap piece for die cutting sentiment , leaves and stem


Mossy meadow card 133683

Scrap piece for die cutting leaves and stem


Other materials used:

Painted Poppies Bundle 153827
Peaceful moments Bundle 153824
Poppy parade stampin' pad 147050
Whisper white Polka dot Tulle ribbon 146912 - approx 16"
Gilded gems 152478
Multipurpose liquid glue 110755
Tear and tape adhesive 138995


Instructions:

Fold your base card in half and burnish it to give it a nice crisp edge.
Die cut in to the 2 pieces of poppy pararde for the inside of your card, doing the die cutting in the same corners,
 but making sure you glue the pieces into your card so the die cuts are on opposite sides (as shown in first picture).
After scoring  and burnishing your poppy parade piece for the main fold on front of your card, glue the pieces of dsp into place, and after embossing your poppy parade piece for the front fold, wrap your ribbon around it, and tie ends into a knot, place tear and tape on to the back, covering the ribbon and then glue to the front fold as shown in first picture.
Now die cut your white card for sentiment and then stamp sentiment onto it with poppy parade ink. For the old olive piece, I like to draw round the outside of the die that I've used and then cut it out with scissors as this gives it a perfect border showing from underneath your sentiment piece, I've added a picture to show you.
The sentiment can then be glued into place on the inside of your card.
Now you need to die cut the shapes out that you need including the leaves and stems and assemble them all. The sentiment piece that you cut out of whisper white you need to stamp on before you assemble it on top of the poppy parade piece.
Now it's just a case of glueing all of your pieces into place within your card. Finally you can add a gem on top of the ribbon knot on the front of your card.
Card done!

Hope you'll all give it a go as it is a fun card to do and you can make it out of whatever papers you like, making it a card for any occassion.
Thanks so much for stopping by and having a look at my blog, please do leave a comment as it's most appreciated.

Take care for now and stay safe.

Big crafty hugs
Natalie xx


May host code for orders under £150 ( to receive a small thankyou gift in the post the following month from me)

CDV7BST4

And if you'd like to join my team please contact me to have a chat about all the amazing savings you could be making on all of your purchases x